
|
|
|
|
|
|
|
|
|
Building A Stave Drum |
Drum by firefly |
Drum by Koko |
|
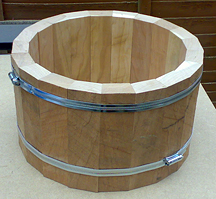
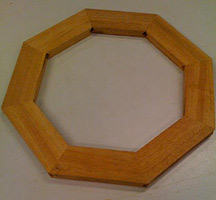
Basic Description Why Staves? Figuring the Stave Angles Clamping Methods Lathing Jschulze's Pictoral for Cutting Staves On A Table Saw Round Edge Method Irregular Angles Suppliers (For suppliers click here and scroll down to Shells/Stave Shells) Basic Description This is the method most commonly used by custom builders. Built similarly to a barrel, the wood pieces are vertical with bevelled edges arranged to form a circle. The staves are glued and clamped. When the glue is dry, the outside and inside are lathed to achieve a smooth, round shell. Pluses: Many exotic wood varieties are available. Grain is vertical which some believe produces a better tone. Uses less glue than ply which some believe enhances the tone. This is an issue of some debate, but there is no denying that it has its own distinctive sound. Easy to make into thick shells. Not likely to go out of round because the wood is not being stressed into shape. Ideal for making mixed wood shells. Minuses: Wood is more costly than ply. Requires more special tools than the ply method. In particular, some sort of lathe or router is needed to round the shell. Not a good method for making a thinner shell. Special tools required: Router or table saw to bevel the staves (router also needed for bearing edges). Lathe needed for rounding the edges of the staves. (Or special jig can be made with a router - see Koko's Stave Drum Without a Lathe. If you use a router, you'll need a bit with the correct angle. If you use a table saw a gadget like this will come in very handy: 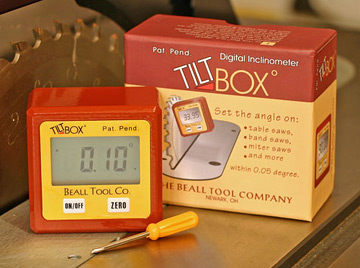
DISCUSSIONS FROM THE DRUMSHED FORUM Why Staves? tcraw1010: Seriously, what is the big fascination with stave shells over traditional ply shells? I mean, both use glue to contruct the shell - so I can't see any benefit there. Basically, you're using multiple "blocks" of wood to contruct the stave shell, so it's not like you're truly ending up with one solid shell. JLee: Well, there are a couple of aspects of this that do seem to keep coming up. 1) Stave shells use less glue, and are therefore more reasonant, as glue does not transmit vibration as wood does. 2) Thin plys do not transmit sound as tone wood (i.e. one single piece) would. If you look at the front of a guitar, you are not likely to see plywood used on a name brand, etc. Now, having said this, I cannot say with any certainty whether or not either or both of these are true in PRACTICE. It has been said before that some of the most listened to recordings in the world had featured drums with keller or fibes ply shells. I guess the definitive test would be to take a stave shell and a ply shell of equal dimensions, equal hardware, equal edges and equal finishes and see what differences in sound characteristics there are. mrogo: From my perspective, it would be easier for me as a novice with limited tools to make a stave. I can cut staves with a table saw, and go from there. JLee: Actually, it would not be all that expensive to make the tooling for ply shells, if you were so inclined. See, the "go from there" part has to include how you will round both the inside and outside of the shell. Kanbasher: ...let me ask you a question...have you tried playing a stave shelled drum at all? ...try a couple out. I think you will readily hear the difference. I'm not being a smart ass here. Let your ears be the judge. munich: I only have limited experience with stave shells. Out of 10 snares I momentarily own, one is a cherry stave (by Troyan, german company). There definitely are differences in sound. Probably the easiest to describe is that the drum won't choke when you tune it high. It's pretty amazing when you compare that drum to another one right next to it. But I'm also lusting for a steambent one. lexlord: I have made probably 50-60 stave shells to date, advantages are as said before, you can use exotic wood thus a nice looking shell, easier to vary the thickness thus influence the fundamental pitch, relatively easy to build a shell with the right tools, less glue though I am not convinced that is a big deal, and they do have their own quality.....but they are just another choice, and as with any drum it's only as good as the player... koko: To me stavebuilding is just a different way to go. I made ply shells, stave shells and a jig to do that. My wish for the ability to make a stave shell was just because it's a different way, but now that I am able to build stave shells I absolutly love it because of the posibilties you have on woodchoice & "design". Within the same principle you can build a segmented as well, which I never did so far. The sound differences are there, but I cant really say I like one better. The staves seem a bit louder and a higher pitch, but I think tuninng and head selection are key factor. DrBeat1269: ...just play one and see for yourself. my main snare is one and I have a tough time going back to a regular one beause it feels so much less responsive to me. Figuring the Stave Angles To begin cutting your staves you'll need to know two things: the bevel angle of the staves and the outer stave width. You can determine this with very basic math, or there is a chart with measurements of the most common shell configurations, or you can use a stave calculator. All are shown below. Whichever method you use, be sure to level the outside stave face (with a jointer) before cutting the angle. |
|
|
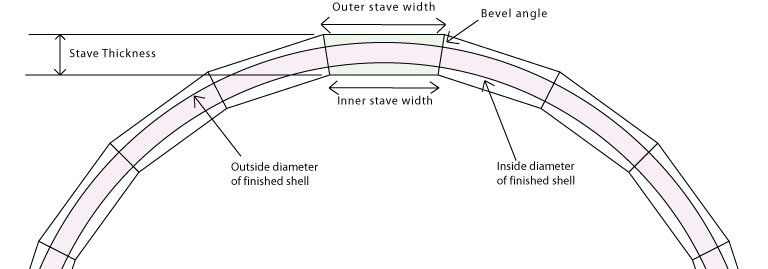
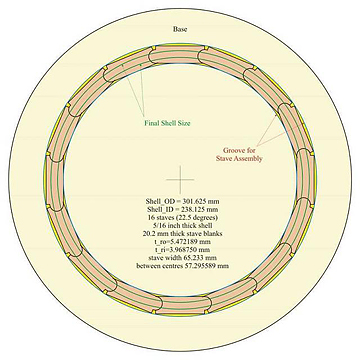
The Math Method A simple formula for figuring the bevel angle is 360 divided by number of staves divided by 2. 360 is the number of degrees in a circle. You divide that by however many staves you want your drum to have. Then divide by two because it takes the face of two staves side by side to make the angle. The outer stave width determines how much wood you will lathe off to get to your desired outer shell dimension. So it's a less critical measurement - as long as you don't make it too thin. It's better to have too much than not enough. DrumShed member Shiloh has a good formula for this: Outside shell diameter (including how much you want to lathe off) multiplied by Pi (3.1415), divided by #of staves - then round up to closest 1/16". The rounding up is important. Without it the formula gives the outer stave width in its final, curved shape. By rounding up, you're allowing for the peaks of the staves. Again - it's better to have too much than not enough - you can always lathe the extra wood off; and especially if you're a beginner, this will allow room for error. The inner stave width will be determined by the thickness of the board you're working with. You just need to make sure you have a thick enough board to shave down to your desired shell size. The Chart Method If you're lucky, the exact shell/stave combination may be on this list and all the work is done for you. Of course, it never hurts to double check by the math method. Measure twice, cut once, as they say. |
|
|
The Stave Calculator Method DrumShed member Casper came up with a very advanced calculator. You can download it here: Stave Drum Calculator (Updated)2.xls.zip His latest revisions include: *Inputing the board width that you'll be using to cut the staves from will yield: -The number of staves possible (both unrounded and rounded down to nearest whole number) per your board width {NOTE: This figure has a built in accommodation for a 3/32" kerf blade cut per stave. This should allow for the lost material due to the cutting process} -The total linear inches required based upon how many complete staves will be yielded per your board width -The total amount of board feet required to yield all required complete staves *Also, inserting the price per board foot in conjunction with the board width will result in giving you a total wood cost for that shell (pre-tax, of course). |
|
ADDITIONAL DISCUSSION FROM DRUMSHED FORUM dwayne: Hello fellow drum builders I'm looking to build a stave drum shell what angle of degree are they cut? fienddrummer: ...here's an online calculator to determine stave width and angles: http://www.logiztix.cc/stave/stavecalc.cfm Crazy8s: Or maybe just do some math. 360 degrees in a circle. Divide by number of staves. Divide that by 2. You also need to determine the thickness you plan to achieve. fienddrummer: I use 180 divided by number of staves....makes it one step insted of two. ...that gives you the angle....but not the stave width. PDGood: It helps me to have a visual. Plus I didn't really know how to calculate the stave widths, so I just drew it in Illustrator and then measured the necessary areas. This is for a 14" drum (13-7/8" OD) with 20 staves and 3/8" thick shell. 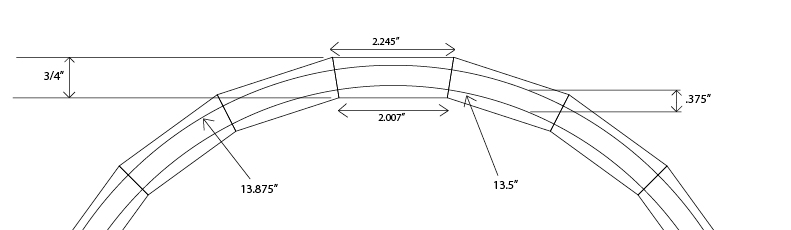
|
|
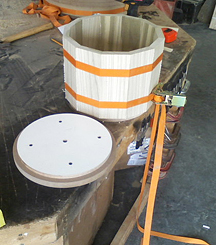
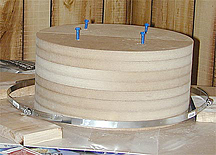
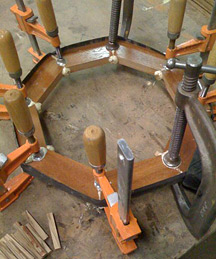
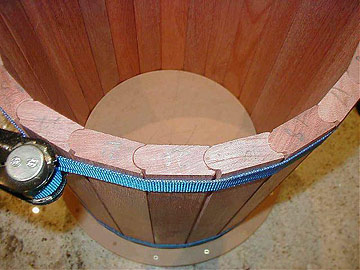
Clamping Methods Dawoodude: Here is what I use, and it doubles for turning the outside of the shell as well. |
|
PDGood: These clamps are availble at Home Depot/Lowe's and can be chained together for larger sizes. The center circle is scrap from making a female mold for a ply drum. It helps support the staves in the gluing up process. |
|
|
koko: My dear friends, here is a little trick of the trade. (Don't know who posted this first, it wasn't me. I borowed this idea too). For the glue up of the stave you align all the staves outside facing up. Tape together with painterstape and leave a small piece extra outside the line up. Press the tape nicely to make sure it bonds. Turn the whole line up the other way around, inside facing up. Now glue the staves, using a brush for spreading. Get one end of the line up, get the other end and bring the two ends together. With the painterstape holding them together there is only one way, a circle, ergo a shell. Tape the ends together with the small extra pieces of tape and there you go! All the staves stay were they should and allow you to put two fingers in the nose and tie the whole thing any way you like. steveprimatic: I do it a little differently: I set the staves up in their approximate position and then clamp them in the middle (hose clamp) I add a hose clamp at the top, and one at the bottom. I then remove the middle clamp and wrap tape around the drum. I then remove the remaining hose clamps, cut the tape at one joint and unroll the shell. I add glue (both sides of each joint) and then roll the shell back up. I repeat the hose clamp procedure. Once all three clamps are in place, I once again remove the middle clamp so that I can remove the tape. The middle clamp goes back on and I'm done. I do it this way because it allows me to fine tune the staves and get them to return to their clamped positions with relative ease. michael_watkins: Once glue is applied to (yes to your question to both sides) you will have no problem with them staying in place during setup and clamping. Only during dry fit it is a ***** to keep them all together. Here's my opinions- Definitely use a form for the first few you make or they will be out of round. I don't have to use them anymore now that the stave milling process is solid, but my first ones came out egg-shaped for sure. Tightbond is fine to use - no need to end up with half a bottle on the glue up table after clamping, but don't be stingy with it either. I clamp with 2 to 3 nylon ratcheting band clamps. Wax paper is a nice touch, but the glue squeeze out doesn't solidly adhere the clamp to the shell. Once clamped, measure the diameter in several places to ensure it is round. Wipe or remove the excess glue before it hardens - it makes things easier downstream. I also leave it clamped for 24 hours, no matter what the time on the glue bottle says. If you have gaps in the staves, don't even bother with glue up, it will be futile. PDGood: Michael's info is very good. Almost everyone I've talked to agrees with those last two points about clamp time and gaps in the staves. One thing I'd add is to be sure to make extra staves. When you do a test fit (without glue) check for gaps. Replace any questionable pieces with one of the extras. This is also good if you suddenly notice a flaw in the wood you had missed before. Always nice to have a back up. You can also rearrange the order (swap the position of two pieces) and sometimes get a better fit. I tried sanding lightly to improve the fit but that always made it worse. The angle is just impossible to duplicate by hand. chewbaccula: Yesterday, after I applied the glue on each stave, I used bungie cables (around 3 feet long) to clamp the drum together. I started out with medium tension cables (blue), then after I had 3 of those on, I put on 3 red bungies, which were the shortest, and applied the most pressure. I then used some clamps to correct areas in which the metal clips at the end of each bungie side connected, since I made the mistake of lining up each bungie in the same place, so the clips pushed against 3-4 staves more, but with the clamping, I think I managed to correct this mistake. koko: I thought of this as well, but dismissed it because I assumed that the material could not hold the force needed for stave clamping. Maybe I should go out and see what more is available. The ones I have can't hold it for sure. Clamp tightening: sadolcourt: One other thing - it seems that they (pdgood style clamps) can't be torqued too hard, or the worm gear will strip. How many more turns of the screw (so to speak) do you go after the glue squeezes out? I imagine not much past that. pdgood: Sometimes ignorance is bliss. I just eye-balled the sizes of the clamps in the store and they fit perfectly. I tightened down what seemed like a reasonable amount and nothing stripped. Very un-scientific. sadolcourt: There was once a raging forest fire on a woodworking forum about exactly how much clamping pressure is needed for glue up. I think the take-away is that if your stuff isn't falling apart, then your clamping pressure is right. Titebond recommends 100-250 psi, the lower number for softwoods, the higher number for hard woods. I've found that the easiest way to scientifically verify this is to open a beverage, sit back, and watch the glue dry. Periodically update your beverage to maintain drying time. koko: My brother reads Woodworker (the mag) too and he told me you can't really overtighten a joint, so that is the goal. Just out of curiosity, how would one measure PSI figures on a joint? pdgood: I'm puzzled by all the tightening questions. If your joints are cut accurately (and I know the quality of work that most of you do is very high) then why would you need a lot of pressure? The joints are flat and flush. Unless you're trying to embed the glue into the wood with pressure, seems to me that all you really need to do is hold things together firmly until the glue dries. Am I oversimplifying? sadolcourt: You're right on, of course. If the joints are well made, the clamp just brings it all together, and firm pressure is good enough. Definitely fits the category of common sense. The PSI figures probably apply to factories with an engineering staff armed with gauges. Some wood mags have written that parallel clamps like Bessey's can muster 400 psi of force. That's good enough for me, no need to double check their work. |
|
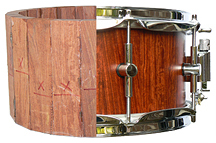
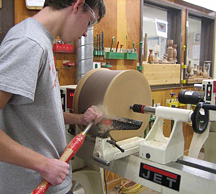
Lathing
Photo: DrumShed member kerry8319 |
|
|
JamesOrr: ...how do you mount the shells (for an entire kit) to the lathe? When they get as massive as some of the larger toms and bass drum, how do you mount the drum to the lathe? PuFf: My guess... and this is a GUESS... is that you make the shell a little bit longer than needed and screw it directly into a large faceplate or a nice block of wood lathed round (so it's solid and not a cylinder) that is attatched to the faceplate. You would then cut the shell to length after turning, removing the end grain that had screws fixed into it. |
|
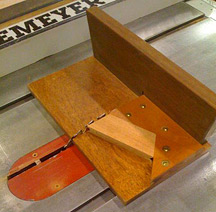
Jschulze's Method
This is a pictoral shows how to cut segmented pieces on a table saw, but it's a clever idea that can be adapted to staves as well. 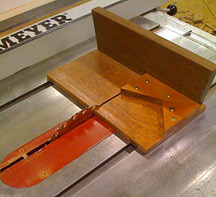
|
|
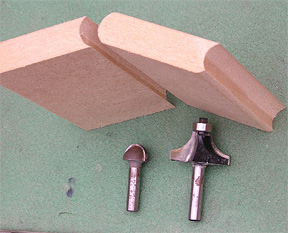
Round Edge Method
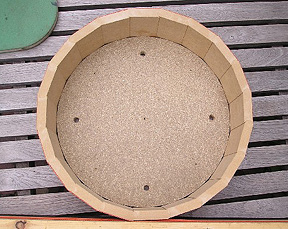
Editor's note: This is a very creative way that Koko came up with to make a stave drum. It's not the standard method, that's for sure, but it is very interesting and does have some merits. Beginning builders will probably find the traditional beveled edge method easier if only because there are more people with experience to help guide you through it. Here's the thread. koko: What do you guys think of round edges instead of bevelled edges? This is purely experimental and only tried as a concept with mdf, but it seems to have some benefits. With a round edge you can use as many staves as you like, without calculating and adjusting your table saw to that angle 100%. You need to calculate the total length of the staves and calculate the length of the desired shellsize. You can use staves from different sizes, which gives design opportunities. The round edge forces the staves to stay in place and are less prone to fall over while glueing. Extra, but not neccesary as found out in another thread, is extra strongness on the edge. Until now I found one downside, the shell in total needs to be forced to full roundness, while staves cut to an angle will do that by nature. To solve this, I made a circle, exactly, but still free to move, fitting inside the staves. After the shell is round, take the circle out and fully tighten the strap. You need to do that as an extra, but with staves cut to an angle you need to make a test run to check the accuracy of the table saw. That is an extra not needed any longer. |
|
|
|
|
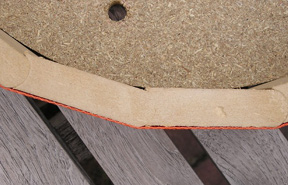
In the pictures, a complete shell, with circle for roundness, a close up from the only seam I sanded a bit to see if it is tight.
(The ones next to this one are still rough and not exactly same height, and therefor look like they are not tight, but they are).
last one shows two staves with the routerbits I used. I think there are better choices on bits, but I have these and this looks
promising I think.
My thoughts on this one are that a round edge doesn't need the 100% accuracy that you need with anglecutting. Round is round and will fitt by nature, always. Iff the diameter is bigger as the thickness of the wood you are able to set the staves in any angle (to an limit offcourse, but ya know) you like. Iff you have a routerbit with wich you can cut a 180 degree rounding in one go you will be king!! randyb: That's a cool idea Koko. Basically, with glue as long as you are getting a good contact between your two surfaces you are going to get a good bond that is stronger than the wood around it. Looking at this, I would figure you have a good chance of getting that to glue up well and hold. lunarsnare: I have never built a stave shell, however just looking at this, I like this a lot better then gluing flat edges. More glue surface left to go thinner on the final machining of the shell wall? Very cool�. Can't wait till you have it glued and shaped� Well this is just a thought� What about running your piece of wood through a shaper before it is all cut to length. One side the concave and the other side the matching convex profile that may be very accurate and less cumbersome in the long run. Woodrow: This is quite clever. I hope it works out. It could be an easier way to produce stave shells for all of us. CSpencer: Very clever. I only see one possible problem. Often when rounding a shell on a lathe (or a router jig) you end up in a situation where you're removing slightly more material from one side of the shell versus the other. This can be caused by a slightly out of round shell or by having the shell mounted slightly off center. When this happens the width of the staves ends up varying slightly. To clarify, I'm not talking about the width (thickness) of the shell wall varying. That would be a huge problem. I'm talking about the width of individual staves, as in from left to right. With beveled seams the variation is extremely small, less than 1/16", so it certainly isn't noticeable and it has no effect on the tone or strength of the drum. With your rounded seems the angle of the seam at the outside of the shell is steeper, therefore the variation in the width of the staves could be much more. Plus, with the rounded seams it will be difficult to get the raw shell round to begin with, which will worsen the variation I'm describing. Of course, it's a problem you can avoid with very careful gluing and mounting and judging by your other posts you do everything very carefully. Even if there is some variation it may still not be enough to notice, although you may not know until you mount the hardware. koko: Hi cspencer. I have to think over your reply to be sure I really get your point. On 1st hand I think this: You are right that by rounding the shell the staves start to differ in size if not completely round. I believe that is the case anyway, as you also state and you accept a 1/16 difference. If I follow you right, your concern is sound, strength and looks. If the rounded staves are all the same width in the beginning I think the variation in width will not be any bigger or smaller as with normally beveled edges. For now I don't see the effect from rounded seems making this worse. The raw shell has to be round to begin with, wich I achieve by inserting a round template while setting up the staves. At the test run I noticed that the gaps can differ, but by gently slapping the corners it was quite easy to get them even and thereby rounding the raw shell. I don't understand the steeper thing, but that is a lanquageproblem. I ll ask my brother iff he gets this. He is the smarter and more precise from us 2. CSpencer: "Steeper" was perhaps a poor choice of words. I'll try to explain myself: Picture a stave with beveled sides. The widest part of the stave is at the outside of the shell and the narrowest part is at the inside of the shell. The difference, which is caused by the beveled edges, is around 1/4". Now, consider a stave with rounded edges. The widest part will be at the front and back faces. The narrowest part will be through the center. The difference between the widest and narrowest part will be much greater than a beveled stave. Judging by your pictures, I'd estimate the difference to be about 1/2". It is partly because of this larger difference that the staves could vary in width more after being machined. By "steeper" I was referring to the angle of the bevel. A typical 20 stave shell has a bevel angle of 9 degrees. In other words the seam meets the front of the stave at an 81 degree angle. This is pretty close to perpendicular (90 degrees). With your design the rounded seam meets the front of the stave at a much smaller angle, around 45 degrees judging by your pictures. I think that this smaller angle could cause the width of your staves to vary more. With a smaller angle the amount of material removed from the outside of the shell will have a larger impact on the location of the seams relative to each other. It could be that in practice it still won't be enough to be noticeable. I suppose you won't know until you try it. koko: I am very, very, very impressed by your thinking. As you said: "You wont know until you tried it". I tried it. Not all the way but enough to see you are making a strong point here!!! First: This second explanation was helping a lot, but somewhere you mentioned 1/2" difference. By this I thought: or I still dont understand what you are saying or you "misjudged" these close up pics. Only way to find out was to build another shell with common edges. Well, I did. It gave me the opportunity to check accuracy of the drawing a friend made (and made available for you all at the builders manual section "Stave layout PDF" by Rjhanes) and to fully understand what you where saying. I made another shell pretty much the same size as the one with rounded edges. By doing so, I could check what you are saying. The inserted circles are the exact same size and there is hardly any play. While setting up, I noticed that the "hassle" is about the same, but at different moments. Setting up the normal staves was a bit harder than the rounded ones, but rounding the shell was a bit harder than with the normal staves. Equal hassle to me. Now the concern you thought of. It seems to be there, but by no means in the distance you thought. As the pictures show, the rounded ones can give more gap, but only 1mm difference opposed to each other. On the outside you can really see this happening. I couldn't get the staves to match exactly and the differences did vary. This variation is caused by the rounded staves needs to be put in correct angle and the normal staves don't. I think that you may need thicker raw staves with the rounded edges. Conclusion so far: Normal staves are less hassle to get placed in a circle by its nature, but more hassle to set up and more hassle to cut in the correct angle, although with a template that is not so hard to overcome. The rounded staves are more hassle to get into a full circle, but less hassle to get up and have a longer seam wich will always be a perfect match by its nature. Seems that the real issue here is the variation in width as you mentioned. (And I am realy impressed by that strong thinking). As shell building will always require 100% accuracy on the job, I think in the end you may end up with about the same variation, but rounded edges are a greater risk for this matter, but only if you are able to create 100% accurate normal edges. (If not 100% your normal shell will also be out of round to a certain degree and with that the width will vary). As far as sound is concerned I call the experianced on that matter to reply. For now the only thing I do in my shed will be cleaning and then go for a holiday. After that I will build two shells with two colors off wood, to see the real difference in width. I thank you Cspencer for your strong thoughts. To me this is what Drumshed is about: sharing thoughts and ideas till we have found the best!! Sam Bredeson: My dad tried to get me to make a stave shell like this, but I couldn't get over how the shell doesn't round itself. I could never get putting a circle inside to make it round enough. Nice job on yours though! If done correctly, I think this method would work great. koko: Hi Sam. The shell will never round itself and that is a downside of this method. I have set up a dry run only and made the round template to a perfect fit by gently making it smaller and smaller in diameter till it slid in. The router is my best friend nowadays, because you can take off less then 0,5mm at a time with it. Your dad seems to be no girly, but a clever man who should post here!! crankz1: Another very cool idea koko! There's nothing wrong with thinking outside the box and trying new things. I can see this as working quite well with your router jig. I'd incorporate the inner circles (you used in glue-up) into the hub assembly that runs on the roller bearings. Seems as though this would be a good way of maintaining run-out accuracy. Provided, of course, that the hub assembly is true and dimensionally accurate. Odd width staves may pose a problem though. koko: Now that this thread is in focus again I would like to add some extra experiences I got a couple of weeks ago. The beams have to be the same thickness and that has to be pretty close too. When you do the round going outside (convex?) with the bit like I had to use you need to go two times. That takes real good adjustment of the height of the bit. It needs to be in the middle. If your beams are not same height that means you have to adjust height every time. With the MDF this problem didn't show of course, but with the maple floorboards from my mother's house it came up. The routerbit itself needs to be sharp and in perfect shape. Especially the round bit to do the inward going (concave?) round... is prone to wear out in use. Especially with hard wood like Purperhart. TheIronCobra: Just started doing these bevels for the first time, and then got called into work. Anyway, Koko, this is amazing and I'm putting you up for the Nobel prize this year. Hmmmm, interesting developments...... Decided on the most important factor in this method GOOD QUALITY ROUTER BITS. Needless to say, I've destroyed my crap quality bowl cutting bit (luckily on MDF) and have gone to buy some good ones. koko: I use old routerbits for the first cuts and at last change for the best and do the final run with these. Save a bit of money, but more importantly, save the shape as long as possible. TheIronCobra: Tried milling up some mdf pieces in this method AND IT WORKED - to a certain extent..... Few questions if you will.. 1 - Where did you get those clamps from? they look cool and useful 2 - When using the bowl cutting shaped bit in the router table, did you use the same radius bit in comparison to the roundover, or did you do multiple cuts with the bowl bit? My roundovers were alright, but I had to do multiple cuts with the bowl bit and found it hard to be accurate and make it fit. I think ill just go and buy a same radius roundover to my bowl cutter and should IN THEORY fit perfectly in one another. koko: I did use two matching bits. (Diameters the same. The one which leaves you with a hollow shape (concave,convex, always confused) in your piece of wood is prone to wear. Especially the top because that piece is taking the most cuts. From what I see at your pictures it looks that yours is worn out. That is why I wrote I use old bits for the first cuttings and only switch to the newest bits for the last cut. (Less wear or risk for a worn out bit). Make sure when you do one that leaves you with a round piece of wood, that you set your router height very accurately, precise in the middle. TheIronCobra: What I meant was, was the total diameter of the bit (convex) big enough to round the inside of the wood or did you have to adjust your router fence and cut multiple times to get the roundness all the way to the edge? Was thinking of buying a big ass bit to compensate for this, but if you have a better method (which you probably do ) would you share? koko: The routerbit last shown cuts the round in one last go. (Only adjustements that are made are for the bit rising out the routertable. If you would make the whole depth in one go that would be very agressive on the wood and router). NO adjustements at the fence, especially NOT at the fence. jbfrench75: Don't you think that round bevels can move with time, even with glue ? I would be afraid about that. Don't you think it could be better to use finger joint bit? koko: Ohhh, freak jeahhh, a fingerjoint would be the thing to use. I met Gert from Lignumdrums (Belgium) and he showed me two staves being cut with a fingerjoint. Men, even without glue it was very strong already. The problem is you need to have a specialy made fingerjointbit for that. The bit has to be cut at the correct angle 10000% right. And those bits only fit in a different kind of router. EXPENSIVE. About your concern of the joints moving, no I dont believe that can happen. With this method you are able to achieve such a tight joint that the only thing you have to do is tighten it securely while the glue is curing and of course there should be glue everywhere. That specifically doesn't mean you have to use as much glue as you can, but as much as needed for covering the joint. If there is too much glue you risk not being able to force it out while clamping. Take in account that you're always at the end of open glue time before you are able to set up the shell. Wato: I thought this joint idea out independently after seeing Flute & Bead Bit Set used for canoes, but used 3/4 inch bullnose and round nose router bits to make the interlocking staves. The timber is Jarrah (I am located in Australia). 65 mm wide 21 mm thick decking was used for all staves except the bass drum staves which were cut from wider 25 mm thick pieces. The round edges allow the staves to rotate for self alignment and the joints will be stronger than simple butt joints. Also, the joints will be inclined to the final surface making any filling a lot easier and better. For assembly, bases were made from 16mm MDF screwed to 16 mm plywood. A circular groove, with accurately machined inner and outer diameters, was routed then into the MDF (only) for inserting the staves. This and other info was calculated using a spreadsheet. Looks complex, but is simple in practice since the bullnose routing is done to get the "stave width" dimension measured with calipers. Dry assembly pic shows top and bottom strap clamps which pulled the staves together using a circular lid corresponding to ID (removed for pic). Glue up was piece at a time using sieved jarrah saw dust added to West System 105 epoxy to form a paste. The "Glad Wrap" around outside helped minimize leakage out of vertical joints. Epoxy was scraped back into internal joints as it thickened while hardening. The bass drum is 20 inch dia. Pretty scary if they were to break apart while spinning on a lathe. However the staves are glued solid into the 32mm thick bases, which could be used for mounting onto a lathe face plate and the lids could be fixed to the other end to help keep everything together, at least while doing the outside. They have been sitting around for more than a year now. Had a guy setup with large metal lathe but he pulled out after the build. Have thought about Koko's jig too. But it would be so much easier to use a metal lathe. |
|
|
|
koko: I especialy like the outside rings to help you set up the shell. I assume that makes it all alot easier. Good one!! Wato: I guess others know this, but I was amazed at how much timber was required to make these stave shells, about AUD$350. Actually, after reading your post, it would have been even simpler to make the shells using the circular groove slots in the MDF ends, because only the width of the very last stave has to be cut accurately. But even this is not required, since oversized will pull up with clamping, given minor gaps in joints etc. I have a large 3HP router which would be good for the big shells but I think it will be too big to fit inside the smaller shells. So it looks like not only two routers will be required to handle the range of sizes but from your advice, may be also two Koko jigs, with one having big strong bearings to handle the heavy load of bigger shells. This is a lot of work compared to walking up to large metal lathe, but may be it is the way to go. koko: A second router can be expensive, that is thrue, but you can do the smaller toms on the stronger bearings, so only one jig. It is all up to you offcourse. thedrumbasher: I know this post is old, but did you continue with this method or go back to the standard way? Looks like a cool idea just wandering how the experiment worked out in full. koko: I stopped building like this. Simply because cutting a straight edge is easier in a way. The method itself is certainly not burried, I still wonder sometimes how to and what to do with it and thinking about how to use it for conga drums now. It's a very handy method, but needs proper preparations beforehand. Irregular Angles hippybaker: Do you guys ever do your staves one sided.. like one side at 90 degrees the other 18 degrees? (As opposed to 9, and 9). Maybe someone has tried this, and has a list of pros/cons? sadolcourt: ....your miters would have different widths. At 90 degrees, a 3/4" thick stave will have a miter (ok, really an edge) of 3/4". To find the width of a miter based on an angle, you have to recall your favorite geometric formula. Too much work for this guy who is well beyond high school. Suffice to say, your mitered stave's hypotenuse is longer than the 90 degree edge. Also - purely for looks - your miters would not be pointed at the drum's center. Completely trivial. jeroen: I see one big advantage - 18 degree router bits are available. koko: You wont find succes with this. The staves will slide away from each other and be easily pushed out of roundness while gluing up. Not sure how to say this in English: The bevel/wood at the 18degr will be longer compaired to the 90 degree bevel. When staves are cut 9 degrees on both sides they will be pushed inwards by the same force and automatically push themselves in full circle. Getting a 11.25 routerbit should be easy, so go for a 16 stave shell. Setting a 100% spot on 90 degree angle is as difficult as setting a 9, 11.25, 18degr angle. They all take 100% accurate setting. The router bit doesn't neccesarely guarantee 100% accurate bevel, for all kinds of reasons. The bit will be okay, but is the router placed 100% accurate? (No dust particels, or whatever). hipppybaker: I shoulda waited to read these answers before I made some staves.... Good thing I used ****ty pine :P Everything was as Koko described. The edges were different lengths, and they were sliding all over the place, and did not want to fall into round. sadolcourt: I found out some rotten news. The 11.25 degree router bit from Woodcraft is discontinued, and will be harder to get as supplies run out. It's no longer listed in their catalog, you'll have to go to a Woodcraft store and have them call around for one. I'll poke around for a new source. It was very convenient, that 11.25 degree bit! Jeroen, take an extra look at the cutting length of the 18 degree dovetail bit. They're short like Napoleon, the cutting length is only 3/8", about 10 mm. So it won't cut a full 3/4" (18-20 mm) thick stock. centurydrums: I ran into the same problem at my local woodcraft store. You can find them at rockler. https://www.rockler.com/CategoryView.cfm?Cat_ID=288 sadolcourt: You're right! I also found CMT and Infinity brands have 11.25 degree. Maybe the outlook is not so bleak. Stave Drum Suppliers (for those who don't want to build their own). For information on where to purchase stave shells, see the Supplier's page on this site. |