|
|
|
|
|
|
|
|
|
|
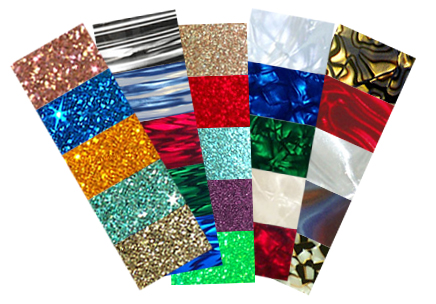
WRAPS |
|
Summary As an alternative to painting, staining, or veneering, you can also wrap your shell in materials specifically made for this purpose. This thread includes information on removing old, damaged wrap as well as installing new. There are two popular methods for attaching wrap: contact cement or Hi-Bond tape. Tape is easier and also makes it possible to remove the wrap later, but it may not lay down as evenly as contact cement or stay flush with the shell when subjected to temperature changes. Contact cement is a permanent solution. It sticks instantly so application requires some care. Also, adequate ventilation is required due to the fumes. Some companies, such as Drum Foundry, offer wrap that is pre-mounted with adhesive sheets. There wasn't a lot of discussion about those, so there isn't much feedback on how well it works. There are varying opinions on some of the methods to applying wrap such as whether you need to cut back the wrap from the bearing edges and also on how to handle the seams. One word of caution regarding removing old wrap - you often hear people refer to using heat guns. These are generally intended for paint stripping and put out an enormous amount of heat. They are very effective and also very dangerous. They will melt plastics easily, can cause small pieces of wood to catch fire, and needless-to-say can cause great harm if aimed at the human body. They are pretty easy to control - just be very careful. Old Wrap Removal Joe Mig: To strip wrap, I used an iron and put a rag between the iron and the wrap. Apply a little heat, and see if that loosens the bond. If not, apply heat for a little longer. A little patience and you'll know how long to keep the iron in one spot. Girlfriend: I was advised to use a heat gun, which I did. That wrap gets HOT! Burnt my thumb r-e-a-l badly. Use pliers or something similar. And the wrap can catch fire. Joe Mig: The rag will get hot, but it helps prevent the iron from melting the wrap. But you can still burn your hand on the wrap this way. You're right-pliers are very good! To remove glue residue use acetone. Jaye: I just got hold of some '70's Rogers shells with a p-lam wrap. I am looking at the seam of it, looking at the thickness of it...and wondering if one uses the same technique removing p-lam as one uses removing the more typical plastics (i.e. heatgun and scraper). Is this thinner type of p-lam agreeable to a heat gun? Or am I gonna end up trashing these shells if I try using the standard heat technique? drummaman1: I used a hair dryer and a putty knife on my bass drum. I made a couple of splinters cause I was impatient, but with a heat gun, it should be faster (be careful with the heat gun...duh) It took about 2 and a half hours. Then I used Goof-off to get the glue off the shell. That took much longer. I could've sanded it off, but I didn't want to lose too much of the top ply. that took about 4 to 5 hours. Some wood putty to fill in any nicks or splinters, and the shell is ready for a wrap! OPFOR: A heat gun and putty knife will easily remove the finish. You'll spend a lot more time removing the glue underneath. I ended up using lacquer thinner to get the shells down to a workable surface. Count Of Monte Cristo: I unwrapped a kit to re-wrap it and it has glue residue all over it. When I sand it down it just gums up. If I re-wrap it, are you going to see the areas of glue build up through the wrap? The glue is not very thick just messy. Gn@rK!ll: GOO GONE! I'm not too sure if it will work with glue, but I know it works for everything else. Also I have heard people using mineral spirits to dissolve the glue and scrape it off with a putty knife. rhjanes: 3M also makes an adhesive goo remover. NAPA, paint stores.... Not sure which would work best on that. Forget sanding. drumsinmotion: I have stripped a kit of it's original wrap to replace with new wrap, but am having difficulty getting the new wrap to stick to the drum. There was old glue residue on the shells, and I just applied the contact cement over that, as well as the backside of the wrap after lightly sanding the backside of that with 220 grit. After 30 minutes of set-up time, the wrap did not stick at all to the shell. Did the original glue residue on the shell cause the new contact cement not to work properly? I'm assuming this is the cause since I've followed the directions on the cement. J.Richard: The old glue should have been removed for the new glue to stick. You'll have a bit of a tough time removing both at this point. Scrapers, rough steel wool, acetone or other solvents and lot's of fresh air and time. Once you get it off or most all of it, you can use the wrap tape on the overlap or butt ends. J.Lee: Make sure you take some medium grit sandpaper and LIGHTLY scuff the underside of the wrap. Be careful here, as if you are not careful, you can sand through to enough depth that, while unlikely to penetrate the other side, could be visible. Just a very light scuffing on the entire surface, making sure you don't neglect the edges. Putting the Wrap On: The Contact Cement Method OPFOR: You may also want to resort to a solvent based contact cement. While the waterbase tends to be lower odor, I find that it does not bond as well. Woodrow: 3M-NF (contact cement) is best. Sjcdrummaker: From Home Depot - The contact cement in the green can... Weldwood is the brand. Green can... not the red can. Red can = bad. SeanSMD: Don't even bother with Home Center stuff. Go to www.grainger.com and get the 3M. The stuff at home centers is primarily made for counter top laminates like formica and wilsonart. Some of the stuff you might come in contact (pardon the pun) with there will eat drum wrap. I would advise knowing EXACTLY what to use before guessing. I know for a fact that 3M Fastbond 30NF works great and will not harm wrap. bigtone23: The 3M 30NF is the best. The green can Weldwood is pretty darn good and easier to find. A gallon would last a looooooooong time! Unless you are wrapping a drum or two a day. drum5123: 3M 30NF sjcdrummaker: When using contact cement it is best to be patient. Lots of times people try to just slab it on, then are so anxious to get the wrap on it doesn't dry fully. Apply it slowly and to a medium-thick consistency with no runs. Apply one coat to the wrap, then to the shell. I do the wrap first cause it takes a bit longer for it to dry on the wrap cause it's not porous like the wood. Then wait 15 minutes... minimum. Mike H: With contact cement, try a little contact cement thinner, it'll gob less. Then use whatever method of lining up you want, tape hinge, wall... my only extra tip is the thinner. I got little lumps that show when the light hits it just right on my first wrap job, thinner fixed all wraps following that first one. hankdriver: I'd go to Drumfoundry.com and read their tutorial on wrapping shells. I think they sell the 3M brand bond that most of the custom drum companies use to bond wrap. I know that Precision Drum sells it for about 20 bucks or so. It's strong, bonds over time, and is great for wrapping shells. There's a pvc cement that you can get to use on the seam if you think you need it. It actually bonds the seams over time. Get a small plastic container that forces a pin head bead of adhesive and put it on. You can get the adhesive and bottle at a local home store. Putting the Wrap On: The Hi-bond Tape Method askdefj: Does anyone use these with the Hi-bond tape? I've got Yamaha Toms, and Ludwig kicks that aren't matching and I'm considering using Jammin' Sam's wraps with the tape just in case I regret it in the future, or sell the kit. Has anyone kept theirs on for awhile? Are the seams still connected and is there any warping? Also, is it only the Jammin Sam wrap I can use with hi-bond tape, or is it possible with others too? Is veneer possible? dave_b: From everything I can see, Jammin Sam uses the same wrap as everyone else, so you should be able to buy the hi-bond tape and use it with anyone's product. I've been using the super cheap wrap that's very similar to what's available at Dick Blicks. I needed my toms done quickly for a gig and I didn't even use tape. I can't really recommend that, but it's worked well for me. For $30, I've gotten through two jobs and they still look perfect. Mike H: I've wrapped with tape and contact cement. Tape is easy and the tape that Tama used on my 1989 Rockstars has been going strong for 16 years. With just one strip on the seam. If you use tape, get one of those rubber net non-slip mat things. Leave the protective film on, cut the wrap to the proper size, line it up where you want it and use some 2" wide plastic electrical tape to close the seam tightly. Then put a long piece of the same tape around the wrap and into the shell several inches on the middle of the wrap (opposite the seam) to lock the wrap in that position. Then remove the seam-holding tape and tape one end of the wrap with the superduperdoublestick (rub it down hard). Put the double stick on the other end and use two pieces of the wide electrical tape to make "handles" on the that end and with the shell on the mat, pull the wrap as tightly as you can, using the nonstick mat to help grip and pull by tugging the shell over it, when it's as tight as you can get it, push the double stick down and rub hard. Then kick the wall, do some of your finest cussin' because you just stuck the double stick to the protective film you idiot! See, even easy procedures have hidden dangers. another_jake "...maybe two years from now you decide the satin flames aren't for you and you want glass glitter...Wait! re-wrapped you say?....Doesn't it require a heat gun and doesn't it peel up wood and stuff like that?....Not if you used the high bond tape method! You just peel the **** off! 10 minutes after you've stripped all your hardware off your drums, you are rockin' and rollin' and the old wrap is off. brhythm: I say, if it's your first time, just get your feet wet with some inexpensive wrap and the tape. Once you've got the hang of things, I say go glue. Once you set something with contact cement, it's not coming off, so you've got to make sure everything's lined up just so. I've rewrapped a bunch of drums using the tape method, and only one has bubbled. With glue of course, no bubbles. But glue takes more time, and, as I already explained (as I begin to ramble here), skill. ijdrum: I'm personally not sold on the tape issue. I've seen other people use it and swear by it...but I'm a glue guy. Since it's your first time...I'd say use tape...other than that...GLUE! J.Richard: Personally for wraps I would use the tape and only on the overlap, which I hide under a lug or throwoff. In the event you change your mind on the choice of wrap or the wrap gets damaged, replacing the wrap is much easier. angelcustom: tape tape tape tape tape, you can always take it off whenever you want to with out any hassle. bobthebuilder: Here is the thing. If you are a home shop (just want to have new looking drums occasionally) type guy, the tape method is fine. Definitely if you want to change the wrap at some point, its a snap. HOWEVER, if you want your drums to look professional, and have that laminate/wrap edged in with your bearing edges, then the tape won't work. Most pros glue and then trim down with a knife and make their wrap become almost like another ply on the drum and routered into the outer bearing edge. jriolo: We cover the entire drum with double when we apply a wrap, along the edges is not enough regardless of what others say, there will be bubble areas. The overlap edge is not only covered with tape but super glued along the overlap to hold it down even better, as well as lugs being placed near the overlap seam. 1st We cut the wrap to the EXACT SIZE WE WANT leaving 3/16 per edge along the edges. We mark or lines on the back of the wrap & we use scissors to cut the wrap. we never have problems cutting straight and smooth as some have stated elsewhere. We place the wrap on the drum so lug holes will go through the two layers of the overlap and help keep it secure. 2nd, We place the wrap on the drum EXACTLY WHERE WE WANT IT and temporarily tape(WITH 1-1/2" WIDE PACKING TAPE) it to the drum at the overlap area(RUNNING THE TAPE STARTING FROM THE INSIDE OF THE DRUM OVER THE BEARING EDGE TO THE OUTSIDE OF THE DRUM & ALONG THE SEAM OVERLAP ON THE OUTSIDE & THEN TO THE INSIDE OF THE DRUM ON THE OTHER SIDE), and then apply the packing tape in the same manner 180 degrees on the other side of the drum(no seam there) which forms a kind of hinge when you remove the first piece of temporary packing tape from the overlap area. You then only have to apply & DOUBLE STICK TAPE under half the wrap at a time & you can easily pull EACH HALF completely tight AND HAVE IT ALIGN PERFECTLY IN TURN. If you originally had the wrap exactly where you wanted it when you taped it down with packing tape, and taped it to the drum as originally stated, the wrap will align itself again on the drum perfectly when you pull EACH HALF of the wrap tight as you lay it down over the tape. We work the wrap onto the tape by pulling the wrap tight and smoothing it down on the exterior of the wrap as it lays down. Finally we go over the wrap once it is down with a cloth and alot of hand pressure to assure adhesion. They align perfectly for us and we don't even have to trim them. We finish by applying super glue on the overlap exterior on the ends and in severl mid points & use "Bob Smith Extra Thick" (which will not run as easily)available at toy and hobby stores. The method above will also work well for alignment for those who are ready to use the high bond liquid adhesives. PDGood: Will spray adhesive work to hold wrap? steveprimatic: I have had some experience with the spray adhesive (not on drums, but on carpet). It never gave me a satisfactory bond and loosened over time. Contact cement works much better. I don't know what would happen with a drum wrap. I prefer the gel contact cement (can't remember the manufacturer). It's less messy and easier to spread (at least on carpet backing). I apply it with a brush and use a scrap of plastic laminate to spread it. joose: Having used both standard spreadable contact cements and industrial spray cements for plastic laminate, I would say if you're looking for quality bond and permanence I would stay away from the spray variety. While great for high volume application, the propellant produces a rippled/bubbled texture to the glue as it dries and I have found that the imperfect application and surface leaves less than a gap free bond with out tremendous pressure to compress the glue contact area. In the particular case of drums where I would expect that you would want to have the wrap effectively become part of the shell, I would stick with spreadable cements. jriolo: Precision sent us this foam brush with our 30NF. It was easy to make a straight line and applies evenly. They recommend going over raw wood twice as the first coat soaks in. On Bass Drum Hoop inlays, we tried the Duco cement for the joining places(no overlaps of course). We also put a few dots around the hoops about every 8 inches or so on opposite sides of the inlay to keep it in place after we had put double sided tape between the hoop and the inlay. Duco seems to shrink and disappear considerably, which is Great! Some recommended no glue on the seams of the drums, but we went ahead and put some parallel to the bearing edges on the overlap area as well as a few spots along the seam. It dries clear and is barely noticeable. Super glue is dangerous with some colors as it fogs the plastic. For Duco application we scored an extension tube at the hobby store and taped it on. RBAcustomdrums: When I'm cutting my wrap, I leave an extra inch for the seam overlay, I also scuff the underside of the overlay to ensure a strong bond. When Im ready to glue I apply contact cement and allow it to sit for 35-40 min(check the directions on the contact cement you use I use the stuff 3M puts out and it works great). After the glue has had a chance to set slightly, I place the shell in the middle of the wrap and begin to roll towards the direction that has the underside of the seam. Then I switch directions and join the other side. I then roll the shell over my table top several times to ensure a strong bond, I also use a J roller to release any remaining gaps or bubbles. After it has cured for a while, I use a glue applicator and apply a small bead of pvc cement (using a pvc based wrap) the glue does a really good job of making a nice clean seam. Gluing the Seams Lickbag: Anyone got word on how best to permanently bond wrapped seams? Any difference for sparkles/solid colors vs. glass glitters vs. WMP and the like? tbone: Wonder if PVC glue would do that? ericsooy: YES JLee: For the seam (where the layers of wrap overlap - probably about an inch worth- I do think PVC cement is the best way to go. It does cause the two layers to bond almost as one. In order for this approach to work, however, you must use blue painter's tape right at the edge (where the top layer ends) and precisely place the tape to keep any excess from getting on your wrap. If it does, and you leave it for any length of time, it will thoroughly discolor the wrap. fienddrummer: Dennis from Phattie Drums used a "plastic weld" on the seams, it was actually called "plastic weld" if I recall. Had like a medicine dropper applicator to it. Maybe he can chime in and share more. His seams are tight!!! I used good ole super glue just on the seam edge with OK results. PhilR: Probably a form of poly cement similar to that used by model makers. It works by "melting" the plastic. OPFOR: I agree with Fiend, super glue works very well. Although, I don't recommend it for satins. No problems with glitters or any of the thicker wraps. The satins are made with some special material and disolve under solvent based products i.e.: super glue or contact cement. jrfrond: First of all, you don't want to use a solvent-based adhesive on Rowlux Illusion (trade name for "satin flame") plastics. It will eat through the delicate backing and cause some major discoloration. Rowland Technologies, the manufacturer of these finishes, recommends ONLY water-based adhesives on their adhesive specifications list, and good ol' 3M FastBond 30-NF is one of them. However, I would highly suggest keeping the glue coat as thin as possible, using a roller and not a brush, to avoid soaking the backing, which could cause dark spots and discoloration. For pearl plastic seams, properly applied and sealed contact cement should do the trick if done properly. For seam repair, thick-grade Super Glue will work, but my favorite is Duco cement, which is basically solvents suspended in an emulsion that makes it all easier to handle. Unless you are REALLY careful, water-thin solvents could cause some real heartaches if they run onto the finish, and they also flash off to quickly to work properly. adonisdrum.com Hello all, welding seams isn't the best idea. Over the years the welded portion of the seam will discolor the wrap. I used to weld seams, but as some drums around the shop aged and discolored around the seams we stopped.... Use 3m-nf water base contact cement. Do not use other glues! The trick for good seams is sanding down the leading edge of the over lap. A laminate file and about 5 minues is all it takes... just be careful not to slip as you thin down the over lap with a file. Use the same contact cement on the seams. Striped Wrap LJ4174: Is the stripe on Gretsch Catalina Club drums a seperate piece of wrap or does Gretsch have this custom made? Like do they take the silver and then have the black sorta printed over it? If it is multiple separate pieces, does anyone see an issue with a seam showing? Not the seam where it'd overlap going around the shell, but if I'd use separate pieces of wrap and butt them up against each other, would they pull apart??? hankdriver: I'm not sure about the Gretch wrap but I'm getting ready to wrap a snare using black glass on the edges and silver glitter in the middle stripe, and it's cut into 3 separate pieces. I would go to www.drumfoundry.com and read the tutorial on wrapping shells using adhesive. BlackHawk2029: As long as your 2 wraps dont shrink and are of the same thickness, you'll be fine. [url]www.jamminsam.com[/url] has wraps that dont shrink. steve_c1234: On the Catalina Club kits they are a single wrap. Both colours are on the one. Bdrummer: Ok, and how do you line-up the stripes? do you tape them together first? And how do you glue the entire thing correctly on the shell so that the end and beginning line up? RBAcustomdrums: I use blue painters tape to allign all the stripes together, then I scuff the shell and the back of the wrap extreemly lightly so that the contact cement will have something to stick to. The easiest way to ensure that the stripes line up is to tape them together, once they are all taped, appy the glue just as you would for a solid piece of wrap. Drill or Wrap First? tcraw1010: I know that it seems the general practice to apply a custom finish to a drum before drilling for lugs/vents. Does the same apply with wraps? fienddrummer: I always wrap the shells, leaving the protective layer on (peeling back only enough to seal the seem, the tape the shell with masking tape and layout for the lugs marking on the masking tape.....then drill. dubbel-trumma: I think its best to drill the shell before you put on the wrap. Then make holes (or markings only and do the rest from outside) in the wrap from the inside of the shell. Bdrummer: I always finish first (paint or wrap) and then drill... Why drill first? You still have to drill through the wrap afterwards?? saopaulodrums: Drill first then wrap. MarkleyCustom: I like to wrap first, before edges OR holes. I trim the wrap right at the end of the shell, sand it flat, then mark the hardware holes on some blue tape and drill. Then I cut my edges. This gives you a really nice, professional looking finish to the wrap. RBAcustomdrums: Do you guys recommend wraping the shell and then cutting snare beds and edges? XxStoryOfTheUSeDxX: I'd suggest wrapping first then cutting and drilling. Do You Wrap All the Way to the Bearing Edge? RBAcustomdrums: How many of you cut your wrap so that it totally covers the shell, or do you prefer to leave about 1/4 inch on top and bottom to protect the finish in case of a defective head? drum512: I think most people leave 1/8" to 1/4" for cutting edges....just so the router bit makes a smooth transition around the shell. I personally left 1/4" on mine....just so the head sits right...I also cut notches in the overlap so there wouldn't be a hump. XxStoryOfTheUSeDxX: I glue my wraps all the way to the edge of the shell, which does not prevent the head seating correctly, but its definitely neccessary to cut a notch for smooth routering. How Do You Cut Bearing Edges On a Shell That's Already Wrapped? hippybaker: How do I do the outside bearing edge on a shell that's wrapped? I haven't done very many bearing edges in my life, and use the "Big "O" method, on a router table, as previously described in DrumShed. Will the seam of the wrap not be in the way? What am I missing? snaremaster031: It is usually best to cut the outside edge after you wrap so that it gets incorporated into the edge and has a nice clean appearance. If you have an overlapped seam, you can do two things - Cut the wrap so that it is butt-joined for about a 1/2" down on both sides. That way the bearing will go right over it and not know it's there. Or, cut right over it and then go back and hand sand/file the spots down so they are flush. (Because the bearing guide will translate the overlap into the profile in the form of a little lump.) Either way, you will want to mask the outside edge off with blue painters tape so the bearing doesn't mar the wrap, and will help avoid it chipping. Make sure the masking tape edges are butt-joined or you will have two lumps to sand out, unless it is in the same spot as the overlapped wrap section. (Which will make it a little bigger.) You will want to use a climbing cut (spinning the shell in the same direction as the router bit) to help avoid tear-out/chipping, especially with glass glitters. Be careful when finish sanding the edges so you don't scratch the wrap with the sand paper. I don't do the "big O" technique because I don't feel that I have as much control over the shell. Instead, I prefer the "feathering" technique. More info on the two techniques should be found by searching (on DrumShed). Bass Drum Hoop Inlay The D Tran: I don't remember where I heard this, but someone suggested rolling a thin strip of wrap into something like a cinnamon roll, then using a belt sander to carefully thin the whole strip down to the inlay width (1/2 inch usually). Any better ways of precisely getting the right thickness for a BD hoop inlay? I don't have a good enough shear or scissors to cut straight worth anything. FYI the wrap i'm using is not Glass Glitter. That would probably cause some damage with a belt sander. To the machine, the belt, and probably me. Guerrilla Drum Making: Straight edge and utility knife or razor knife. You can see pictures of the process if you check out my blog at: http://guerrilladrummaking.com/refur...rumdesignscom/ Cutting Wrap Count Of Monte Cristo: What are you cutting your wrap with? I have been using the T-Square and a blade, but dammit if it doesn't cut exactly straight all the time RBAcustomdrums: I also used a T-Square and a blade. However, I did clamp a long 2x4 to the table parallel to the edge of the table, I then pushed the T-Square against the 2x4 to ensure that there would be no give in the T-Square. Count of Monte Cristo: I wanted to see what some of you guys use for cutting wrap. Straightedge and a blade? Scissors? Do you have a machine? daggerdrums: I use a straight edge and my dad's expensive carpet knife with fresh blades everytime. It does the job great! jrfrond: Bought a machine called the Javelin Keencut, but I don't have room to keep it set up in my current shop, so usually, it's a 54" rafter square and a 3' x 5' bench. I clamp the rafter square at both ends of the pearl, and use a sharp razor knife. Some plastics cut easier than others. In order of difficulty (easy to hard), it's pearl, sparkle, and glass glitter. GG (glass glitter) eats blades for breakfast, and you need to make multiple passes. OPFOR: I use one of those razor, pizza cutter style knives for cutting anything other than GG. On Glass I use a hand held. powered, laminate cutter. RiJiD: It really depends on the type of wrap. Standard MP (marine pearl) wraps cut easily with sharp scissors and you DO get a great deal of control - more than with a blade. For sparkle wraps - scissors or blade. When using a blade, what's really important is to not try to punch through on the first few draws. Focus on scoring the plastic lightly so the blade doesn't have a chance to wander. The first cut sets up the subsequent cuts and you can apply more pressure as the # of draws. You don't have to go all the way through - once the material is sufficiently scored you can just bend it and it will snap at the score line. Glass glitter is the worst. Plan to sacrifice blades (both cutting and routering). Again, the best method is the one I previously mentioned. I suggest trying a cut on scrap of the material you are using BEFORE you commit blade to the big $ stuff. fubar1217: I have two strips of blue sparkle wrap that was cut for 1.75" bass drum hoops. Problem is, I have 1.5" hoops. For those that cut wrap, what do you guys use to cut it nice and straight? I've thought of maybe glueing the wrap to the hoop first and using a router to trim the excess off. jrfrond:[/B] For full-dress hoops, that's the ticket...trimming with a router. I do the same with drums as well. For inlays, you have no choice but to be SUPER precise! Overlap PDGood: How much overlap is needed? Danalog from GN: I usually do 1.5 inches. especialy on snares that way the strainer can sit comfortably on my seam. Count Of Monte Cristo: Ok, to me the best thing would be to oversize cut the wrap and then just trim it with a laminate trimmer; but then what about the overlap and drumheads? I guess the dw thing (notched) would be best but thats pretty hard to get precise. skaman: I've only done one wrap job and it was with GG (glass glitter). I had very little trouble getting the DW style overlap to work for me. Just allow for some overlap and cement one end of the wrap down all the way around leaving the loose end uncemented. Then cut mark and cut for the overlap and superglue. I hear that you can't use the superglue on some types of wraps though. Not sure which, it seems I remember satins to be the ones. jrfrond: I wrap all the way to the edge, then I trim the laminate flush to the edge with a razor knife, then proceed to cut the roundover and trim the wrap all in one pass on the router table. I have yet to tear or chip the wrap. On the contrary, it comes out super-clean. I use my highest router speed (25,000 RPM). The "hump" formed in the roundover when passing over the seam gets cleaned up and profiled carefully with a file, before final contour sanding. This achieves a "vintrage" look to the wrap. You never saw vintage shells "short-wrapped" or notched. It all depends on whether you are rewrapping a vintage drum, or wrapping a new shell. New shells are properly undersized, and the wrap/seam combo poses no problem. With a roundover, the edge of the wrap winds up under the edge anyway. I just finish the corner of the seam with a file to break the sharp edge. It's really pretty simple. Works with a 45 degree countercut as well. Now, if you are rewrapping a vintage drum whose heads have to be hammered on or pried off, you might have no choice but to short-wrap it for functionality's sake, BUT it would be an obvious mod and hence would devalue the drum. At this point, you (or the owner) needs to determine whether they want a player or a collector's item. rhjanes: On vintage, I just use the Aquarian Vintage heads (Made to fit the old "full bodied" shells...LOL) They fit over the shells and wrap. Epiarch: I have done it a few different ways. both have their advantages... A lot of the time I will wrap to the edge and then route the edges. Other times I will route the edges first, and then cut the wrap so the measurement is exactly to where the outside 45 starts on the shell. The draw back to wrapping and then cutting is you have the seam bump in the edge to sand out, so that takes time. About the only draw back to wrapping after is you have to make sure the wrap is perfectly squared with the drum when you wrap it otherwise it wont stay centered on the shell and the last part of it will end up covering one of your edges. I do both ways, just depends on my mood Bdrummer: Why doesn't anybody place their wrap seam butt to butt, without the overlap? I know pearl wraps do shrink, but is this also the case with sparkles or glass glitters?? It just doesn't seem as nice with the overlap. OPFOR: I have done a butt joint on sparkle wraps before and was pleased with the result. What I like most was that I was able to hide the seam completely with the throw-off. I do know that some of the acetate wraps will shrink over time so that could be a detractor. fienddrummer: I built a vertical multi-stripe snare and all the edges are butt jointed together....it was an experiment with left over glass glitter wrap scraps....worked great. ijdrum: This is a half-assed pic of what woody was talking about. The little notch at the top lines up perfect with the other half...so it's flat at that point. The overlap is where the wrap extends past the notch. The router bit shows how the bearing doesn't pass over the over lap...but where the wrap meets flush. Seams RBAcustomdrums: What is the best way to prep the seam and also cut the seam so I wont have a problem when I go to cut edges? Reid: My vote is for not notching the seam to cut edges. You end up with a step in the edge, but it's very easy to take that down with a file. drum512: I notched mine. What Wraps Are Made Of gheeley: Is drum wrap, Celluloid or PVC? drum512: PVC rustynuts50: Off the Delmar website mate: After being molded under heat and pressure, the finished blocks are sliced into thin sheets. This cross sectioning of the block yields a true three dimensional effect. These sheets can then be laminated to rigid PVC or acrylic films. No other decorative media combines the creative possibilities of this technique with the usefulness and versatility of plastic sheet materials. This block process can be used with several different types of material. These include: - Cellulose Nitrate - Cellulose Acetate - Flexible PVC (vinyl) jrfrond: The drum wraps from Delmar are mostly PVC, some acrylic, and acetate (not celluloid, which is a different cellulose-based material). Acetates look really nice, but require certain storage procedures and complete cementing on the shell to prevent shrinkage and wrinkling. PVC and acrylic is much more stable and inert, hence it won't cause heartache down the road. I only use one acetate, which is the vintage Oyster Black. Like I said, they will be OK as long as they are glued 100% to the shell, but if you plan to stock it, it needs to be in a cool area, away from bright and/or UV-containing light, and laid flat with some weight on top to keep it from curling up. fienddrummer: Gretsch calls theirs nitrate don't they? |
|
Non-Standard Wrap Materials motsiwel: I thought I'd post this idea of mine simply cos I haven't seen it done before and I'd love to know what you think! 30 stave 14"x5.5". The blade on table saw is fairly blunt so the edges weren't as smooth as I'd like making the joins pretty yuck. It's still structurally sound but the gross joins gave me the idea to cover it, so I took this awesome looking piece of upholstery fabric and sewed it into a tube just a little bit tighter than the drum to make snug fit. |

Drum by motsiwel |
|
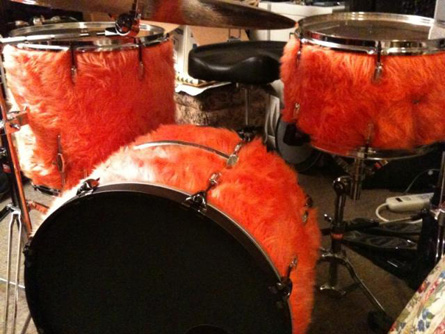
OPFOR: I think its a great idea. I did something similar but actually glued the fabric to the shell and then lacquered over it. It was a ton of work and came out nice, but I don't know if I would try it again. I think your concept works well and also give you the flexibility to change it over time without too much hassle. michael_watkins: Nice- I have wrapped drums in fabric many times. I don't lacquer over them though, just some 3M sticky spray. As mentioned, you can change them out as often as you like, It's easy to apply and dirt cheap. I did a wrap in skulls for a halloween show and it was around $25. I have been toying with the idea of using spandex or similar stretchy material that can be applied without taking the lugs off but haven't put too much effort in it yet. I think that would be cool. cutaway792yahoo.com: There was a company years ago (late 80s I think) that made spandex drum wraps with little slits for the lugs to come through. I think they were called Geddit Drum Wear or something. And I believe Sheila E. was in the print ads. J.Richard: Fabric has been used, there is a company that makes a fur wrap (think 1960's shag), wallpaper has been used as well as contact paper, comics and news print (decopauge), animal skins, shrink wrap, etc. shiloh: Thats a great idea, make it look regal, I was going to cover one of my shells once with Tuck tape and duct tape and call it the handyman's special. |
Drum by pellisdrums pellisdrums: I think it's a great idea. I finished a snare with some western looking leather-ish fabric. It was actually the first wrap I ever did. I used spray adhesive because I wasn't familiar with contact cement at the time...it turned out like you would think a first time wrap job with spray adhesive would turn out...but from the pictures it looks decent. |
Drum by ijdrum ijdrum: And my contribution to fabric based wraps. |
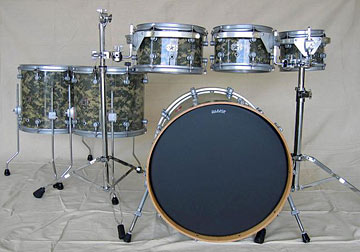
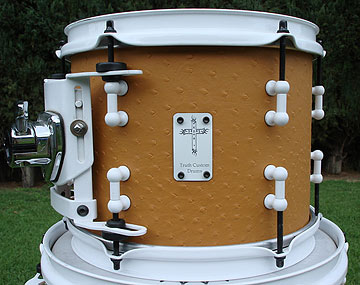
Drums by OPFOR OPFOR: I had the good gentlemen at Drum Foundry make it (camo wrap) for me. They did a great job as it is a real wrap - just like a sparkle/ glitter/ or pearl. It is very durable and easy to work with. The only downside was the wait but that is to be expected on anything custom as I am sure we can all appreciate. |
Drums built by Truth / cutaway79@yahoo.com This is my first "real" wrap job (previously I had only used pre-cut self-adhesive material). It's a synthetic ostrich skin that I found at a local fabric store. |
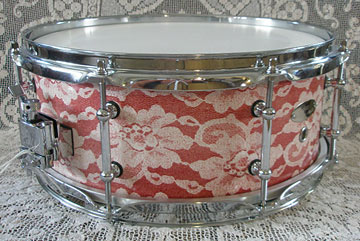
Drums built by twells twells: Just thought I would share my new line geared to female drummers called the Jane Series after my drummer daughter. This is my first prototype, pink lace, and am currently working on a black lace. |
Drum built by casper |
Drum by painter213 |
Drum by painter213 |
|
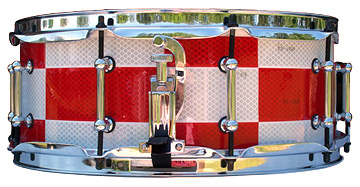
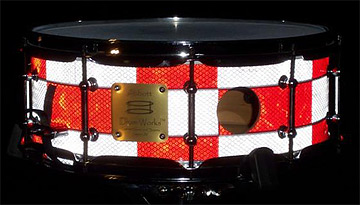
painter213: Well, as I was waiting for paint to cure so I could place hardware on the three shells that I painted, I had this shell laying around. The shell had a already been painted, but I did not like the way the color came out, so I had a few beers in me and I came up with this. I had a roll of DOT reflective tape and thought, what the hell. |
|
KickBass: I am building a snare and I am planning on wrapping it. I want it to be pure white. I have pure white formica here at my house, but will that make a difference in sound since I think it is slightly thicker than a normal wrap you buy for drums? Would it be ok just to use the formica? headbangerdood@hotmail.co: I am under the understanding that the thicker the finish the less the drum resonates. skaman: It shoudn't make much difference. personally I dont hear any difference between a wrapped shell and an unwrapped shell. OPFOR: Not only will it work, but it's been done! I just picked up some 1972 Butcher-block finished Rogers drums and the finish is formica. For being 30 years old, they've maintained their finish quite well, maybe better than a more traditional wrap but that's just an opinion. I wrapped a concert bass drum in black formica some years ago for a local high school and it came out quite well. Again, very durable material and certainly appropriate for an application where they might be abused. snaremaster031: When using formica, I believe you need to use the "Vertical Grade" or something similar to that, as it is thinner than the counter-top version. The vertical grade is meant to be post-formed onto curves and edges. (A max of 3" radius seems to ring a bell.) The thicker version may break or be nearly impossible to glue down on a radius due to it's rigidity. OPFOR: Snaremaster is right. Formica is very brittle and the very thick stuff will probably break, especially on the smaller size shells. You might need to find a thinner gauge than what is available at the local hardware store. dave_b: I've been using the super cheap wrap that's very similar to what's available at Dick Blicks. I needed my toms done quickly for a gig and I didn't even use tape. I can't really recommend that, but it's worked well for me. For $30, I've gotten through two jobs and they still look perfect. askdefj: The adhesive contact paper? I went out and got some yesterday.. I'm trying them on my drums just to see how they go, but, I'm not to sure if it'll hold up well. How Much Do You Need? To figure the distance around a drum, measure across its diameter and then multiply this by 3.1415. Remember that a typical drum that we call 14" in most cases is actually 13-7/8", so be sure to measure and not just guess. Example: Say you have a drum and it measures 13-7/8" in diameter. To convert the 7/8" to decimals (to make calculations easy) divide 7 by 8. 13-7/8 = 13.875 (converted to decimals) Then to figure out the distance around the drum, multiply this by 3.1415. 13.875 x 3.1415 = 43.588" around. Add 1" for overlap and you have the length of wrap that will be required to cover this drum. Wrap generally comes in 24"x54" sheets, so this means that any drum that is over 16" in diameter will require more than one sheet. altereddesigns: I have just wraped my new kit and for a 22" bass drum. You need one full sheet and then a small piece for the bottom. Tips oiboiluis: I've seen that people blow dry drum wrap to make it shrink for a tighter fit when they build drums. |