
|
|
|
|
|
|
|
|
|
|
|
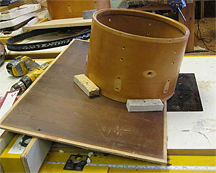
Reducing The Amount Of Overtone Ring In A Drum Recutting Uneven Edges Shell Diameter Too Small Lug Problem Broken Screw Head Indentations in Keller Shells Finish Becoming Cloudy Repairing a Split in Wood Stabilizing Spalted Wood Reducing The Amount Of Overtone Ring In A Drum PDGood: There are many ways to accomplish this, some more aggressive than others. Listed below are various methods beginning with the most gentle and making the way down the page to the most aggressive. Tuning. This is the first step you should try. It's not easy, but it is the best way to reduce ring because it doesn't otherwise alter the sound of the drum and there is no cost involved. The idea is to get the tension the same on each lug by tapping the head about an inch or two away from the lug. Try to match the sound exactly near every lug. The closer you get, the more ring will be reduced. Thick heads make this more difficult. There are limits as to how much ring you can reduce this way. On some drums a good tuning is all you need. On others it helps but just isn't enough and you will need to combine this with other methods listed here. Also, know that if you tune the top (batter) head very tight, it will reduce ring. As a way to test how tight it is - you want to get it to the point where it is difficult to push the head in with your thumb. Adding air vents. This makes a subtle difference. A big plus is that it doesn't alter the tone of the drum as so many other methods do. All the gel and tape methods drastically remove highs from the sound - this way doesn't. Another plus is that you can add them one at a time to gently alter your sound. You're very unlikely to go too far. I've used up to (4) 1/2" vents in a snare drum. If you put huge vents in like Spaun and some other companies are doing these days, you get into a whole different sound. On the down side, it does require drilling holes which you may not want to do on vintage or expensive snares. Adding wood rims. I've been told that this dries out the sound because the metal rims contribute to the ring, whereas the wood rims do not. I don't have any personal experience to verify how much it changes things. Putting gels or tape on the heads. It's quick, effective, easy and cheap. The down side is that it really reduces the high end (treble) from the sound of the drum. Changing drum heads. If you go to a thicker head or from a one ply to a 2 ply, it will reduce the amount of ring. It will also drastically alter the tone of the drum, so you have to experiment with brands and different models within the brands to find the right combination for your drum. Experimentation can be expensive. Get with friends and try different head combinations on each others drums. The Evans Genera Dry and similar heads is about the most drastic thing you can do. They have perforations around the rim of the head and it makes a huge difference. It also drastically changes the sound - not for the better in my opinion. The only thing more drastic than this would be setting your wallet on the drum head - an old studio trick that takes 100% of the ring out. Recutting Uneven Edges mountainhick: Just wanted to share a quick dirty jig I came up with today to deal with a vintage shell with edge problems and re-cutting challenges. This is also follow up to a previous thread where I mentioned how I cut angles other than 45 degrees with a 45 degree bit and a simple angled table. Anyway, I am re-furbing a Slingerland kit and when I put one tom on the plate glass to check the edges found: Problem 1: A dip several inches along the edge... I kid you not... 1/8" out of level from the factory! This edge was original and had never been touched. Obviously needed re-cutting. Problem 2: The angle of the stock slingerland edges is not 45 degrees, and all I have is a 45 degree bit. I don't know exactly what angle they are, but it doesn't really matter, because the cure was to align the jig to the stock inside edge cut itself.. no need to measure the angle. Problem 3: The inside of the re-ring is very irregular and the resulting thickness of inner edge to outer surface of the drum varied by 3/16". So, just using a piloted but as guide would create an irregular diameter. |
| The Solutions: |

|
|
|
Problem 1: Level the good edge opposite the unlevel edge on a flat sanding surface (on the plate glass), then cut the opposite unlevel edge on the tablesaw down to the lowest point of the dip. Problem 2: Create a tilted table jacked up to match the needed angle of cut using the 45 degree bit. I just screwed a piece of plywood to the router table/saw fence at the correct angle: Problem 3: Screw 4 guides onto the jig around the outside of the shell so when rotated, the shell moves in a circular pattern indexed on the outside of the shell, not the irregular inner surface of the re-ring. Note: to adjust depth of cut, the whole jig can be moved by moving the fence, and the router bit can be raised and lowered. During cutting, the bearing pilot on the bit never contacted the work. Shell Diameter Too Small PDGood: I have a shell that is 13-3/4" instead of 13-7/8" as it should be for a 14" drum. The biggest problem turned out to be the snare wires. The manufacturers of snare wires rightfully assume that the shell is made to the industry standard 13-7/8". On my slightly smaller shell that put the ends of the snare wires nearly touching the bearing edges. In fact, if they are not centered perfectly they ride on the bearing edge and even if they are centered perfectly, if you attempt to tighten the wires a little bit, that uncenters them. The resulting sound of snare wires resting on the bearing edge is absolutely horrible. The solution was incedibly simple. I just bought wires for a 13" drum (12-7/8") and haven't had any problems since. Lug Problem LJ4174: OK, I have this friend... Yeah, a friend of mine who built this custom drum kit and last weekend he decided to finish the last shell that's been laying around cause he was thinking he might add a peice to his kit... The shell is a 12" tom shell and it's already finished, buffed and ready to go... However, when my "friend" drilled all the lugs he thought he put them at 1" from the top of the shell, so he also put these lugs at the same location, 1" from the top. He's using mini lugs, so 2 holes per lug. Well, after he started to put everything together and got to the DSS mount, he realized all 12 of his lugs are too close to the edge of the drum and the DSS won't fit, turns out the rest of the drums where down 1.5" - maybe even 2" from the top - see, my friend didn't take one of his drums apart, he just went off memory... OK, so that's the story, so how would you guys handle this... Would you re-drill the lugs and plug the holes that aren't needed. If my "friend" did this, 1 of the holes would be hidden with the lug and the other hole could be easily hidden because the tension rod would go right over it, however you'd see both holes on the inside of the shell... Or... I was thinking my "friend" could just not use the DSS and put the tom mount right on the drum, however the rest of his drums have DSS mounts... Most likely though this drum will be on the other side of the kit, like a left handed floor tom... He was thinking of maybe putting it over the bass drum, but that would probably look goofy without a DSS... Sam Bredeson: I would use the farthest hole already drilled to be the nearest hole on the new pattern, then just try to fill/cover the one hole left over. (if that makes any sense..) turn | o o into | x o o | =edge, o =hole, x =filled hole Bdrummer: Yes, I'd fill it. if you do it right, it's barely noticable from the inside. Sand it off, use very light /natural filler. What I did once was: use some 'sawdust' (don't know the English word) to mix it in that hole with the filler as a 'final layer' so when you sand that it's pretty much the exact same color as the shell. At the outside, just finish it as well (if that's possible with the particular finish). In that way it's pretty hard to notice... LoodVig: IMO, you should slap the mount right on the shell. Plugging and re-drilling could turn out pretty ugly, if not perfect. No one will notice that one tom doesn't have a DSS unless you point it out. Crazy8s: A 12" shell costs all of what, $40? Buy a new shell. wittpercussion: You can also get a plug cutter or some maple plugs at your local woodworking store, glue sand and it looks a lot better than filler. Broken Screw Head amram: A head of a screw holding the company badge to a tom broke off recently. While this is really not a big deal because the other three screws are still intact, it would be nice for the sake of completeness. It looks like there would be no way for me to take the remainder of the screw out without damaging the shell. Anything I can do? Is there anyone I could take the drum who could perhaps.. I don't know .. weld a screw head back on? skaman: Use a screw extractor to take out the broken screw and do your best to find a matching one. amram: Won't a screw extractor create a larger hole around the broken screw? Could this be bad for the drums? And would an identical screw be able to fit into the slightly larger hole? skaman: If you use the right size extractor it wont make a larger hole. PDGood: If you wind up making a bigger hole you can fill it with wood filler or a combination of sawdust and wood glue. Then redrill. ange d mange: And when you put the badge back on, it'll cover the hole anyway. Indentations in Keller Shells dawgman: I ordered a couple 6.5" x 14" Keller 10 ply maple snare shells recently. This is my first build, so I don't really know what to expect in terms of the overall quality of the shell. On both shells (though more severe on the second shell), there are what appears to be "score lines" on the inner most ply. Not to be confused with the line where the ply wraps around and meets up with itself. This line is an indent running the whole width (6.5") of the shell. 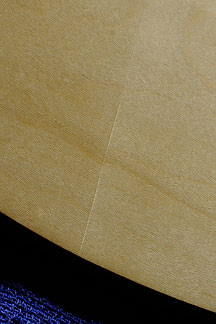
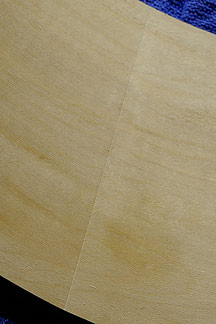
shiloh: Even though the lines are on the inside, and the fact it bothers you enough to ask why, I'd have them replaced. To me it'd be like buying a new car with a big scratch across the dash, sure it`s inside and it still goes fast, don`t worry about it.... NOT!! From the pics you can clearly see crushed wood from what/whyever it was incised, I know I wouldn`t settle. fienddrummer: I know what you're talking about.....they are tooling marks from the shell machine. They are an indention line were the shell mold comes together. I've seen them on the outside of keller shells too. They don't present a structural issue at all - just an asthetic issue. But, if you're not happy with it, send it back. spirit: I am sure it can't be right- I for one would never accept that.....It would spoil the whole experiance to build with that and always see it! Send it back- for any build let alone your first- you need the best available to give you a chance of a good outcome! dawgman: Just as an FYI. The shells were taken back and replacements have been shipped out. So all is well in drum building land in the Northwest. dawgman: UPDATE: So I got the new shells in the mail yesterday. After a thorough examination, the shells still had the same condition, but not nearly as pronounced as the previous two. These ones can be taken care of through a little sanding....so I'm happy. I'm thinking That FIENDDRUMMER knows what hes talking about. They are tooling marks or index marks from the shell jig at Keller. Which means 1) there is nothing that I can do about it, as it is a common occurence, or 2) Keller needs to fix the issue at their end? JLee: Still, it should NOT happen. Yes, Kellers are the standard for ply shells. Yes, some of the most famous recordings of all time, in many genres, have been made using Keller shells. You know what? Doesn't matter. If you read all the literature that Keller puts out, combined with the fact that they now sell direct (albeit in odd lots) via Ebay, etc. , it seems to me that it would be incumbent upon them to provide a mistake-free product from the get-go. Should it be ready for stain out of the gate? Well, probably not. That would be a bit much to ask. Should it be gouge free? Absolutely. In my limited experience as a drum builder, I have purchased a total of 12 Keller shells in various sizes. While, in the end result, I have been very happy with them, the fact remains that all but two (both snare shells) have had noticeable gaps that I saw fit to fill. One came to me with an inexplicable extra horizontal seam that had no real purpose. I am in a good position, geograghically, as I can always drive down to Anderson International and hand pick my shells. However, since they do not sell all lengths, this is a mixed bag. Just a suggestion - for those of you who are in the States, if you order from DSH or AmDrumparts.com SPECIFY that these shells will NOT be wrapped or painted. (Meaning the starting condition of the outside of the shell is of particular importance). I know that Andy at DSH and John Riolo at amdrumparts.com take things pretty seriously and would give a shell a once-over for this purpose if asked. Finish Becoming Cloudy sadolcourt: So the weekend was spent brushing 6 rounds of General Finishes water based acrylic onto the walnut shell. Lots of in-between coats sanding to rid the shell of dust nibs, tiny drips and wotnot. ....all has gone south. The shell is fine, but the finish is not. The acrylic is cloudy, and up close, I can see granules of some sort underneath the finish. Qjon: Just wondering about those granules you mentioned. are you sure it is granules, and not lacquer build up around tiny dust particles. Static electrisity can be a big problem if you use a wrong type of cloth for cleaning betweeen layers after fine sanding. IF that is the problem you could use a cheap air cleaning device with an ionizer (i think that is what is it called.) This forces dust particles and even smoke to the ground. sadolcourt: Some of the issue could be process, though I washed the shell with some cloths dampened with water after vacuuming to ensure I got all the dust, then vacuumed again to get off any additional dust or lint. For this water based acrylic, I avoided using a tack cloth product, they are coated with an oil based component, so I didn't want any residue from the tack cloth to cause an interaction. I also avoided using mineral spirits and denatured alcohol as cleaning solvents, similarly to eliminate any potential interaction with the water based acrylic. There are microfiber clothes available at the auto store, I might try that as a dry tack cloth. noguera: I«ve had the acrylic go cloudy on me before, while finishing stringed instruments. it always had to do with less then ideal temperatures (under 70 degrees farenheit) and high humidity content during application and initial curing. Might also be related to the interaction between the oil sealant and the water based product? sonorguy: The same granule thing happened with a walnut shell I made. I had to refinish it 3 times before I was happy with it. After I sanded down for the third time I blew it off REALLY REALLY good with compressed air and it looks great now. Don't know what caused it though. apauly1954: Yeah I'm pretty sure acrylic going cloudy &/or granular is to do with moisture. Need to get the humidity down in the painting bay somehow. sadolcourt: I live right next to this large body of water called the San Francisco Bay, so humidity is a part of life. Would constructing a "drying box" do me any good, or is the humidity trapped at the time the acrylic is applied? There is a guy on a woodworking forum who sprays Target brand water based poly on his impressive Telecaster guitars, and uses a spare closet as a drying chamber. Says he cranks the temp past 110 F using a space heater. Thoughts or opinions on making a drum drying chamber? apauly1954: I reckon you'd have a lot of success if you painted in a room/space with a couple of those small fan heaters on high for an hour or so before starting in. They really dry things out & dry, hot air is what you need. Or if you can borrow or hire one, the hot air blow dryers that the dog groomers use. Then you just have to make sure you don't sweat onto your paint job! noguera: A space heater in an enclosed space that keeps air warm and dry should do the trick! Here in Guatemala it«s humid and we have a rainy season that spans over 5 months, so unless I stop doing stuff for half the year, I have to make myself a "dry room" with a space heater and a small dehumidifier. works wonders. apauly1954: Ah yes a de-humidifier! Why didn't I think of that? We have have them in our homes in England coz it never stops bl##dy raining! noguera: I«ve had great luck with the cheapie krylon acrylic clear you can get for $2 a rattle can anywhere, it dries very hard and rarely goes cloudy, you don«t need a thick coat of it, too, and that is good for the drum. it also fills out the remaining pore in the wood nicely. can«t beat what you get for the price. pdgood: At work we have a humidity controlled room for film imaging/processing. What I learned when the de-humidifier went out and we had to scramble for emergency measures is that both an air conditioner and a heater are de-humidifiers. That seems wacky to me, but that's what the experts said. casper: If you have issues with the windshield defroster/defogger in your car actually fogging the inside of your windshield you can just turn on your a/c instead. You can even turn the heat up if it's chilly just as long as your a/c is on your windshield will effectively defog without the adverse side effects. Coco: Blowing air out of the deeper grain and tac-ragging the sanded laquer will help to prevent things like this massively as well. Rob_a: I for one can attest to the problems of temperature and humidity affecting a finish. Just sprayed the finial coat of lacquer on a mahogany stave shell, during the night the temperature dropped and the humidity went up quite a bit. The finish had spider webbed over 3/4 of the finish, it was toast. Repairing a Split in Wood Dev: Got this off a guitar builing forum... You are gonna have to think of cleating or putting a butterfly jount in the crack - that will stop it from running wild again after you glued it. You'll need some AR glue (Titebond), some ordinary household vinegar, a couple of damp cloths, and a household iron. Set the iron just to the point where a drop of water dripped on the sole plate evaporates quickly, NOT to "cotton" or "linen". This should be about 1/2-2/3 of the dial. Thin out a small amount (1/4 tsp) of AR glue with a few drops of vinegar, and using one of damp cloths, work the glue into the crack by rubbing it into the crack against the grain of the wood. Rub it in well. Next get out the other damp cloth, place it over the crack and surrounding area, and apply heat with the iron. This will cause the fibers around the crack to swell together, and also will evaporate the water from the AR glue at the same time. I'd apply the iron for a couple of minutes total, but lift it occasionally to inspect the area for a few seconds. My concerns at this point would be the crack closing and the finish on the guitar being OK. A slight bump in the edges of the crack is normal--moisture expands wood and this usually goes away in a couple of days if not quicker. After you've heated the wood for a couple of minutes, let the area cool. Don't be concerned about the AR glue getting onto the surface of the finish--it's water-soluble, will not bond to Taylor's UV varnish, and can be scraped away with a fingernail or sanded and buffed off. Sand with #1500 paper, no water, and buff with some fine polishing compound on a soft cotton cloth. I'd wait a day or two to buff, to let things stabilize. It's a good idea to cleat the back of the crack by AR gluing a thin small patch of birch, maple, or other light wood on the underside of the top, with the grain of the patch running at 90 degrees to the grain of the top. This must be clamped; hopefully you have access to a proper clamp. An uncleated crack has a chance of re-opening in future. Stabilizing Spalted Wood A product called Polycryl fortifies soft, spalted woods to make them easier to turn. http://www.preservation-solutions.com/product.php?category_id=1000&product_id=1006 |