
|
|
|
|
|
|
|
|
|
|
|
Building A Ply Drum |
|
|
Basic Description Getting Started Koko's Experiments Tom Featherstone's Step by Step Ply Building Method Internal Pressure System Basic Description This is the method most commonly used by the big drum companies. You build a mold (usually a female) that is to the size of the outside diameter. Order thin sheets of wood known as plies, glue them and place them inside the mold. Apply pressure. When dry, release the mold. Advanced builders will make their own plies from very thin sheets of laminate. The plies a beginner should build from will have several layers of laminate even though they are quite thin. Pluses: Economical Requires few special tools Once the mold is made, shells can be turned out relatively quickly and easily. If you use a female mold you can add to the thickness a little at a time, as much as you like. Easy to make a thin shell. Flexible which aids durability. Suitable for mass production. Minuses: Limited wood selection Uses more glue which some people believe affects the sound in a negative way. More likely to go out of round than stave method. Special tools required: Router (to make the mold and to cut the bearing edges) |
|
Getting Started First you'll need to decide what size shell you want to build. This will determine what size mold you build and also the thickness of plies you purchase. If you're trying to duplicate a particular drum by counting the number of plies, it's important to know that plys made by different companies are not all the same thickness. So, you may not get the result you want. To complicate matters further, some early Gretschs even had varying ply thicknesses within the same shell. Instead of counting plies, get the overall measurement of the thickness of the shell you want to make, and then check with your ply supplier to see what thicknesses they offer that will help you duplicate this. Many people find that 1.5mm is the easiest to work with. It is bendable enough to fit into a mold (female), but has enough spring that it will try to uncurl while in the mold which will help put pressure on the glue as it dries. Birch is available in this thickness from Anderson International Trading. A female mold is by far the best way to go. In addition to the way it exerts pressure as mentioned above, it also establishes the outer diameter and then you just add plies to get the shell thickness you want. Don't forget to alter the grain direction of each ply for added strength. This will help keep the drum in round. You'll find that bending against the grain is much harder than with the grain. There are two tutorials listed below. Koko's began as a trial and error experiment. He posted info as he went along - sharing ideas with others and learning and adjusting as he went. Koko is highly regarded in the drum building field as a guy who does not miss the details. The second tutorial is by Tom Featherstone, who has his method well worked out and has presented it in an easy to follow way. In the end, both use similar methods. |
|
Koko's Experiments - Building With The Ply Method This is an edited version of a popular thread on the subject of how to build drums with the ply method. It's a good idea to read it all the way to the end. We learned some things along the way. koko: As I promised in a couple of threads the past week, here is my (new to me also) method on plywood shellbuilding. Let me say first that I built 15 shells in this way the last weeks. It has been a process where I learned and still am learning. When you take a close look at the first couple a shells you can clearly see I was learning, but the last ones are okay. On the process I made quite a few notes on length of the plys. Finaly I got how to calculate for length and checked my calculations with the last 2 builds. It all seems d**n close. The mold is not 100% okay which will show, but at this moment it is the process that counts. |
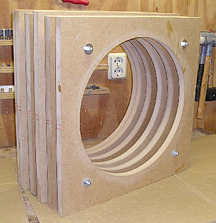
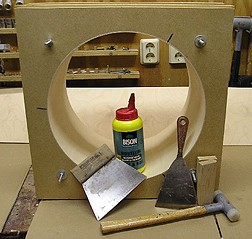
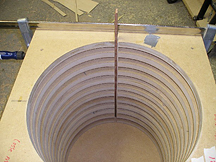
| The first picture is a simple mold built from MDF. A solid mold would have been better. |
|
|
Next picture is how you can lift the ply into place. This is 3mm plywood, pretty strong. A gentle smack with a hammer is needed if the length is 100%. |
|
|
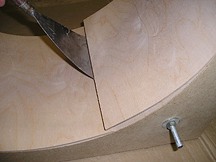
Next picture shows the ply in place, and shows it is a little too short. I did this deliberately. I needed to know the exact diameter for the calculations. I inserted a ply with known length. Inflated the mandrell and measured the gap. Then added the gaplength to the woodlength and by that you can calculate the exact diameter with Pie. The too short ply is used for the next layer, so no loss there. |
|
|
The calculations: Take the exact diameter of the mold. (Measure the way as described above. Believe me, you can't get closer). For the first (outside) layer take the mold diameter minus the thickness of your wood and multiply that by Pie. (3,14159). For the next layers take the previous diameter minus two times the thickness of your wood. Example: Mold diameter: 15 7/8". (40,32cm). 1st: 40,32 cm minus 0,3 cm = 40,02 x Pie = 125,73(= needed length) 2nd: 40,02 cm minus 0,6 cm = 39,43 x Pie = 123,87 cm 3th: 39,43 cm minus 0,6 cm = 38,83 x Pie = 121,99 cm |
|
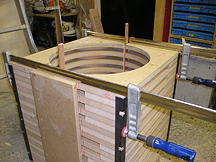
Next picture shows all the tools needed for glueing, smacking and the outside layer installed. Because of the time needed,
there are no pictures between that moment and the mandrell inflated. Basically it is: glueing, insert the first layer,
glueing and insert the last layer. Clean the edges from glue before inserting the mandrell. You might mess up the inside
of the shell with glue. You don't want that.
|
|
|
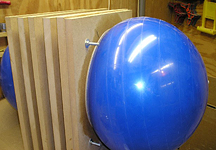
The mandrell: This was the hardest part in this process. How and where would you be able to get an inflatable mandrell
at an affordable price? This is something that hits you in the face at a moment you least expect.
This is a 15 dollar gym ball, you can get a a sportshop. It comes in different sizes, mainly 65 and 75 cm. There are
smaller and bigger ones, but those are not at the local sportshop. This is a general purpose one and can carry up to 400kg.
Specialty stores do sell similar balls for up to 1000 kg, at 40 dollar.
You have to inflate with a compressor, otherwise it won't be hard enough and takes way, way too much time.
Next thing I am after is a strong bag around the ball in a cylindrical form, that can act as an outerbycicle tire. Strong,
keeps in shape and prevents the innertube from expanding/exploding but can get rock hard.
|
|
|
I smack the shell out with a hammer and piece of wood on the edge.
|
|
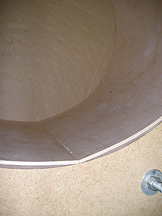
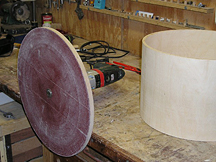
The edge is sanded with a huge mdf circle with the stuff from a beltsander glued on.
This is used to clean up the edges and to make the edge square to the shell. The drill powering it is a 5amp, strongest drill I could get and is still suffering from this. So, it works, but be gentle on the motor. (I plan to build a set up with a pully and all that, but ya know - time & money). |
|
|
Shows how I cut the shell to desired depth. The board is square up and this high to give full support while cutting. The edges then need to become bearing edges, but that is described so many times here. |
|
|
Crazy8s: If you cut the plies to the right length, you will not need pressure applied from the inside. koko: I know you are right about that, but somehow it feels better with some extra aid from the ball. It doesn't hurt and it is not much work or money. the essential pie: The Gym ball is very helpful, I would have never have thought of that. I tried using a lawnmower inner tube, but it would not fit. So far the inner pressure has been the biggest problem with my shells, so this will be a great help to me. I use a similar mold to yours but with no gaps in the walls (I have about 20 1/2" discs which I stack for the depth). I have only made two shells, using 0.6/0.7mm veneer, which is very very hard to work with because its so thin. Hopefully if i try out with some thin ply, like with your method it should be easier. Thanks for giving me some more ideas! koko: The gymball is absolutly great, every time I use it gives me the biggest grin on my face, but this weekend two of them exploded!! That was a very nice, low, quite loud kaboooosh. It is funny now, but I somehow was a bit afraid of that going to happen some day, so while inflating the shell it pointed in a safe direction where the remains can't hit me in the face or so. A strong sack or something around the ball is definitly on my list. JLee: One question - wouldn't 3mm be a very thick ply to work with? I am assuming that means the single ply is 3mm. Did you use any veneer softener or anything of the sort. It would seem that if you can make shells with this thick a pieces you are actually ahead of the game, as the well-regarded Eames shells, for example generally use four plies that are collectively as thick as a Keller six ply. koko: The birch plywood is built up from 3 layers of 1mm each. So, it is 3 mm when I buy it. A full sheet is 153 x 153 cm. By that you can saw it with or against the grain. When sawn against the grain (ending up with a vertical grain shell) you can bend it quite okay. Up to 12" shell is possible. I did not know there is a softener for wood and read about it here at the Shed. It is strong when you're after a 12" shell, but can be done. PDGood: I was surprised that you hammered your shell out of the mold rather than have a release of some sort. But that's exactly the kind of thing I was hoping to learn from this. koko: At the moment I am working on a new design for a mold. The goal is to reach a method where there is no gap, "easy" to insert the ply, and easy to release the shell. (Smacking it out is okay, but when I am after something new, why not go for the bulls eye?) The closer to 100% you get the harder it is to reach those last few % You don't need to build new molds Koko. What you have will be perfectly adequate. To make finished shells come out of the mold easy, just cut slots down the side of the mold. On the top and bottom piece of MDF just put a little bar of metal or wood across and bolt it together when the circumference is right. when you take the bars off, you will get a slight bit of extra circumference, enough so the cured shell will come right out with no probs. The only way you will get no gaps in plies is to cut them exact. Each ply needs to be custom cut to fit perfectly inside the previous ply BEFORE you put the glue on.. I highly suggest you use thinner plywood too. You can just use warm water in a sponge and wipe the ply generously and it will make bending a ton easier. Using water will also make the glue penetrate much better into the wood, making your layup stronger. koko: Hi Crazy, First thanks for your thoughts and sharing your experiences. I really apreciate it. The reason for me to seek for better, or different molds is for two reasons mainly. First and most important is to ease the inserting of the ply. A 100% accurate ply is not easy to insert. Taking it out is the second good reason for my search. Third one, important to me as well is that easy inserting and easy releasing is that if that is reached you can insert all your plys, do a dry test and see if there is a gap and gently cut the plys to 100%. Cutting a slot in the mold is exactly what I did, but on two sides (opposite to each other). The two halves now can slide back and from each other, making the insert and release easy. I took care of the wood taken off by the cut and now, if the two halves are back together the circle is perfect again. If there is a gap between the halves, the ply is too long, if there is a gap in the ply it is too short. By this method, you can try for the accurate length for the outside ply and then calculate. You are right about the thickness off my plywood, but it is what I can get at an affordable price and short distance. As soon as I have experience enough with this method I am for sure going for thinner plys. The bending is not so much a problem, but I will consider the sponge method. the_essential_pie: The problem I find with making the exact cut of each layer before the glue is added, is that when I add the glue, the wood then expands and will no longer fit as it is too big. Do you not find this a problem? For me its one of the biggest reasons my shells havent worked very well, because of trying to gauge the exact length of each ply, accounting for gluing etc. and as a result of inaccuracies in these areas I end up with gaps between layers of ply. I might add that I use 0.6mm veneer. koko: Essential, the glue is a problem for me too and am working on it. |
| With the latest experience, I went back to the mdf mold. Now I decided to cut this one open at two sides. Now I have two halves that can move outwards. I clamp the halves together with huge clamps. |
|
|
|
With the two halves moving you can easily insert the plies without the tool shown in the fourth picture, because
the circumferance is so big with the halves a bit apart. Clamping the halves together will push the plies together and
follow the mold. (Being round then). With this method I achieved three ply's 99.99% correct length. No mentionable gap between them. Eureka you'd say, but no. NO. When the plies were dry with no glue, everything was absolutly gorgeous. No gaps, perfectly matching, GOD save the queen! I really was sure the answer was found, but when glued together there was a gap, in the outside two layers and the mold was fully closed. As Essential already wrote, there is something changing when glue is applied. With the post from Jon (thanks, I owe you one) about the wood softener and a book about steambending in mind I think the reason for the gap is that the glue is acting as a softener. Softening the grains makes the wood more easy to compress and with compressing getting shorter (or better said, less stretched at the outside). Especialy because the inside layer is gapless. (The inside layer only has glue at the outside, which is stretching. The middle layer has glue at both sides and has a small gap. The outside layer only has glue on the inside and thereby crushing more easily) and has the bigger gap. The mold is fully closed and all fine. |
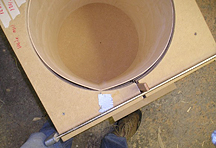
| Picture shows the mold, and the dry outside layer in place with the mold halves still apart from each other. You can see there is plenty of space, which is helpfull when getting the layers seated. No need for the tool any more. |
|
No pics from the glueing in progress, time is needed. The shell is now curing and tommorow I'm gonna take it out to see how to confirm the theory (or proove me wrong). |
|
koko: Crazy, you suggested to wet the wood with a sponge. What would you think will happen with the glue. Does it need longer curing time only or should I think of something more? Thanks. Water resistant white woodglue, Bison D2. Crazy8s: The reason I suggested the use of water on the wood right before you put the glue on, (lightly moistened btw...), is because it will help the wood to absorb the glue better and give you fewer voids because the glue will run more smoothly. I also slightly dilute the carpenters glue with water so that it goes on better, but that isn't very necessary. The reason why I suggest cutting the plies perfectly BEFORE putting glue on is because when you put the glue on it adds thickness. When you go to put the cut ply in with glue applied, the ply wants to occupy the space it would have before the glue was applied. Does that kinda make sense? I don't know if I am describing it right... When the plies are cut perfectly, the force it applies is considerable, more than enough to force out all extraneous glue. This leaves you with a very thin bond, which is exactly what you want. You will not need an internal bladder at all if you do it right. The reason why you are getting gaps is because when you put the bladder in, it exerts more force than is necessary and the only place for the wood to go is outward which is changing the circumference, giving you that troublesome gap. I recommend ditching the bladder and use clamps all around instead. With the clamps, be sure you clamp the inner seam very well because that is where you are going to have any problems. The wood needs to be thick enough that it doesn't buckle under pressure, but thin enough to be appropriately malleable. I use 3 ply plywood birch, .5mm each ply = 1.5mm per sheet. The plywood is good to use because it is cross laminated which gives you added strength. You do not need to use wood softener or anything if you work with the grain going vertically. (The inner ply will obviously be going horizontal, and it is that play that gives the strength you need.) You can also do the grain horizontally, but you will want to use something, like warm water, to soften the wood cells enough to make it flexible enough so that it doesn't fracture while you are trying to lay it up. the_essential_pie: Koko, I initially thought that when the glue is added it will soak into the wood and therefore make it expand, and in turn, when the glue dries the wood will then shrink slightly. But from your experiences this makes me think that I observed the change wrong, considering you've made a lot more shells than me. Crazy 8s, thanks for the helpful point, the 0.6mm veneer that I used, did really become the most problematic with buckling as you said, so my shells ended up with gaps not at the seams but between the plys (although this is also slightly because of me not consistently cutting the lengths either before/after gluing). The 1.5mm 3ply birch is the same spec that Highwood uses, to my understanding, and his shells seem to be problem free, so cant be going wrong there. koko: I did what you suggested, perfect length cut before adding the glue, or the bladder. It was really 99.95% accurate. All 3. Then I calculated for glue and cut 1mm of the middle layer which gives space for 0.3mm thick glue. That is way and way too much, but in this experimental space I accepted that. Then I cut 1.5mm of the inner layer, to cover for the first and second layer of glue and sneaking back a bit on the calculation. While writing realizing this is point ONE for evaluation!! The inner layer has no gap, the middle layer is small one and the outside a little bigger. Have to overthink my calculation!! The gap already was there before the bladder was inserted. The mold was perfectly home when checking. I guess that the use of a thinner plywood, as you suggested earlier, is part of the solution because the 3mm plywood (3ply, 1mm each, crosslaminated, vertical grain when shell) is of course stronger and less bendable than 1.5. I have a small piece of the 1.5 and that is bendable like a piece of paper. At this moment I'll have to do with the 3mm, it is the only thing I can get my hands on, or afford. I have not found a wood supplier that sells maple veneer in the sizes needed for shell building. I tried the clamping method, if I understand you right, but that gave me gaps and dents and even gaps between plies. I used almost all the clamps I have, over 40 on a snare shell. It made a nice picture. Discussing this helps a lot. I checked a feeler gauge for 0.3mm and it still seems a lot, but if wood is expanding like Essential suggests 0.3 is not so much. Maybe I should make plenty of space by deliberately cutting 1cm off the layer and see what that does or recalculate/evaluate with the gaps I have now. At the moment my head turns between influence from the glue on the grain, to thickness to simple miscalculation, to bladder or no bladder, and what not. If you take in consideration that the layers are aprox 1250 mm in length, the gap we are talking about is 2 mm, which makes an error from 0.16% and still it is killing me. I am not going to give in. Crazy8s: When I said perfectly cut plies, I did not mean mathematically perfect. I meant cut to fit, as in put a ply in that is longer than you need and force it to conform to the circumference and mark where the seam should go on the overlap and cut it just very slightly longer, like .5mm longer. Test fit it and make sure it perfectly conforms to the circumference. I wish I had a video camera to show you, but I don't. PDGood: I tried it Crazy8s way and had no problems. I only used a formula to get close - then I test fit each piece dry, trimming a little off at a time until I had a perfect fit. It still fit when glued up. koko: That is ok, Crazy, I get what you mean. I am getting more and more the feeling that the diffilculties are mainly caused and increased by the thickness of my wood. Took out the shell this morning. It is ok so far, except for the gap o'course. It is nice round and all that. I let it rest in my house now, see if anything changes by temperature changes and humidity and all that. Couldn't give the darn thing a rest and took my last 3 sheets out and went for it. With the first shell in hand I measured the gaps, added these to the length and without dry fitting smashed those ply's in. DENG, as far as I can see now it is very close to what I am after, no gap. Tommorow I can take the shell out to see, but so far it looks really promising. So, Crazy, you were right from the beginning, get the ply to correct length and you will be king! Sorry to be such a pain. I think that you would have to do a shell first to get those final lengths. There seems to be 3 major things to account for. The glue is acting as a grease, allowing the sheets to slide into their exact final position more easy. The glue may add some thickness, helping the inner sheets to push more outwards and by that pushing the sheets home into the mold for that last thou, also and the glue may act as a softener a bit and thereby the wood bends more easy which also makes it easier to get at final position. Evaluating the splittable mold I say that it is THE method to get your plies in way more easily and getting the shell out is of course a joke now. Especially for dry fitting and custom cutting, I think being able to split the mold is great. This is of course from a 3mm plywood users point of view. Getting the sheets in and out was a pain every time and when achieving close to 100% match even more difficult and risking of cracking the seams ends. Reading my own words back I realize that these are great words for a one experience result. By next weekend there will be time for me to build another shell and hopefully also a new 14" mold (this one is 16"). That should prove me right or wrong. I'll keep posted in both occasions. Crazy8s: You might also try using some sort of strapping system around your mold. Leave a slight amount of gap in the mold and put your first ply in. When you have the first ply in, and feel it will have no gap, crank the mold together a little bit more. This will close any gap you might have ended up with. I will say it is a ton of work to make these shells, and it is quite messy and expensive, but what you get out of it is something pretty unique. koko: I use a clamp instead of a strap, that is working fine also. If I understand you right, you are suggesting to make a mold that could go in and outwards 'till the gap in the ply is closed. But that leaves you with a shell which might not be round. If the the cut is still open the mold/shell will be bigger at 3 and 9 o-clock. If the cut is more closed than it should be, the shell will be smaller at 3 and 9 o-clock. The mold has to be perfect round when fully home. By that you have perfect shells, with a gap if you cut it too short, or the mold can not be closed fully and you will end up with a shell not round. If the mold is well thought out it should save time. I think that is what is achieved now. By more experience and giving the whole concept a thorough thinkover to see where time is lost I think it is possible to build shells in a time with which the shells would pay off without being overly expensive. tbone: If glue is changing the dimensions of some plies, would using urea resin (2 part) glue prevent that? koko: Don't know Tbone. I think that this thread is going in and out of highly theoretical assumptions and back to the ground from trial and error. I think the best of both worlds and as I have no access to prove the theory, I went back to trial and error. Great result so far and I keep notes from what I am doing and achieving and hopefully find the solutions quicker when the theory is more clear to me. I also like to keep the rough shell a bit longer. By that you can cut it into desired length without the risk of having to make the shell shorter than intended because something went wrong. Just thought of something else. As it is hard enough to cut 100% exactly square, I measure for length at bottom and at top side of the sheet. By doing so you may not be square, but angles are copied. (If one is 91degree, the other will be 89 degree. Together that is 180, exactly what you need). If you want your top and bottom to match and the seam there is only one way to go: fully and 100% square. Of course, if you are able to do so, do so, but it is freaking hard to be 100% and trust me, I am building with wood since I am 10 years (skateboard, Alva, Alpha?, to be precise) old and still it is hard for me to achieve. HighString: ...regarding gaps appearing in the plies once they are being glued up....some people suggested the glues caused a physical change (shrinkage) in the individual plies..........my experience indicates that regardless of how tight you may try to "dry fit" the plies when measuring up, etc., that once there's a glue layer between the plies, it acts as a lubricant allowing them to slide against each other for a better fit. Pickledswede: Bit off the general topic, but I had a thought when thinking about this thread earlier, if you wanted to make different sized drums would it be possible to make mdf rings to fit inside your mould, say 1 or 2" thick each, and then that changes the diameter of the mould so you can have a different sized drum, maybe using pins to hold them in place? koko: Well, to be honest, I think the idea in general is good but somehow gives me the feeling that in the end it is not realy going to work out good. There is too much possibility for play, inaccuracy and the like. Only when really, really good sized the rings will do the trick for multiple use of one mold. Why not change the process. Take large sheets of mdf and first cut a small diameter in this big sheets. When done cut new bigger circles in the sheets and repeat 'till alll the desired shells are built. You can do one kit with one set of sheets. You should thoroughly think over the cutting method but with a router and a straight bit with a bearing on top you only have to do one and copy the others. MDF is not that expensive, so consider the cost and the trouble too. Pickledswede: I thought about that option too but in the end I decided, what would happen if you wanted to build more than one set of drums? Or if your first set didn't come out well? It seems that it's a lot of wasted wood whereas the rings could be used over and over again, it probably needs a lot more thought, but I think in the end it should be possible... roundbadgeman: With the attempts to make the ply shell above, why not use a solid metal mold? Wouldn't the wooden shell slide out or be subject to being fairly easily pulled out once the glue is dry? If the interior of a metal mold is smooth, wouldn't there be very little friction to prevent you from simply pulling the wood ply shell up out of it? Or is this naive? koko: A steel mold would of course be superb, but that is something not so many people can build or afford to buy. You are referring to the male mold method and as being said earlier in the thread, it was great to use. The female mold however is my choice now. I certainly dont think it is naive, but a nice and tight shell will be a struggle to get out. |
|
McLovin: So how do you guys mate the ends of the veneer? Do you just butt them up? Cut them on a .45? Fezzasus: They are just butted up with a 90 degree cut. I believe the larger shell companies use a 45 degree cut to ensure constant contact (you can thump the top of the ply and it will meet the other end of the cut, then you just square the shell off afterwards) and they don't need to worry about accurately cutting each ply, because I'm only making a few and can take my time on each ply i prefer the less visible straight cut. Silky7483: I was wondering where everyone was getting just regular maple or birch veneer for their plys. Nothing exotic, just a nice long sheet of affordable veneer. PDGood: http://www.aitwood.com/ jeroen: I saw this pod cast where they re sawed there own veneer You need a really big band saw though. It looks doable for a 5" snare or so (but could you get it thin enough?) http://thewoodwhisperer.com/episode-...u-were-veneer/ Six-Ply: I'm pretty sure for the wide sheets necesary for bass drums the log is peeled in a manner similar to the way a vegetable peeler works. THAT'S when it get almost undoable for a DIYer....unless you have a large warehouse and $80,000 for the necesary equipment. lastchild442mac.com: I want to try to build this kind of mould too. Is it possible to have all the specs of the mould in centimeters please? koko: 1: diameter of the shell 13 7/8 " = diameter of the circles being cut out of the mdf boards. MDF boards are square and add aprox 6" to the diameter to get the measurements for the boards. 2: Height of the shell: say 6.5" plus 1/2" is height of the mold. (divide by 18mm = number of mdf boards. My mold was with gaps, I would make it solid now). Thickness of the sawblade = thickness of the little beam that goes in between the molds halves to compensate for the cut. Make 1 absolutely true board and copy all the others to that "Master" with the router!(Circles and outside!) Do spend all the effort on your master!! Screw together and THEN cut in two halves. To tease you, I made the measurements in inches. Not being an ass, but learn to calculate from inches to cm and vice versa. All drum related specs come in inches. It will come in handy to know how to do that. 1 inch = 2.54cm. Divide 2,54 by 8 (or 16, or 32 or 64....) and multiply that by 7 example: You want a so called 13" shell. Shells are 1/8 undersized to accomodate for wraps, lug gaskets or whatever. So, a so called 13" shell is actualy 12 7/8". 12 x 2.54= 30.48 cm 2.54 divided by 8 = 0.3175 cm x 7 = 2.2225. 30.48 cm + 2.2225= 32.7025 cm. you can cut that number down to 2 behind the digit, so you work with 32.70cm. Pi is not 3,14! it is 3,14159.....Calculate with that, 3.14 is NOT close enough! Six-Ply: I was assuming that each ply is one continuous sheet. I'm sure there are sonic tradeoffs to laminating in the same veneer. Are there tradeoffs that heads and tuning techniques could overcome.....maybe. I know DW Drums uses one continuous veneer for each layer in the ply. Possible one reason why they are premium priced? gheeley: No they dont mate, they joint their vertical plies just like everyone else, if you know what you're doing & what you're looking for you can see the joints. The only continuous pieces are the horizontal layers & faces, except in exotic woods which nearly always have multiple pieces book matched. Anything that involves having to layup individual pieces & do book matching takes time, and lots of it.... time = money! Six-Ply: So each layer in the ply isn't one continuous ply? Is this something that's done at the wood supplier where the veneers are made? J.Richard: When you say continuous it's creating a misunderstanding. A 3 ply shell 7" deep x 14" diameter for example has 3 layers of veneer 7" wide and approx 44" long. 2 layers the grain is running horizontally with one layer (usually the center) the grain runs vertical. The outer layers usually have an overlap for strength where the snare bed and throw usually end up. So each layer is continuous as in 1 sheet 7 x 44". Sometimes it's one piece, most times it's several pieces joined, for the center core. I'm sure there is one or two companies that can do a continuous run of veneer to cover any diameter shell, any ply width, if you find them let us all know. ∗∗∗∗∗∗∗∗∗∗∗∗∗∗∗∗∗∗∗∗∗∗∗∗∗∗∗∗∗∗∗∗∗∗∗∗∗∗∗∗∗∗∗∗∗∗∗∗∗∗∗∗∗∗∗∗∗∗∗∗∗∗∗ Tom Featherstone's Step by Step Ply Building Method Here's an excellent step-by-step tutorial of a ply build by Tom Featherstone - Email: tom@hippo1.gotadsl.co.uk The aim of this guide is not to provide competition with drum shell producing companies but to aid people with the desire to produce their own shells, and hopefully avoid issues I had when developing this method. Building the mould. You will require the following tools: • Router • Saw (or Jigsaw) • Drill • Small, thin plywood. (12" x 6", 5 or 6mm thick, that's 1/4 inch) • 1/4" Straight router bit • Bolts to mount router to plywood You will require the following materials: • Thick MDF sheet (8mm or greater, that's 1/2" inch or more) • PVA wood glue • Bendy/Neatflex MDF • 4 or 8 L brackets • Bolts, washers, nuts and wing nuts • Door hinges Bendy/Neatform MDF is known as Bendy MDF in the UK and can be bought from B&Q among others; it's known as Neatform MDF in the US and can be bought from www.rockler.com among others. The size of the thick MDF sheet depends on the size of mould being made, for example a mould capable of producing 14" x 8" shells uses 3 18" x 18" sheets. As a general rule you should have a gap no greater than 3" between stacked MDF sheets. Additionally there should be at least 2" of wood on each side of the decided diameter (so a 14" diameter mould should be made from 18 x 18" sheets of MDF) The inside of the mould will be lined with Bendy MDF, this means when calculating the diameter of the hole to be cut, the thickness of the Bendy MDF must be taken into account. It is important to keep in mind that drum shells are undersized, a typical drum described as having a 14" diameter actually has a 13-7/8" diameter shell. However, I intentionally undersize mine to 13-3/4" to ensure the apex of the bearing edge is on the flat part of the drum head rather than the edge, hopefully creating a more evenly tensioned head and purer tone. Therefore, to calculate the required diameter to cut into the thick MDF, you must take the diameter of the required drum size (in this case 13-3/4") and add 2 x the thickness of the bendy MDF. Now we must create a circle jig for the router, this will allow us to cut perfectly round circles in the MDF for our mould. The circle jig is essentially a drafting compass, where instead of drawing a circle. It cuts one. Mount the Router to one end of the plywood, this typically requires a few bolts but the number and size of bolt depends on the brand of router. |
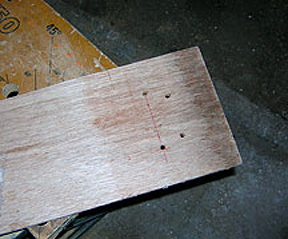 Router mounting holes drilled into plywood. |
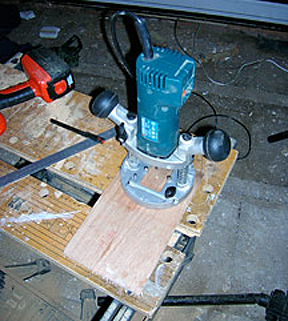 Router mounted to plywood. |
|
While mounted, use the router to cut through the plywood with the straight bit; this gives the exact position of the router bit. Now measuring from the far outside of the hole made by the router, mark half the length of the mould diameter and attach a screw at the point, this provides a pivot for the router to cut the MDF. Mark the centre of the MDF and screw the circle jig to it, ensure that there is enough movement to allow the router to move in a circle around the pivot point. |
 Centre marked on MDF sheet |
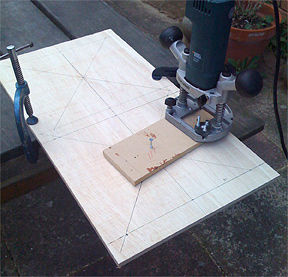 Router mounted to pivot point on MDF. |
|
Now cut away. Remember safety! Wear goggles, hand protection and a mask - routers spin very fast and are very dangerous tools, additionally the dust from MDF is carcinogenic. 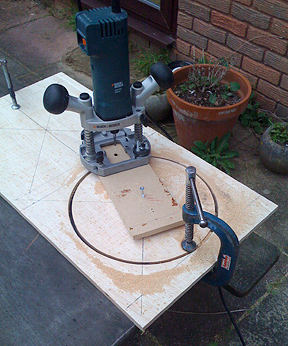 Mid-cut Now we must stack the sheets of MDF to create a mould, space each sheet by stacking squares of MDF between the sheets, gluing each one to the MDF underneath. To ensure each sheet matches the rest, I suggest placing the Bendy MDF inside the mould while the glue dries, the outwards force of the Bendy MDF will move the sheets to match up with the rest. 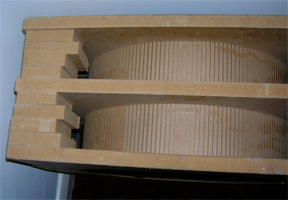 Stacking between the cut sheets of MDF Next the Bendy MDF has to be cut to fit and put inside the mould. To attach it, simply apply glue to the edge of the MDF sheets and place the Bendy MDF inside, you may need to clamp it in places. Now you have a fully working mould, however in its current form it is very difficult to get the completed shell out. Cut the mould in half, mount hinges on one side and L braces on the other to allow it to open. As for the gap created by cutting the mold, use a plywood spacer (1.2 mm - two sheets of veneer) to fill this gap. 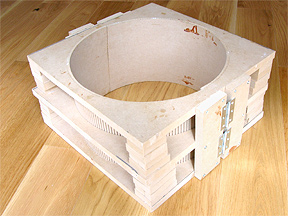 Completed mould with bolted L braces to open the shell. The hinges are on the opposite side. Building the shell. To build a drum shell, you will require the following tools: • The mould • A car inner tube, or large inflatable gym ball to provide pressure • Car tyre pump/compressor to pressurize the above. • Another sheet of Bendy MDF to put between the shell and inner tube/gym ball to spread the pressure evenly from top to bottom of the shell. • Stanley knife • Tape measure. • Flat surface • Router (mounted to router table, will show how to build a table) You will require the following materials: • Non-backed veneer • PVA glue • 80 grit sandpaper • Double sided tape The amount of veneer required depends on the size of the drum being built and thickness of the drum. Veneer is typically 0.6mm thick. eBay is a good starting place for small qualities of veneer, I would suggest that you pick a cheap wood to start with; maple, birch and oak tend to be cheaper than more exotic woods such as walnut and cherry. The veneer must not be backed with anything, which means it cannot be iron-on, felt backed, paper backed etc. Cutting each ply. Large companies such as Tama, Pearl and Yamaha use thicker plies in their drums, typically 1mm thick, most veneer tends to come in 0.6mm thickness which can be found in Keller shells, DW shells (very closely modelled on Keller) and others. The main reason for using thicker plies is to produce drum shells more quickly, for example, assuming DW and Yamaha use the same technique, Yamaha can make the same thickness shell 66% faster than DW. Some smaller companies have overcome this limitation by making 3ply sheets, then putting them in the mould. This saves time, especially if the speed of production is limited by the number of moulds, however it does make each ply much more difficult to handle and bend into the mould. It also limits how thin a drum shell can be built. For example, in a 6 ply shell, there are 4 joins created that want the wood to be straight, and only one join that is keeping the drum round, it's much more prone to go out of shape than a 6 ply shell which has every ply formed in the mould, as all 5 joins will be keeping the drum round) For now I will concentrate on forming each join in the mould, in future I may cover other techniques. Precision is the key to a good drum shell; you must cut each ply exactly to size with the Stanley knife before putting it into the mould. Be careful when cutting along the grain as the knife tries to follow the grain. You may find sharp scissors work better for some types of wood, Oak especially. The length of each ply can be worked out as follows: Ply 1 length = (diameter of mould � 2 x thickness of veneer) x Pi Ply 2 length = (diameter of mould � 4 x thickness of veneer) x Pi Ply n length = (diameter of mould � 2n x thickness of veneer) x Pi (Where n is ply number n) 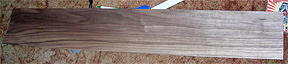 A veneer cut to size. Place the first sheet of veneer in the mould, you may need to open the mould slightly to prevent the ends of the veneer overlapping. Tighten the mould back up to ensure a snug fit between veneer and mould. When putting the second ply in, apply PVA glue to the veneer already in the mould and glue to the side of the second ply that will face the first ply. This ensures enough glue and fills any holes. Don't worry about the excess; the pressure will squeeze it out. Now put the Bendy MDF in, followed by the inner tube/ gym ball and pressurize. 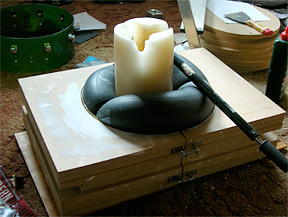 Early mould pressurized. The candle provides a centre support and ensures the force from the inner tube acts out towards the veneer. Every other ply should have a vertical grain, this makes the drum stronger and prevents the shell ripping along the grain when cut or drilled. As trees aren't wide enough for a vertical grain ply to be made from just one sheet, you must join a few together (typically 4 or 5). They are glued in the same way as above. 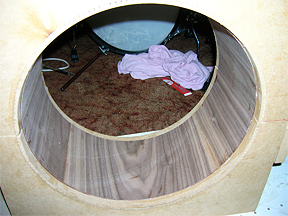 Vertical ply. Continue building up the shell until a sufficient number of plies are reached. I would suggest 8 0.6mm plies as a minimum. 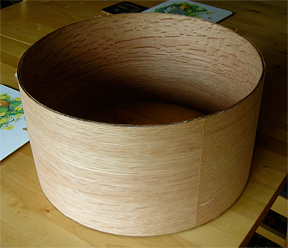 Shell taken from mould. "Squaring up" the shell Once the shell is removed from the mould, it must be 'squared up'. This can be done in two steps, the first is to take a Stanley knife and cut off the excess wood on the edges of the shell. This will make each ply level with the next. To further square off the shell, tape 80 grit sandpaper to a flat surface and spin the drum shell on it, this will level off the edges until it is completely flat. 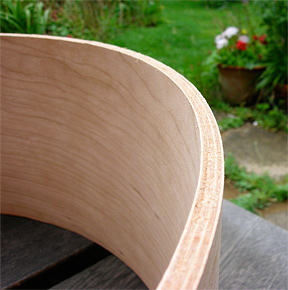 Flat edge, clearly shows ply orientation. Cutting Bearing Edges Finally, bearing edges must be cut. This can be done with a router table and 45 degree bit. If you don't have a router table, one can easily be constructed from a sheet of MDF mounted to a wooden base, the router is mounted to one end with bolts; very much like the circle jig before. They key when mounting the router to the table is to ensure all the bolts are countersunk, the top of the table should be completely flat so precise edges can be cut. When cutting edges, you should aim to leave a ply completely flat, this can then be rounded off with sandpaper afterwards. Adjust the height of the router bit accordingly. The router bit has a wheel at the top which the shell sits against, preventing the shell from being cut all the way through. |
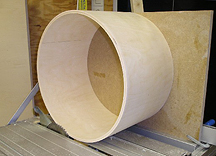
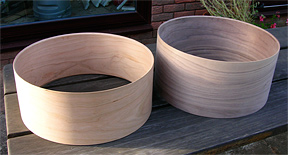 Completed shells |
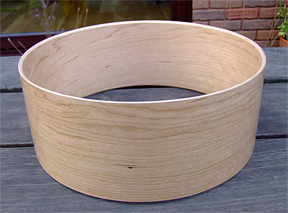 Completed shell |
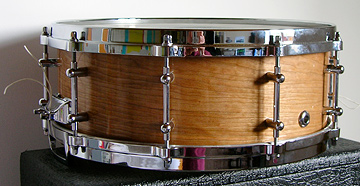 Finished drum. |
|
Internal Pressure System Most people use a simple inflatable device like a gym ball to provide internal pressure to a shell in a female mold. However, DrumShed member MtheS came up with this very impressive device: 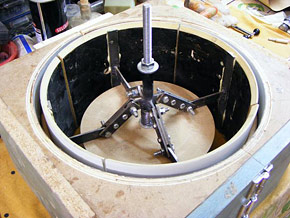
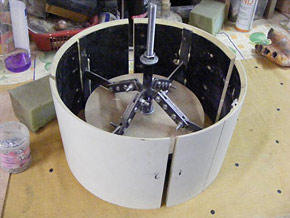
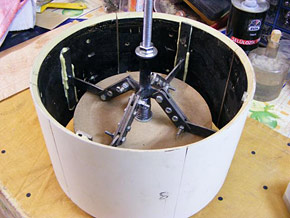 |