|
|
|
|
|
|
|
|
|
|
|
|
|
PDGood Handcrafted Drums
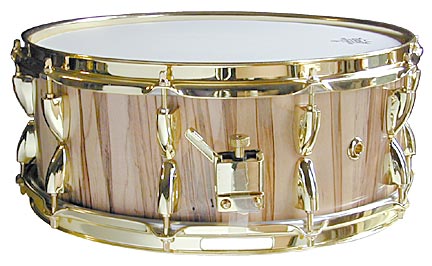
5-1/2 x 14 x 3/8" Ambrosia Maple stave snare This very unusual wood is the result of the work of the Ambrosia beetle which bores into a tree and eats the fungus, thus coloring the wood. |
|
|
Building the snare - step by step This is a quick overview. For all the details you need to build your own snare go to: |

|
|
|
Staves. The wood is Ambrosia Maple. The pluses are that it is beautiful and surprisingly inexpensive. Some of the downsides are - it isn't easy to find many good pieces and it is not nearly as hard as northern maple. The pieces were cut into staves on a table saw at 9 degree angles. |

|
Ready to glue. Several people had recommended laying strips of masking tape on a table and
then laying the staves on them, gluing them, and then sort of rolling it up. I tried this, but once
the stave circle got half way, pieces started falling off of the tape. Here's another method
using a support made out of mdf. The staves were glued and then set vertically around
the support. The metal bands (2) were already nearly in place and a quick use of the cordless screwdriver
brought all the pieces in line. The mdf supports could then be removed (by grabbing the screws).
Only a little hand adjustment was needed to get the staves to fully line up. I used Titebond II on this drum
which has held up fine over time but have since learned that Titebond III is a bit better (more moisture resistant
and withstands shock even better).
|

|
Glued shell. After the glue set for a day, I removed the bands and this was what the shell
looked like. At this point the staves are 13/16" thick because that's the thickness of the wood
planks. This would later be lathed down to 3/8". The numbers on the top of the staves indicate
the order in which they were assembled. The staves were test fit before gluing and some that
didn't fit well together were replaced by extra pieces. I found it impossible to improve on
pieces that didn't fit by sanding them.
|
|
|
Finished shell. The shell was lathed and a finish applied by
Jerry Prosise. Check out the incredible work
on his site.
I was very pleased with the finished shell. One of the nice things about Ambrosia Maple is that it looks different from every angle. |
|
|
Completed drum.
The gold hardware (actually brass) really matches the warmth of the wood. There were less lug
choices in brass though, and I wound up going with the single ended lugs. They cost more and took
twice as long to assemble, but have a nice look, I think.
This drum has good stick articulation, and a slightly higher pitch than a similar ply shell would
have due to the thickness of the staves. Plenty of volume too.
|
| A special thanks to all the folks at Dixie Graphics for their help. |
|
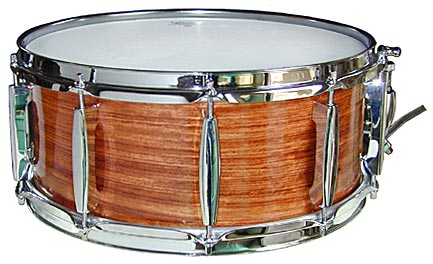
6 x 14 x 3/16" MDF/Bubinga |
listen to an mp3 file |
|
Why Does This Work? Believe it or not, this snare is made of MDF particle board with a Bubinga veneer. Rings of MDF were cut and glued together and then wood filler added to make an even surface for the veneer. Given that it's mdf and not real wood, it really should be a lousy sounding snare. I'm no chemist, but I would guess that the glue content in mdf would be very high. By all measures, this should be a lousy sounding drum, but take a listen to the audio file on this page and hear for yourself how surprising it sounds. I'll leave it to the experts to say why this is - all I know is what I hear. And for whatever reason, this is a nice sounding drum to my ears. |
|
Building the snare - step by step |

|
Raw material. This is nothing more than MDF particle board bought
from Home Depot. I cut it into 16 inch squares. The outside diameter of the drum shell needed to be
13-7/8 inches, and having a few extra inches outside that made the positioning of the router not be critical.
|

|
Routing. The routing was done on an automated CNC router. A "cut file" was made on the computer and
that was sent to the router. The router operator added the "bridges" - the small areas that connect the
piece being cut to the main board. This prevents chatter when the router is approaching the end of the cut.
Afterwards, the bridges are trimmed off with a Dremel.
|
|
|
Gluing. The rings were glued and clamped. I made two mistakes. First, I should have had a lot more
clamps. The rings lined up beautifully wherever they were clamped, but came out of align
elsewhere. Also, I should have had bigger clamps. Mine were too small to reach the full extension of the shell.
However, it was no problem to just use a few books laying on a beam on top for pressure in that direction.
|

|
Assembled. Here the rings are fully assembled. The picture doesn't show that there were
imperfections in alignment so wood filler was needed to even it all out before applying the
veneer.
|

|
Being veneered. Veneering was not as scary a process as I imagined and went very smoothly. I was
afraid the wood would crack, but I treated it first with Better Bond Super-Soft veneer softener. You're
supposed to apply a lot of pressure when you veneer which isn't possible with a curved shell, so I found
some veneer glue that activates by heat. Then all you do is iron the softened veneer pieces into place and
there's no problem. This method makes the pressure unnecessary. The one surprise I had was that the veneer
was very hard (Bubinga) and difficult to cut.
|
|
|
Finished. This was my first drum and I applied eleven coats of polyurethane and kept waiting for the grain to fill in - but it
never did. I've since learned some important technique steps. First, use sanding sealer to fill in the pores. It is essentially a
polyurethane with high solids content. And secondly, apply three coats of your finish (poly, lacquer, whatever) and then sand vigorously.
Ideally, you'd like to sand until it is completely dull (no low spots) if you can do that without going all the way through the poly. That's
why you apply three coats before sanding - so that you have something to level without touching the shell. Even for a novice, polyurethane goes on smooth and looks great. See http://pdgood.us/drumshed/finishes.html for a lot more information on finishes from people far more experienced. |
|
A special thanks to Tracy Crutcher and Jack Lane of Dixie Graphics for their help with this project.
And also thanks to Andy at http://www.DrumMaker.com/ for his help with the bearing edges. |
|
For anyone who wants to build their own snare, here are some files that may be helpful. |
Layout for 14 inch stave drum This is a pdf file with the layout of a 14 inch stave drum with 10 lugs and 20 staves. Outer and inner measurements are included. |
Female mold for 14 inch ply drum - non circular This file is a pdf to help make a female mold for constructing a 14" ply drum shell. To make it easier to release the finished shell, the mold will need to be cut in half. Since the saw blade will remove some wood this will make the circle out of round, so the file has been adjusted so that the width of the circle is 1/8" wider than it is tall. |
Female mold for 14 inch ply drum for CNC router This is an eps file set up for a CNC router to help make a female mold for constructing a 14" ply drum shell. To make it easier to release the finished shell, the mold is made in halves. The router will cut these halves separately, so there is no need to remove any wood to account for the width of the blade. The inner diameter of the circle when the halves are put together will be 13.875". |