
|
|
Drum Kit Home
Conga DrumsThe BasicsDiscussions Mike Robertson's Tutorial |

Photo courtesy of Koko |

Photo courtesy of Drums On Sale |
|
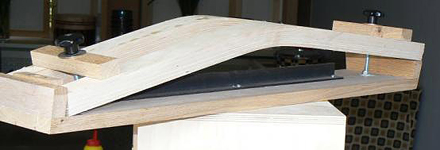
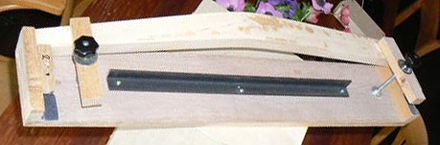
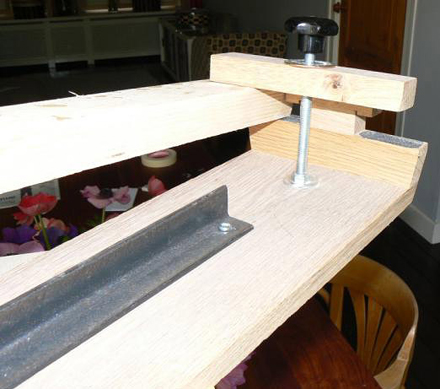
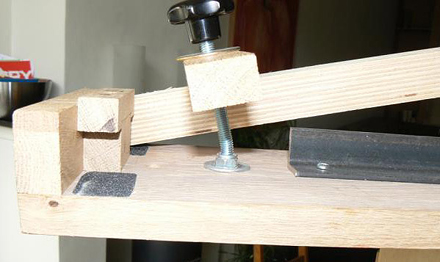
The Basics Finding information on how to build a conga on the internet has been somewhat difficult. In may be partly because many people just hand carve them so there isn't much else to tell, but the other theory is that the complex stave shape discourages most builders. After some research and lots of discussion the plans for a stave method conga are presented below. One important note: conga building is not a money saving venture. If you want to go the least expensive route, then buying one already made is your best bet. But if you're in it for the joy of building, please proceed. One other thing worth mentioning right from the start is that this method requires a table saw with a very high blade. You will need almost 5 inches of blade above the table top. Here is a basic concept: 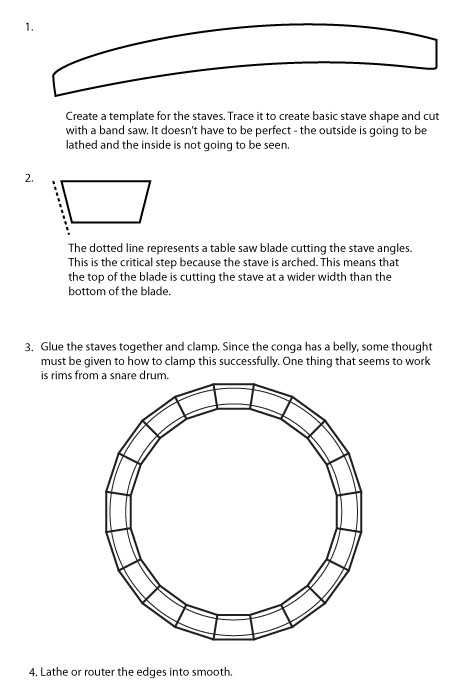 DISCUSSIONS FROM THE DRUMSHED FORUM deuce13coop: They are pretty simple creatures, congas. Aside from hardware, there really is only the shell material and shell shape. As for the hardware, I have already mentioned I would stick to the heavy duty type and the 4.0 mm rims. The shell, much like drum kits, is a matter of personal preference. They are basically either solid wood (most are Siam Oak) or fiberglass. I'm sure there are other materials out there now but most are one of these two. Being a drummer, I doubt I need to explain to you the differences (soundwise) between fiberglass and wood. But, some people may favor fiberglass over wood simply for the weight factor. Personally I like the sound of my woodies. I'll take the weight for gigs in exchange for the sound I prefer. But, again it's personal preference you may disagree. As for the shape, here is what Toca has to say about it: "Toca offers two different bowl shape congas; the 'Traditional Afro-Cuban' shape and the 'Contemporary Afro-Cuban' style bowl. Traditional Afro-Cuban bowl shape has a very sharp taper at the bottom of the shell, creating a strong bass tone in the drum. The Contemporary Afro-Cuban bowl shape has a larger belly and a much bigger hole at the bottom of the drum, producing more volume with less effort." I have the Traditional shape but volume is not an issue for me. Also there is the head choice, which much like drum sets is matter of what sound you're looking for. I play synthetic heads on my quinto and conga, and a real skin on my tumba. I like the snap and brightness the synthetic heads on those two and the warmth of the real skin on the tumba. You can always swap these out over time. rkillah1123: My question is "What/ or how do you cut the angles into a stave to make a conga? ...what i mean by that is, how do you figure the curve in the wood? J.Richard: Cutting compound tapered angles is tricky. You will want to read a LOT of info on wine barrel construction. If you can, when no one is looking, take one of the Congas apart and check out how the staves are made. This should give you an idea what's involved. You may want to try a smaller version of the same type of construction. Try making a set of Bongos to see how it goes without spending all the time and money on something that may not work for you. I've seen guys cut the angles with table saws, bandsaws and routers. I have never made an atempt at building one, it always seem less costly and less aggravating to just buy them. That's just my opinion. Casper: If you want to get a good belly on the drum (resonant chamber) then you'll also have to factor in the width variance throughout the length of the stave. 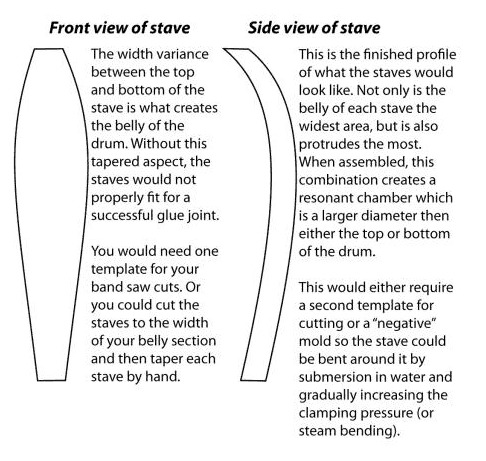 I imagine that getting this taper correct would be the hardest part. The bearing edge (head side) is a larger diameter than the base, but not as large as the belly... The most beautiful congas that I've seen have been built mostly by hand (with hand tools) with a lot of tweaking between the rough and finish phases. I think that I saw one builder use a negative mold to bend the staves around to form the contour flare for the belly profile. Clamp the stave to it and submerse it in water, wait for it to soften up some, tighten the clamps, submerse it again, etc... Makes sense, but still seems like there's something else that I'm missing though.. PDGood: I saw a video where a guy cut the staves all in one pass on a table saw. Here's the link to the video. He really doesn't explain it - just sort of zips right past that part. http://www.youtube.com/watch?v=T3hs_JVE9vo Casper: I'm willing to bet that if you played around with the angle that the stave is held in place on the template sled - you could get it to automatically taper it for you at the same time. You would have to arrange it to where the ends are closer to the blade than the center (so the stave is leaning slightly away from the blade). That would give you a tapered result, but how to calculate the amount of tilt for the stave to be at is what I'm not sure of right now. Especially since that angle has to correspond to the desired final dimensions which relates to the curvature of the initial template used to rough cut the stave in the beginning. fienddrummer: The key is his jig for the table saw!!! koko: The stave is pre-bent to a shape where the future top is tilted inwards enough to cover for its future diameter relativly to its belly diameter and so is the bottom tilted inwards enoughs to reach for its own diameter, again related to the belly. Now to the sled. The stave is resting on the belly and both ends (top and bottom) of the stave each rest on the sled, each to its own height, in relation to their future diameter and the belly. The sled itself moves, with the aid of the fence, exactly parallel to the sawblade, which is tilted INWARDS. Cutting the bevels now is doing two things at the same time. It obviously cuts the angle to the stave, but since the stave starts being cut higher up (and at that height the blade is closer to the fence, since it is tilted inwards) the blade also cuts the correct shape of the stave. Casper: I just got around to taking a second glance at the video and the stave is held into the jig parallel with the tabletop, not at some obscure angle like I originally guessed. Koko nailed it when he said that the front view profile (the fanning out for the belly width) is created automatically courtesy of the blade height/cut material relationship. Except that the blade is tilted outwards (away from the jig) instead of inwards (towards the jig). If the blade was tilted towards the jig it would actually be cutting an inverted version of what you would want. Also, the sled in the movie is a miter track based jig - he doesn't use the tablesaw's fence at all. Which is great from both safety (no possible binding between fence and blade) and repeatability (it has to run exactly the same each time since it's a fixed position) aspects. koko: Got to admit, didn't see the vid, but have seen another one. It was Fiends comment that made me sure it was this principle that was shown. Sawblade inwards or outwards is determined by the way the stave is held in the sled. |
|
|
|
|
|
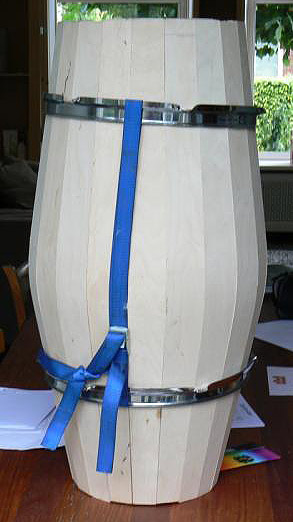
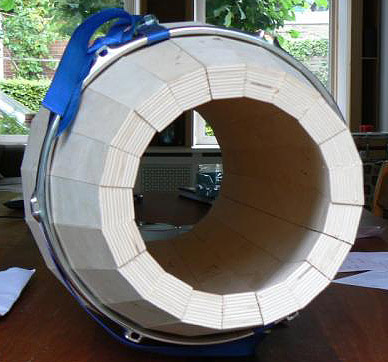
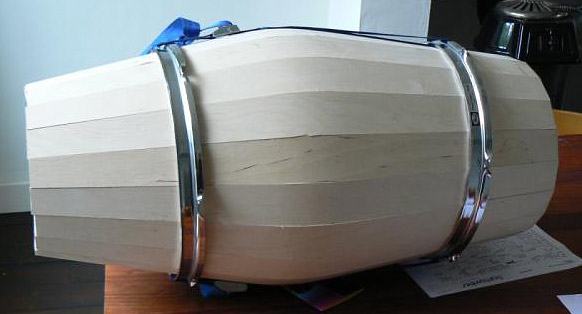
PDGood: This is great but a few questions remain. How thick are the walls of a conga? Does the blade height need to be a particular distance, or just enough to reach the widest part of the stave? Does the inside of a conga need to be turned? And the biggie - how does one go about creating a templat for the basic stave shape? (The first cut made in the video) Casper: I have two different sets of "big box" congas - my first set which is just some little LP Aspire drums and then my gigging set which are Meinl Marathon series. I measured the thickness at the bottom of each drum and had to guess a little bit since the edge guard systems prevented an exact measurement. Here's the shell thicknesses for both: Both drums are the respective Tumbas of each model. LP Aspire: 5/8" thick, 21 Staves Meinl Marathon: 7/8" thick, 24 Staves (much larger belly, much bigger sound, much more rewarding to play) Those are the finished shell thicknesses, so factor in your wiggle room waste factor and you'll have your starting thickness - I imagine 1" thick would be more than substantial. Both models have unfinished interiors and I can't remember ever seeing a conga with a turned interior. As far as the blade height; just high enough to completely cut through the widest part of the stave. To create the template I would first figure out what size drum you want to make and how many staves to use. Then decide how large of a belly you want to create and draw a rough sketch of the profile on some paper (maybe cut a brown paper grocery bag so that it opens as long as possible and use that). Once you're happy with your sketched template, cut it out and tape it onto what you want to make your real template out of, trace it and cut it out. I'm not sure if there's a "golden ratio" for the relationship between the belly size and hoop diameter. I can take some measurements and let you know what I find out once I have the rest of my Meinl drums with me if you're interested. I guess the most important thing to remember is that you can't make the belly protrude any further than what your table saw can actually cut (have to factor in the added height for the stave sled also). From there I would imagine it'd be trial and error. Koko: a.t.m. I am creating staves for a conga and am desperatly searching for a saw that has enough height to cut the stave's. I skipped the idea of a bandsaw, but maybe have to reconsider. Any other thoughts on how to cut the stave? Casper: Koko, which part of the stave cutting process are you working on? Cutting out the original shape or cutting the bevel/taper? Are you going to plan on trying to steam the wood? I would probably reconsider the band saw idea if you have one with enough height clearance. If you're going to cut the initial curved shape from a template - you could use a duplicator pin on your saw to help with accuracy, etc... What size table saw do you have - 10", 12"? sadolcourt: A quick look of specs shows a 10" table saw has a 3.25" depth of cut, a 12" has 4". Presuming a jig made with 3/4" MDF base, you're left with 2.5" / 3.25", which is the maximum outside height of the belly curve from the jig's base. Of course, with the blade angled over, the max cutting height is less. Possible you may have to invent a jig with a rocking see-saw top. As the stave is cut, the front of the stave is low, the back is high. In the middle of the cut, you rock the see-saw, so the freshly cut front of the stave is tipped higher than the back end, which is now low. Alternatively, a curved jig that is clamped to your saw's table top. The jig has an entrance and exit ramp, which match the curve of the conga stave. The only issue is how to move the wood thru the cut while keeping your fingers well clear of the blade. jeroen: just curious how much height do you need? and whats wrong with a band saw? scally: I can see that the blade height might be a problem. A bandsaw will have the reach but my cuts would be very ragged. Handplaning every stave would be a lot of careful work. koko: wwooooow, found a shed with a saw that is high enough for cutting the conga staves! This week i have to finish the staves, next week hopefully cutting!! koko: Tried my luck at a local historical shipyard. They allowed me to use their table saw and this morning I have cut the staves. This weekend some more pictures, but here is a little preview. It was roughly assembled and needs some work, but you get the picture! These are pre-formed staves by laminating, cut with the aid of a sled and a tablesaw. Once the sled was ready it was straight forward cutting, but you must stay concentrated. |
|
 |
 |
|
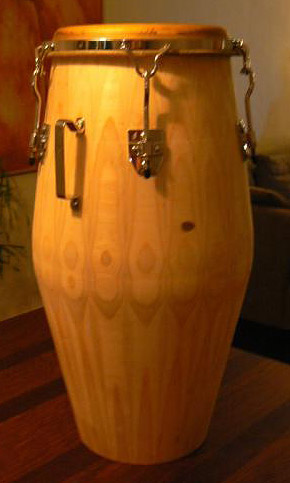
PDGood: Koko, how high was the blade of the table saw that you used? That seems to be a very important requirement to making a conga by the stave method. koko: The sawblade was 12cm (5issssh inch) and that was max I could squeese out of it. That was quite a struggle to find. You need a very very powerful machine to cut 12cm thick wood properly. (Other machines can cut that kind a wood, but don't give a decent cut). Of course with conga staves you don't cut through 12 cm thick, but you need a decent cut at that height. koko: The conga was finished and played tonight for the first time. We ripped a valje conga for the parts. (Size wise this is a quinto actually). This whole project was started a little under a year from now when I met Jeroen (not the same Jeroen we all know from his contributions up here), who is a professional percussionist. He wanted something extraordinary special and searched for a woodworker to do it. This all is in the test and experimental stage right know but all is looking (and sounding) very promising. Jeroen was very pleased with what he heard today and took the conga (quinto) with him home for a real test ride. He will be recorded somewhere in October and hopefully I get a few soundbites for you guys too. We tested it on a concrete, a wood and a carpet floor together with a conga and tumba. (Both Valje) They made a good pair and mine sounded true and tone/colorful. All in all a real success for a first offender. This conga is different from others since it's built up with plywood laminated, it is way thicker and a little shorter. It is a test ride all the way. When we are done with it, I think it has seen all kinds a shapes and configurations. |
 |