
|
|
|
|
|
|
|
|
|
WOOD RIMS |
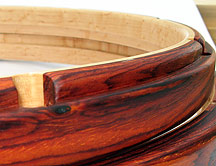
Hoops by stellardrum |
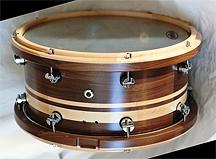
Drum by Unix |
|
How To Build Them neotim: Ok, so I wanna build wood hoops for my kit from walnut. It's for my stave kit which I'm almost finished with, so I'm familiar with building stave shells. I haven't found much info on techniques for building segment drums, especially segment hoops. So, I've been brainstorming, and I want to get your input on how I plan to go about building them. First, for each drum, I will build a stave with horizontal grain (glued at the end grain). I will use 1.5" thick wood pieces and make it tall enough for two hoops (plus extra for sanding, cutting, etc). Second, after the shell is dried, I will cut it into six slices about 1/2" thick... each hoop will be three equal layers combined to be 7/8" after sanding. I'll have to build a tall 90 degree fence on the table saw to do this. I will get the slices drum sanded to remove table saw marks. Third, I take the three slices and glue them together for each hoop, arranging them to that the joints overlap. After the glue dries, I'll get them drum sanded again to make them flat. Fourth, I'll throw it on my Koko jig to make 'em round, cut the head notch, lug holes, etc. So, has anyone tried to build a segment hoop this way? I don't know for sure if this will work or not, but it makes sense to me. sadolcourt: For slicing objects on the tablesaw as you describe, you'll want to make a very secure jig, something like a big tenoning jig, and not rely only on a taller fence. I wouldn't suggest to pass the ring through the blade in the same manner as a flat board. I've sliced a shell before using a Japanese pull saw and a hand plane to clean up. Consider a non-electric solution, it'll take you about 15 minutes of cutting and cleaning up. Meinl_aa recently posted a picture of a finger joint, you'll need a bit similar to that to ensure that there is some long grain contact when butt joining (end grain to end grain). The extra glue surface and long grain contact will make a better glue up. I'm attracted to using a router based circle jig for this. A router attached to a flat arm and anchored at a center point would be accurate enough. It's easy to attach the ring to an MDF base table during cutting, put screws in the tension rod holes to secure it. A straight bit will do the cutting and shaping, and a round over bit will put a nice fair on the edges. The straight bit could also be used to plane the ring flat. koko: Until step 3 I am with you and it is exactly how I would do it. I highly respect Seth's (sadolcourt's) input on every thing he writes, but this time I have to tell I do it like you described. A large fence, securely tightened and kept square. I used to do it like Seth. I MUST WARN you however, you are putting yourself in danger, because the handling of the shell requires full attention and to hold it your fingers are on the same path as the sawblade is. BE CAREFUL. Keep the blade as low as possible. If you can't lower your blade go Seth's route! (A japanese saw cuts while you pulling, instead of when you push, an important detail). Make the initial rings a bit wider at first. It is not possible to cut them of the shell neatly. You want to do a second run when small. I use a large disc to sand them 100% flat again. To round the hoops I wouldn't throw them in my jig, I would make an mdf of the like ring, in the sizes you are after. Attach the future hoop to the ring, copy the ring inside and outside with a straight bit with bearing on top. (Bearing touches the mdf ring) Leave the hoop to the ring until both sides are done! neotim: You're right that cutting the slices on the table saw will be somewhat dangerous. I'd use a fingerboard close to the blade to keep the shell against the fence. My fence will be one half of my "Koko jig", which I have squared to the table saw and is 26" tall, so I think that'll work. Also, I love your idea about the straight bit with the router. I never thought of that, but you're right... that would be so much easier than using the jig! Of course, I suppose that I could round out the full shell on my "Koko jig" before I slice it up. That might make slicing it easier. But then I'd have to make mdf disk templates as well, so it's probably easier to use the straight bearing bit later. Sound of Wood Rims theNew: While we are at it.....what are the sound qualities of wood hoops??? redlettertext: Wood hoops cut down on high frequencies (actually they just don't add them like metal hoops do). If you take a drum with metal hoops and put wood ones on (or even just one wood hoop like I did on my snare with a test wood hoop I made) then you can notice less high pitched ring from the drum. |
|
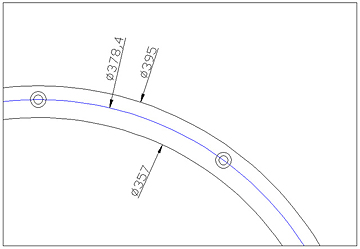
Measurements For Wood Rims cola1218: I'm building wood hoop for a 14" snare. I copied this from yamaha DINAHOOP & Pearl diecast hoop, but I want someone to check this.. is this correct? 14" wood hoop - Inner diameter : 357 mm - Outer diameter : 395 mm - Hole to hole diameter : about 378 mm - Hoop height : 30 mm And I'll drill 6mm diameter for rod and 10mm dia for rod-head. |
|
|
koko: NO experience with wood hoops, but ill give it a decent go. Diameters: I would choose the hoop-inside diameter as wide as the outside diameter of the shell and add a mm or 2 max. I would cut the bearing sleeve for the head only 1 or 2 mm wider as the ringsize and as deep as the ring. Outside diameter should be big enough to make the hoop strong enough to carry the pressure from the tensionrods. Somewhere between a cm extra outside the tensionrods. The placement of the tensionrod holes should come from the lugs as positioned on your shell. The tension rods need to go down paralel to the shell, so this diameter should be measured or calculated with the lugs in place. Mark the drilling points by dividing the hoop in 8 or 10 or ?? (number off lugs) stellardrum: If you have your shell and lugs in hand the answers are sitting before your eyes....try making a wood hoop that fits all and you will become prematurely bald like me. Mic: I never made one for 14", but for 12". My measurments were: 331 hole-to-hole, inside 311, outside 351. If I would make it for 14" my hole-to-hole would be 381. If you have undersized shells and you don't want to use thick gaskets, maybe you measurments are ok. fubar1217: I would listen to Jody from Stellar as it is his business making wood hoops. Build the snare if it isn't built yet and make the hoops according to that snare. Measure the actual outer diameter of the shell after it's finished. The inner diameter of the hoop should be 1 or 2 mm bigger than the outer diameter of the shell (at least with metal hoops it's like that). Then insert a tension rod in one lug, then another in the opposite lug. Measure from tension rod to tension rod and you will have the diameter for the holes on the hoop. cola1218: Just now I got to know that I did not consider the shell out-diameter and the height of lug hole center. Normally 14" out-dia is 353 mm, and lug center height is 0.5 inch.(right?) koko: Out diam. for the shell entirely depends on the builder, wrap or paint etc. Take your shell, measure this shell and you know what you need to know. Then take your lugs, measure these and you will be fine. Best bet is to attach the lugs, measure from two opposite lugs and you're shure you got the right diameter, as Fubar already said. As Jody, from Stellardrums said, take the stuff you gott, place it and take a close look and all the answers are there. rookiebuilder: I recently bought some wooden hoops from Odery in Brazil. They're made of Imbuia wood and they are supposed to go on my yamaha akira jimbo snare (which already has wood hoops). Well, the odery hoops are much deeper than the stock Yamaha's and that prevents the strainer from switching back and forth. The strainer arm gets to about 70 degrees and bumps into the hoop. (It's an overhead style switch like the die-cast strainers on DSH.) What would be the best solution for this problem? Should I: a) Try to find a new strainer that would fit that hole pattern and not get near the hoops? b) Cut an indentation into the hoop so the strainer arm can pass? CSpencer: I wouldn't cut into the hoops .. I haven't seen the hoops, but since they're Odery I bet they're stunning. I'll bet you can find a strainer that will fit the same holes as the yamaha. Or, you can put a piece of wood under the strainer to raise it off the shell enough to clear the hoops. rookiebuilder: The strainer arm is only bumping into the hoop a little bit... I mean that if it was just a little farther away from the drum, it would clear the hoop! All i had to do was bend the arm out just about an 1/8 in! No harm done to the hoops or the strainer! By the way, thanks to brian of Detroit customs! Without him, the hoops would still be sitting on my bedroom floor! I couldn't find vinyl washers to fit the odery holes but he hooked me up and they fit perfectly! Jomammma: I'm doing a natural wood finish on all wood hoops including 6", 8", 10", 12" and 14" toms and a 20" kick. And I was wondering...how many coats of tung oil on the hoops? I put nine coats on the shells, should I put nine on the wood hoops? rhjanes: 9??? wow. Ok, I guess if you were sanding. Fomby's recomends no more than 5 (But, they are not sanding either). I just get on enough top coat to be able to protect the wood, and have some to wet sand and polish if going for the gloss. On wood rims, every rim shot (and I'm not a hard hitter) on my Yamaha hoops, leaves a small compression mark. So, I'd stick with tung, as it "gives", unlike lacquer.
|