
|
|
|
|
|
|
|
|
|
Building An Acrylic Drum |
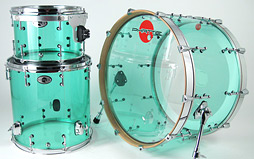
Drum by Phattie Drums |
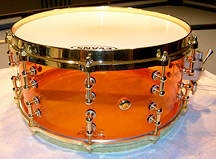
Drum by cuscorbeil |
|
Basic Description Making Your Own Acrylic Shell Repairing Acrylic Seams Drill Bits for Acrylic Cutting Edges Cutting Acrylic Shells Removing Scratches On Acrylic Filling Holes In Acrylic Acrylic Rims Venting An Acrylic Drum The Sound Of An Acrylic Drum RCI vs Gold-N-Times Octobons - Pipe vs Tube Basic Description Most people (if not all people) buy the acrylic shell and then assemble the drum with the hardware of their choice. If there is someone other than a major manufacturer who has successfully formed their own acrylic shell, I haven't found them yet. Ready on for details. Pluses: The visual effect is #1. They look very different and are eye-catching. Minuses: Building the shell itself is beyond the ability of virtually any small time builder. Acrylic shells are not so much popular for their sound as for their appearance. DISCUSSIONS FROM THE DRUMSHED FORUM: Making Your Own Acrylic Shell drummerdude: I was wondering has anyone ever made their own acrylic drum shells?? By heating and bending flat acrylic. Is this possible? What about the seam?? What kind of glue? Also what about using plexiglass??? Would that work? ijdrum: I think the main problem is heating the acrylic evenly. If you don't do this...then the shell will be of different molecular makeups. I say to try it...and let us know how it works. As for the seam...you'll need to use a super strong epoxy. I've seen some that actually "melt" the acrylic/plastic together. moosryan: A lot of people have wanted to do it, but no one has pulled thru yet. ************************************************ one_beat: I want to build an acrylic snare with my dad. We have access to lots of tools and stuff, but we don't really have much idea on stuff like joining the shell and what to mould it around and I just wondered if there were any people out there who could help. I dont know much about drum building and this would be my first project, I would like to build a 13"x5.5/6" Snare. The Mank: As this would be your first build I would suggest buying a pre made acrylic or even a wood shell. Even though it would be great to make your own acrylic shell, it would be tough to come anywhere near the standard of one made by GNT (Gold-N-Times); also I would think that heating and bending acrylic could be pretty hazardous if you didn't know what you where doing. one_beat: Yesterday we went to try and find an acrlic sheet in the right kind of size for our project. The store only had 4mm so we didn't buy it (waiting for some 6mm). We went home and started work on something to mould the acrylic around to get it round. We made basically an MDF stave shell, 8 staves and this morning/afternoon we are going to turn the outside to be round. By the way, this is going to be made in 1/4" acrylic, hopefully. gheeley: Good luck with the acrylic mate, I've been in your shoes mate. Can I ask how do you intend to bend the acrylic? I have tried it and could not achieve a consistant bend due to uneaven heating & if I heated too much we got bubbles. It's far easier to just buy the acrylics in my experience. one_beat: But then it wouldn't be as exciting, buying a shell and strapping some hardware onto it. Thanks for the heating advice. We plan to use a heat gun and do it gradually. Lou Rolls: I can tell you, sign writers/makers use Acrylic and stock most colors. They will sell you some - if not, the yellow pages will give you a supplier. You need to heat the whole sheet in one go. A heat gun will not work - it may, i just dont think it will as you're more likely to crack the acrylic. A Gas oven or electric oven, will work. I bent my sheet in a normal home oven - it was along time ago though. one_beat: We've tried bending it today and we got bubbles. We're gonna lower the oven temperature and do it in 4 pieces. That's the biggest we can get in the oven conveniently.  WKZ: Well I think an acrylic shell with bubbles in it would be pretty cool... maybe not structual, but cool. one_beat: I think it would also but, the bubbles weren't all over it. They probably would have ruined the chance of getting decent edges, though we tried doing the edges 1st, but it wasn't gonna work so we cut it off square again. ************************************************ xamanex: Hello friendly, I wanted to ask some questions on the acrylic material, I have a piece of this material in my house, the thickness of the same is of 5 mm. Ok my question is: How I can give circular form to the acrylic? Because it is a flat plate what one is that the acrylic one knits with chloroform? I have a mold of 10" for a drum, but not as to give form to the material ..... I would think that this is obtained with heat If some of you have conducted some similar operation with this material, would be so amiable as to respond? J.Richard: If I understand you. You want to make a drum shell out of a flat piece of acrylic you have? You would NOT be able to do this in a safe manner, safe for you or the acrylic. If you want an acrylic shell it will be better if you order one from a manufacturer. koko: Heat it in a oven, can't remember temperature. It will slight gently in place. You need a mold to shape it in. You might want to heat it, wrap it around a mold and let it cool down. Artists get those funny shapes the same way. ************************************************ gheeley: Here is acopy of some of the thread from drum wrap & drum maker (www.drummaker.com) i dont think people will mind me pating it here as it might be interesting. Don't directly heat acrylic or similar materials with a direct flame. It will bobble & burn. I did some thermo forming with acrylic at college & what you need to heat it evenly, heated elements strips or similar would work, that's what is used to bend angles in plastics etc.. but you want level heat over the whole surface. You also need a jig as when its heated its is very flimsy. You would probalble need a cylinder mounted on a horizontal bar, the cylinder needs to be the exact size - the thickness of your shell material. When your acrylic or plexiglass is heated, transfer it via a large flat tray from your heat source to the cylinder. Lay it onto the cylinder so it flops over it (kind of like a rug over the line to dry) then as it's slowly cooling rotate the cylinder via the bar so that the remaining material slowly bends around the circumferance of the cylinder. Timing is everything in this, you need to get it on to the cylinder & cool enough to let it stay put but not too much that the remaining material won't bend under its own weight. I have seen plastic fabricators use this method to form tubes, the other method is to do exactly half a shell at a time in two pieces, then glue together. There are adhesives available if used correctly that will leave almost invisible seams in plastic. Hope this gives you an insight to why people do not try this often. P.S About a heat source, there used to be a small company in the UK called ricochet, one man company making acrylic drums, he used an old pizza oven to warm the sheets to bendable temperatures. Be carefull though & always contact the manufacturer about thermoforming & heat tolerances, we don't want people killed from fires, fumes or explosions etc.. Repairing Acrylic Seams Silky7483: I just bought an amazing set of acrylic shells right here on the forum, and I've got a seam to repair on a 10" tom. It looks like the small piece of acrylic used to join the edges together has cracked and has chipped off all over the place, leaving a perfect seam. I was planning on using some thick Weld-On to repair it directly at the seam, but I was wondering how I could remove the rest of the broken overlap inner seam? I've read that when these things are put together, they are usually chemically welded, so I can't really pry it up. Can I use a dremmel to sand/chip at it? Is there any kind of solvent or method anyone has used for a situation like this? rhjanes: Yeah, to remove the split, chips, I'd vote dremmel with a sanding wheel on it. koko: I vote against dremel with disc. You easily burn the acrylic, get scratches at the inside which will show. I say, get yourself to an expert. Acrylic is used on many occasions, try an art forum if no one here shows up. Silky7483:  koko: The picture sure made it more clear to me. With this kind a color (I assumed your shell to be clear colored, eeuuhh you know "see through") the dremel might do the trick. From the picture, it looks like a (sort of) crack and both edges a mirror image to each other. In that case, I would glue and leave the chips as they are. Remember the better the match at the seam the stronger the joint. So, I would not fuzz with the crack. Glueing is a way of chemically welding. Did you try contacting the manufacturer? They should be able to tell you what to do. Silky7483: I got them used right here on DrumShed, so manufacturer is out. The edges seem to match up pretty well, so I got myself a tube of really thick Weld-On (#16 I think...) I just figured I'd try to chip away that busted seam and maybe even use a small strip of acrylic to recreate it. I figure I can go at it with the dremmel and not worry about it too much. I suppose that since the little parts of the seam are bonded chemically now that there's no solvent or anything that would weaken it...and that even if it worked it'd probably eat through the actual shell. Silky7483 My Weld-on #16 came the other day and I bonded it overnight. I thought about taking a pic...but as I had hoped, it worked perfectly, so theres really nothing to show! haha The seam feels extremely secure (although I'm not going to start bashing on it just to test) and I'd say it almost feels more solid than the shells with the tab-overlap seams. I'm very content. It was a quick and easy fix! Drill Bits for Acrylic xborder88: Can you drill the holes in acrylic drums the same way you drill holes in normal wood shells or do you need a special bit of some kind? ...gach: unibit XxStoryOfTheUseDxX: What he said. (A) normal bit can cause cracks which will eventually grow. Chippy569: What's the difference between a unibit and a standard wood bit? -Brian-: |
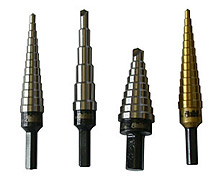
Unibits |
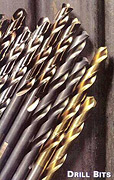
Drill bits |
|
************************************************ skunka: I'm going to build an acrylic snare drum. I wanted to know what the best drill bit to use for acrylic was. Since I am drilling an amber acrylic drum, there is VERY small margin for error because you can see almost every part of the drum. koko: For acrylic you can get bits with a slightly different cutting angle. Most important is to slow down the RPM on your drill a bit (Too fast rpm will give burned holes) and use a drill stand to prevent the drill bit from getting an uncontrollable grip and digging itself in. See if you can run a test and gain some experience. skunka: Thanks, I asked my uncle (drummer and builder) he said that I should use a brad point drill bit. skaman: Some say brad point, but many say to use a uni bit for acrylic. This is by far the most popular advice I have read and it has worked well for me in the past. I've drilled acrylic with a brad point before too and it worked out, but the unibit just slices so cleanly. OPFOR: Make that two votes for the unibit solution. They work great on all types of material - including metal! A little pricey compared to other bits, but well worth the expense when it comes to clean cutting. fubar1217: I use the brad point for more precise hole positioning, then open it up with a uni-bit. ************************************************ moosryan: What speed do I need out of a drill to drill a Gold-N-Times shell? PhattieD: For Gold-N-Times shells, I usually hover around 3000 rpms. Use a very sharp bit and it will literally melt through the shell, leaves a very clean & smooth hole that will be less prone to cracking in the long run. Cutting Edges Mike: Anyone have any experience cutting acrylic shells down? pdgood: This is all second hand information - I've read about two different approaches. One is to just go slow so that you don't melt the shell with the heat/friction of the saw. I've heard others say that if you can find that middle speed just where it's about to melt then it sort of heals the cut as you go. I have no personal experience with either method. If you have scraps you can test the theories. Silky7483: Cutting the edges was only messy in that once they get cut, it forms what can best be described as plastic snowflakes. These 'snowflakes' as I call them cling to EVERYTHING in the immediate area. I set a totally average speed and had no trouble. I think if it were so fast that the friction started melting the shell, you'd have trouble, and that if it was too slow, you'd get lots of marks. I might have had an unusually fine time doing it though. I was really worried at first, but they cut like butter. disinformation: I use my aluminum cutting saw as it has a negative rake and so does not try and kick back so much and secondly has no set eg: the teeth are all in line so only the thicknes of a tooth is lost. The cut is very clean but you must be ultra careful and wear full face and hand protection just in case. Edges can be cleaned up with wet and dry. Cutting Acrylic Shells zkeys: I am looking to trim some fat off a 6" clear acrylic octoban shell. It is a piece of extruded acrylic 1/8" thick that I picked up off of ebay. The problem is that it does not sit flat on its edges. Sit it on the table and it wobbles. So bascially, I am thinking about using my 12" mitre saw to cut a little off the end of the tube in order to get a flat surface. Does anybody have any suggestions for saw blades, or should I abandon the idea? The blade on my mitre saw now is a 32 or 36 tooth blade but I am thinking that if I go up to an 80 or 100 tooth I would be ok. Anybody? fienddrummer: Have you tried plane sanding it first? I would start there. 80 grit two-sided taped to a flat surface. This is just if you're trying to get the wobble out of them. I have no idea as to cutting them to length. I would bet that there are blades made for just doing that....there are blades for everything else! AndyGTC: I cut acrylic with a hacksaw. That way I can go slowly, not put any pressure on the tube and get a nice clean cut. I then sand the edges smooth. Acrylic is very brittle so I don't use anything but a hand saw. Removing Scratches On Acrylic drummerdude: I located an acrylic shell at a local drum shop. Completely stripped. I am considering buying it and cutting it down to make a piccolo snare. The only thing is the shell is loaded with scratches. Is there any way to get rid of these?? gheeley: You can wet N dry acrylic but have to go through every possible grit up to 2000 + then you would have to polish. I would not try this unless you have a buffing machine!!! Unless you have arms of steel. Enraged Panda: Go to a plastic store. There is plastic polish called "Novus" that comes in bottles 1, 2 and 3. 3 is for heavy scatches, 2 is for medium, and 1 is for shine. Buy all three and go from 3 to 1 and you'll have a nice looking shell. Filling Holes In Acrylic gonado: Hi. I just bought a Tama octoban, but it doesn't have the bracket, so I thought to put a new 1 but the new 1 only has 2 holes (original bracket was 3 hoes). So here is the question - how could I cover that extra hole? I was think (of) melting some plastic and covering it and then sand and repaint. koko: "Plug" it with a bolt and some nice nuts or just leave it. Melting and the like are most likely to cause more harm and attract the eye to it, instead of masking the extra hole. gonado: Thanx, maybe I could convert it into an air vent or something like that. gonado: I just found an acrylic repair kit so I can use it then sand it and repaint the entire octoban. Acrylic Rims I am lucky in the respect that I run a c&c router at my work. I was planning to use it to make a set (of rims) out of 1" thick clear acrylic stock I have lying around the shop. I'm afraid that if I use acrylic that it will crack when I do my first rimshot. I'm gonna make a top hoop first just to see, and then try my luck at the snare side if it works. The reason I'm posting this is because I was wondering if anyone has tried something similar to this. Roo: I think you're prolly right about them cracking. I think the combination of the force from the tension rods and aggressive playing would prolly render them useless pretty quick. Would make for a killer display model drum though. WillB311: Sonors x-ray kit has polycarbonate (i think) bass hoops, but that's on the bass which isn't getting abused as much. asddrummer: Yeah I think ray at GnT said they won't work because of the tension and that'd prolly snap them just right there. Then give it a few hits from a stick and they're shattered. But realistically, I think you could pull off bass drum hoops out of it. dtothaizzlej: As far as stress goes, I was thinking of making them as beefy as possible. I was planning on making them a full inch thick as well as a full inch deep. Then I was gonna slightly round all the edges and polish the whole thing on a buffing wheel. I am even considering cutting the recess for the head ring using a round nose bit so that I can eliminate sharp edges as much as possible. That would take away many crack prone areas. I am gonna make the top hoop this weekend even if it is just an experiment. I hope to have some results soon. adrock: I would even go thicker than an inch. Try 1 1/4". Most regular wooden hoops are about this thick. disinformation: I have tried this out, we do have a set, I will dig them out and post a pic when I get a moment. Ours are manufactured from 25mm sheet polycarbonate which is the only thing we have found works. Acrylic is far too brittle - it will crack when you tension it let alone doing rimshots on it. The polycarbonate is extremely resiliant and will last a long time. It's not quite as clear as the acrylic but it's not really an issue. dtothaizzlej: I'm sorry it took this long for me to get back to you with results. I fortunately had no problems making the hoops, but I definitely wish I had used lexan instead. The hoop I made cracked before I even got it tuned. I can't wait till I can get my hands on some more stonger or at least crack resistant material. My fantasy material would have to be brass, especialy with a cast drum. The maker of the router I use brags that it can be used to machine brass but I haven't had the chance to work with that yet. It just sucks the acrylic didn't work out, the effect on a clear drum would have been badass. Venting An Acrylic Drum AndyGTC: Would you vent an acrylic snare? The reason I ask, is that I'll soon be putting together my own snare from an acrylic shell. Now, it's quite a deep shell, 6.5" or 7" (can't remember which) and I'm concerned I'm not going to get the 'crack' I like from my snare sound rather than a deep more 'rounded' sound that larger / deeper shells tend to produce. I'm thinking of some large (ish) vents maybe 2, maybe 4, evenly spaced around the shell which I think will allow me to get nearer that sound that I'm after. However (and I know a few people here are dead against this style of venting) am I under a misconception here and should I even be attempting it in the first place given, once it's done there's no going back?! disinformation: Ok, First things first, assemble the drum and try it, don't vent it before you have played it complete as even though it may be the same as the next acrylic you never know the sound you are going to get with a certain combination of heads and tensioning etc so start with that. If it is not the sound you are looking for then maybe start with a standard 1/2" vent or a few single 1/8" holes in line with the t rods at the bottom end to keep the shell looking tidy. Remember it's an awful lot more difficult to fill those holes up once they are drilled so what ever you decide to do go carefully and take it step by step. This is what I do with the acrylics we do unless someone is adament they want a swiss cheese snare for the look !!!!! (Seriously we get it all the time - I like the look of the vented snare with 4" vents :s). I am sure many others have their own view on this but this is my personal approach. Woodrow: I experimented with venting and didn't like it. I suggest one vent first by the butt plate, then add a second (only if needed) by the strainer. If that doesn't work... quit! It won't get better! Vents don't make a drum better as far as I have found in my experience. Enraged Panda: From what I've played..you have to have a lot of mass (shell thickness) in order for vents to sound good. asddrummer: I just used my unibit and went as deep as it would go. I put a hole in between each lug - sounds awsome now. BadgerDrums: How do you do this without melting, burning the acrylic? how do you polish the vents after you drill and sand them? Would you use a forstner or a hole saw? shiloh: There are bits designed for boring holes in acrylic. Go to your local glass shop and ask - regular bits may cause hair line fractures around the holes, check into this before prceeding. The Sound Of An Acrylic Drum herrmann: I'm looking into purchasing an acrylic snare, but I'm wondering about how it will sound. What sound differences exist between wood and acrylic snares? drummerdude: Acrylic is louder. Kanbasher: Not nessesarily. Guerilla Drum Making: Yeah...it isn't necessarily louder. But I can say that under a microphone (studio recordings), they don't sound the best... they aren't as diverse as wood drums. Tempus: There are different formulations in acrylic shells, as there are in the wood realm, so you can expect minor variations even between acrylic brands, but the essential differences between wood and acrylic will be a harder, edgier and more attack-based sound from the latter. It's worth stressing, though, that increased volume is by no means a given. max: I used one for the first time this weekend. I was surprised at how versitle it was. It had a warmer sound than metal and was very full range dynamically. It cut through the mix very nicely (I listened while a friend sat in) I really liked the rim shots on it. Sort of a cross between metal and wood. Nice rim clicks too. ************************************************ ryan: ....if somebody could, could they describe the differences between Maple shells and Acrylic shells? LoodVig: Acrylics are LOUD! IMO they're not exactly pleasant sounding but they look cool as hell. the_essential_pie: Punchy is definitely a word I would use, low on overtones, quite deep/dark in tone (but depends how you tune them i guess). I quite liked the sound of them, plus they do look cool. fubar1217: Acrylic shells are very focused. Almost too focused for me. Acoustically, they sound almost dead, but it could be the bearing edges on the drums I have. Pretty much a round edge with maybe 1 or 2 mm of contact with the head. To my ears, it makes the rack tom sound very muffled, but it's perfect for floor toms and kick. My 18x22 kick has an EMAD batter head, an EQ1 batter as the resonant side and nothing else inside and it's VERY punchy. Mic'd up, I'm told the kit sounds really good. Count Of Monte Cristo: I personally think they are kind of dead sounding but if you cut dual 45"s on it it will have more tone. RCI vs Gold-N-Times beef: What is the difference between RCI and Gold-n-Times acrylic shells? fubar1217: As far as I know, Gold N Times has a reinforcement at the joint whereas the RCI shells don't. Don't know about thicknesses though. I know the Gold N Times shells are about 1/4" thick. skaman: RCI is also 1/4 inch. Sonorlite: I thought they offered 2 different thicknesses, now? skaman: 1/4 inch or the "snare" 1/2 shells Mike: RCI offers more than 2 thicknesses. They offer many. You have to email for pricing though. Try looking at leecustom.com. They have other thicknesses. daggerdrums: A GNT shell is a (sterling plastics shell) Ludwig uses them. They also have (as mention above) a support tab. They use a high bond acrylic glue. RCI has some sort seam welding process, no tab is needed. Octobons - Pipe vs. Tubes A few people have made their own Octobons by purchasing pipe or tubing. For anyone considering this, it's helpful to know that pipe and tubing are not the same thing. Pipes are made for carrying gasses or fluids so the inside diameter is the critical measurement. Thus they are sold by their inside diameter (ID) size along with the wall thickness. To complicate things, pipes are rated by the "schedule" number, so a schedule 40 pipe does not have the same ID as a schedule 80 pipe. The schedule list is arbitrary and does not follow any known mathematical formula. So the long story short is - measure it yourself - don't just buy pipe by looking at the shelf label. Tubing is far simpler. It is used for structural purposes and so the outside diameter (OD) is the critical measurement. The wall thickness will vary due to the amount of strength needed to support weight. |