
|
|
|
|
|
|
|
|
|
|
|
MEASURING Shell Diameter Sequence Lug Positioning Around the Drum Lug Position From Bearing Edge Lug Hole Diameter Tension Rod Length Tube Lug Size Golden Ratio |
|
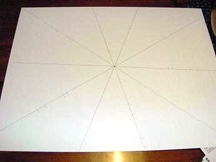
Shell Diameter MarkleyCustom: Standard drumshell OD (outside diameter) in USA is always .125" (an eighth inch) smaller diameter than the stated drum size. 14" snare = 13.875 OD 13" snare = 12.875 OD etc... Sequence There are varying opinions on the sequence that should be followed for drilling, edging and finishing. It's not a matter of right or wrong, it's a preference. The most common sequence is: Finish Cut bearing edges / snare beds Drill The thinking is - you should finish the shell before drilling the holes for hardware to avoid drips and messes caused by the holes collecting the finishing materials. And most people will cut the bearing edges before drilling because the edge making process could have a problem and you might have to go a bit further than expected on one end. If the holes were already drilled, this would put them off center. But as I said, it is a matter of preference. Read on... DISCUSSIONS FROM THE DRUMSHED FORUM. JLee: I always finish first, then drill. I have found that, with the proper precautions (and using a unibit) I can control the bit wandering, tearout, etc. On the other hand, no amount of care using dowels to plug the holes seems to keep just a minute amount of finish from seeping into areas I don't want it to go. meinl_aa: Hi-Gloss and Sparkle finish will be done before drilling, bed and edge. But for Oil and hand rubbed (traditional finish) will be done in the final process. sadolcourt: I recently re-finished a cherry shell using rattle can lacquer, and I covered the drill holes with smiley face stickers that were slightly bigger than the holes. The results were very good. gabbagabbahey: I'm about to start my drum building project. I'm trying to build a snare drum and tom tom (both 14"). My question is : Do I have to drill the shell to install the lugs before or after I cut the bearing edges - or does it matter? The steps I'm following are: I build the shell using plywood. Then I cut it (desired depth). Then? Drill the holes or bearing edges first? an_original_name: I would cut the edges first and then drill holes for hardware. If you drill holes first you might find that the holes aren't quite centered once you've finished because you cut slightly more off one end than the other when cutting the edges. Also I would put whatever finish you're using on before you drill holes and cut edges, that way you wont get any paint or whatever leaking through the holes and making a mess of the inside of the shell. steveprimatic: I'm still relatively new to the whole building thing (5 drums), but I prefer to drill all holes first, then do bearing edges, then do snare bed. I use a tool to cut the lug holes that registers on the rim of the drum. It just seems easier when the rim is wide then if it has the bearing edge bevel. I do the finish last. I really haven't had an issue with finish leaking into the inside. JLee: I am no expert, but I would recommend doing the edges first. All too often, people over router the edges and end up having to "chase the cut" they want. This results in a shorter shell, if only minimally. Start routering off enough of the shell and eventually your lug holes are closer to the edge of the shell than you had at first intended. Kanbasher: Do the finish work first, then the edges, snare beds & drilling in that order. painter213: Do your finish work first then true up your shell and then drill and then cut your edges. This is my order. Anyway you do it, it does not matter as long as you do your finish work first. Just do it the best way that works for you. I like my way, but that might not be best for someone else. jeroen: I am in the process of making a 12 stave snare. I thought it might be a good idea to round the shell a little, then drill all the holes next, finish rounding, and (then) the inside. I thought it might have a better result because you can eliminate tear out (if any) from the drilling process. Might this be a good idea or is it unnecessary complicating things? sadolcourt: It would theoretically be fine to drill before rounding, as long as the bearing edges are co-planer to each other, and the stave / segment joints are perpendicular to the edges. As long as this relationship is maintained, there is no problem. However, ya never know if you'll have some sort of catch or other issue where the shell might have to be cut shorter to eliminate a problem. Shortening a predrilled shell means one of three things - 1) patching the holes and re-drilling or 2) some sort of work-around, e.g. taking off an equal amount on the other edge to maintain symmetry or buying custom lugs, or 3) just living with the mistake and being Eeyore depressed about it. Finally, finishing the shell is much easier when it has no drill holes. Holes permit the finish to run through to the inside of the shell. Holes also accumulate wet finish, which then causes drips. Ugly. My method of work is to drill after rounding. Using a brad point bit and a piece of wood to "back up" the exit point of the drill bit, chip-out is minimized, and any tiny chip out is covered by the lug screw's washer. Lug Positioning Around the Drum brad: I use a dressmakers ruler. One of thoes flexable ones. Its like a plastic strap. Measure the circumference and divide by the number of lugs your using. Tape the shell where the lugs will sit. Use a square to draw a line to the other end of the shell,mark the lug hole spacing,double check,drill. Simple and quick. The measuring tape cost me $2. Editor's Note: (I've lost track of who wrote the following two posts, but they are too good not to include here. Apologies to the authors.) Post#1: Just put a head on and sit your hoop on top of that... hold it down and mark below each ear - directly in the center. Should get your very close for lugs with swivel inserts and hoops with oval holes. Tube lugs, for example, will require a more accurate layout. Post#2: It is a simple thing to do; no need to waste money on some very expensive layout mat that some other site sells. All I used, on four different drums, was a flexible, non-stretching, tailor's rule to mark the locations of the lugs around the shell. Then a carpenters square to line them up. It just takes very basic arithmetic. (And one should have some math skills to be able to build drums.) Measure the shell with the rule, preferably to the 32nd of an inch. Divide by the number of lugs, and voila! For tube lugs, just measure as accurately as you can and make sure shell and square are...well, square. Chances are, if the tube lugs don't line up well, the mistake will be in your drilling, not the measuring and marking. To me, this is the easiest part of the job. I laugh when I see the price of that "drum layout mat". And my way is actually harder than what Andy suggests. If you go with the flexible tailor's rule, make sure you have one that is metric. I've gotten more accurate results with metric. If you are a professional builder, and building a lot of drums, then the mat would make sense as it would be quicker than measuring each shell. And a professional should invest in his equipment. There is also a cooks sheet or something that bakeries use for making cakes... You can find those cake layout sheets at Michaels or Hobby Lobby (craft stores) they come in a set with some other cake thingys. ijdrum: What I'll do is get some poster board and find the exact middle of it. Draw a vertical line...then take my ever trusty cumpas...and mark off for every line from there. If it's an 8 lug drum...then I know that each line has to be 45 degree apart from eachother. By doing this...I'll also get the layout for a 4 lug drum. I have a different one for every different number of lugs. It's similar to Woody's...but all on different boards. Here are my calculations: |
|
4 lug drum - 90 degree between each line 6 lug drum - 60 degree between each line 8 lug drum - 45 degree between each line 10 lug drum - 36 degree between each line 12 lug drum - 30 degree between each line |
 |
|
After you get your lines marked...take a ruler and mark each diameter on every line. So marking for a 12" drum...you'll mark 6" on
the line from the center. I do every line so when I place the shell on the template...I'll get a more accurate placement.
Crazy8s: I use a tailor's tape measure and wrap it around the shell tightly, dividing the resulting number by the number of lugs. This hasn't failed me yet. StellarDrum: $8.99 (cake divider) http://www.candylandcrafts.com/press_sets.htm fienddrummer: The ole' cake divider. I have one of those too!!! StellarDrum: Use your cake template mounted to some plywood, and run the lines out far enough for the bigger drums and your good to go. tbone: I bought the one from DrumFoundy.com & it's awesome. I know I could've saved some $$ on a cake divider, but this one's much nicer, color coded for number of lugs, is marked for snare beds, and buying it supports a WORTHY BUSINESS!! Sometimes it's not always what you paid! PDGood: I tried the template method and although it does work, I just was never comfortable with the process of converting horizontal lines to vertical accurately. Plus it requires a fair amount of totally flat space to work with. I switched to the tape measure method and found (for me) it was easier to be accurate. You can even do it with the drum in your lap where you can really eyeball it closely. A big plus for this method is that you will be able to tell easily if the shell is not exactly the same measurement around in different places. For instance, the center may be slightly different than the top or bottom. I'd also suggest double checking your measurements - no matter which method you use. After marking my lug positions, I take an index card or thin piece of poster board and mark on it the distance between the first and second lug marks. Then using the index card like a tiny ruler I hold it up to second and third lug marks. Then the third and fourth. So on....all around the shell. It's amazing how if you're off even the width of a pencil mark in one place, it can affect things all the way around. I used to worry about this a lot and re-measure and make my marks again many times until I came to the realization that there is a huge amount of play in the lug holes in the hoops. So it wasn't nearly as big a deal as I was making it out to be. I guess the moral of the story is - most any method will work. koko: Every word you said is true, PD! steveprimatic: I wrap the shell with adding machine paper tape, mark the overlap, then unroll it and measure it. I then divide by 10 and use a CAD program to print out boxes with that measurement. I can get 2 to a length of paper. I tape 5 of them together and wrap it around the shell. If the ends meet, I know I have accurately divided the shell. I agree with PD in that all the play of the lug and rim holes allow adjustment, but I just try to be as accurate as possible from the beginning. p^3: I'm working on a drum template layout for marking lug positions (and other attachments) on the shell and I want to get it right the first time. This is similar to pin_drummer's layout. See the image for a quadrant of the layout. The layout is an E size plot (34 x 44) and Kinkos will plot it for $12. Here is a list of drum sizes and lug counts that I've marked off on the template DrumDiameter/ Number of Lugs 6 / 4 8 / 4 10 / 6 8 12 / 6 8 13 / 6 8 10 14 / 8 10 15 / 8 10 16 / 8 18 / 8 20 / 8 9 10 22 / 8 9 10 11 12 24 / 12 26 / 12 28 / 12 14 I have angle tickmarks every 2.5 degrees, in case I need to add a line for something particular (after I get it plotted). (This explanation is more for me... I'm a noob!) Maybe I'll remember to do this since I wrote it down! The way this will work is you sit the shell on the plot, get it aligned with the appropriate "diameter" boundary and possibly with the wrap seam, or other specific wood traits you are trying to show (or hide). Clamp it down and then use a square to mark lines at each "lug count" line. Ie, lug lines are marked with 4, 6, 8, 10, 12. If you are putting 10 lugs on the shell then at every "10" line align the square to this mark and then mark the shell. Here's the pdf file: http://www.thinkpeak.com/p3drums/tem...uttemplate.pdf fienddrummer: I've been using this template for some time now...it's great! OPFOR: I've been using this template without any problems for a couple of years. Jarick: So if I bring this file in to say a Kinko's, could they print it out properly? Do they need any info to get it on the paper? fienddrummer: it's an "E" size plotter print....the local copy shop here quoted me $12 for a copy of the one I already have printed. Jarick, You should be albe to take the file to Kinko's and the should be able to print it. Lug Position From Bearing Edge dummydrummy: There's lots of information on lug placement for the various number of lugs on a drum and I did a search before I'm shot but what determines the distance you place the lug from the bearing edge? I couldn't find anything on here. I have a Modern Drummer drum building article saying to use 1 inch distance between the top of the lug and the bearing but it seems to be an estimate. Anyone point me in the right direction? gheeley: we use 1.5" (to the first mounting hole centre) as a general rule on most cast lugs, 2.5" on bass drums fubar1217: I would say it depends on the length of tension rod you're going to use. With the Ego well rounded lugs I have, there's a very specific length from where the threads in the lug start to where you bottom out the tension rod so you have to be very careful with tension rod length and lug position. If you're unsure, take a head and the hoop and place it on the shell, then put a tension rod in and thread one or two turns into the lug. You'll see where the lug will end up on the shell. I usually mark there, then move the lug up about a centimeter to account for variances in the head collars from different manufacturers. Mike H: Originally Posted by dummydrummy ...saying to use 1 inch distance between the top of the lug and the bearing... Whoa! Too Close! Suspension mounts won't fit! You can use node points: depth x 0.225 8" x .225 = 1.8" 9" x .225 = 2.025" 10" x .225 = 2.25" (din't even need the calculator for that one!) 12" x .225 = 2.475" 14" x .225 = 3.15" 16" x .225 = 3.6" P.S. this really only works on single point lugs. You can put them all at a fixed distance Like Gareth said, but I like the space to vary proportional to the depth. jriolo: (for toms) We use a 42mm tension rods and that puts it at 2-1/4" approximately to allow for isolation mounts. Have all parts on hand before you mark and drill! Lug Hole Diameter haggardpat: As I started taking off the lugs to seal the insides of the shells I noticed the holes were very tight to the lug. It almost won't go in. Should I drill out the hole a tad bigger so the lug will go in easily but not have any slop? They are 1'' tubes on a glass glitter wrap. -Brain-: I'd say get a rat-tail files and widen the holes a tiny bit at a time until the lugs fit perfectly. ijdrum: Figure out what size the hole is...then go get yourself a brand new bit that is the next size bigger. Don't get something they have because what you need is out...get exactly what you need. haggardpat: I drilled them out next bigger and it worked awesome. Tension Rod Length meinl_aa: I'm making my first custom snare. I have trouble about LUG parameter. Refer picture below, would you please suggest about: 1. "A" value's standardization 2. "B" value : my snare's depth is 5.5 inches. 3. What size (length) of tension rod? (relate with B value) Thank you very much for all suggestion. 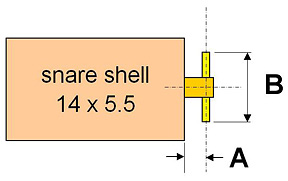
jay mac: Your depth is fine, a snare can be any depth you like really. Regarding the t-rods you can use what ever size t-rods you like too. They start from about 35mm ranging to about 105mm or there abouts. Once you have put your lugs on the shell, place a head and a hoop over it, and use a few differen size t-rods to work out which ones work and which ones don't. There are better methods then that, but it's easy. For a 5.5 depth shell, I would think but all depending your lugs you would be wanting either 45mm, or 55mm t-rod. dimperdoo: For B, there's not a standard value - double ended lugs vary in spread based on the depth of shell/length of T-rod. For the most part, your tension hoops will nest to where the bottom of the T-rod's head is about 1/4" towards the lug (figure 1/2" for top and bottom combined) I have a drum foundry, double end, single point LUG and it's about 2-1/4" end to end (your dimension B) With that lug you need to make up 2-3/4" with T-rods - so half that = 1-3/8" - You'd need 1-1/2" at least - probably 1-5/8" to thread 1/4" into the Lug. You have a little play here. say, 1-3/4" T-rods would probably fit as well? I believe, maybe someone else could chime in, that the T-rod is measured from the base of the head - not overall length? Tube Lug Size BreakerBoyDrums: Does anyone have the correct tube lug sizes/lengths that correlate with shell depth? I'm looking to use some on a 7 inch snare but I have no idea what size to pick up. Kanbasher: Generally what we do is take the depth of the shell and subtract by 2.5" and that would give you the length tube. So, on a 7" deep shell you would go with a 4.5" tube (or thereabouts). You can find something close to that lug wise that's out there or we can make you up a set of lugs. (At Allstar Drumworks). Golden Ratio Monday317: The Golden Ratio tends to occur in nature, and though its use in drum kit design might be questionable, it's worth considering. The Golden Ratio is the square root of five plus one, then divided by two, or 1.618. For my own use, I like to apply it to a five-piece kit: The middle tom has the Golden Ratio applied. The higher tom(s) simply use the same depth, which balances their sound projection, and eases their positioning on the kit. The floor tom remains square for the percussive effect. On a typical jazz kit, 10/12/14/20, the 12" tom would be 7.416" (12 x the inverse of the Golden Ratio, or .618 [call it 7-7/16", with just a little extra sanding on the bearing edges. I don't think 1/32" here or there is going to make a huge difference. You could go metric with 7" 11mm and get a little closer, if you want to be anal.]) The 10" tom would have the same depth, again 7-7/16". This gives you balanced hanging toms, with about 1/2" less depth than what we now call "standard", and that extra room over your bass drum can be real handy! I love the look, and now the middle tom doesn't overpower the smaller tom, giving the kit a more balanced sound. Going up to a standard rock kit, I like to have my middle tom between the high and floor in diameter, so I play a 10/13/16/22 kit. My 13" Golden Ratio tom comes right in at 8", so my 10 x 8" tom is already a standard size. Over the 22" bass drum, it gives me a more comfortable feel than 9 or 10" deep toms do. A Bonham-size basher kit might be 12/14/16/18/26. Now my 14" Golden Ratio tom would be 8-21/32" deep as would my 12" tom. Again, the floor would be square, or close to it. I might use an 18 x 16" floor with a 16 x 16" floor to balance the two. "Why not make a completely Golden Ratio kit?", you might ask. I answer, "No reason why not, go buy yourself some Keller shells and try it. let us know what you think...". I suspect that such a kit would sound fine, but maybe a little flat since all the drums have the same proportions. The aforementioned jazz kit is now 10 x 6-3/8"; 12 x 7-7/16"; 14 x 8-21/32 floor (more likely hanging) tom, and a 20 x 12-3/8" bass. A recording engineer might love them (especially in birch) as they'd be more reliant on EQ and easier to "voice" than the typically proportioned kit. I dunno. jriolo: The drums I've heard sound great, I think you need good tuning and heads rather than any golden theories. PDGood: Monday, for those of us who are naive about this ratio, where else does it exist in the world of sound? Monday317: Oof... you might as well have asked about how does vibration figure in musical instruments! Let me give you this to look over: From Wikipidia: In mathematics and the arts, two quantities are in the golden ratio if the ratio between the sum of those quantities and the larger one is the same as the ratio between the larger one and the smaller. The golden ratio is an irrational mathematical constant, approximately 1.6180339887.[1] At least since the Renaissance, many artists and architects have proportioned their works to approximate the golden ratio-especially in the form of the golden rectangle, in which the ratio of the longer side to the shorter is the golden ratio-believing this proportion to be aesthetically pleasing. Mathematicians have studied the golden ratio because of its unique and interesting properties. The golden ratio is also apparent in the organization of the sections in the music of Debussy's Image, Reflections in Water, in which "the sequence of keys is marked out by the intervals 34, 21, 13 and 8, and the main climax sits at the phi position."[3 3] The musicologist Roy Howat has observed that the formal boundaries of La Mer correspond exactly to the golden section.[34] Trezise finds the intrinsic evidence "remarkable," but cautions that no written or reported evidence suggests that Debussy consciously sought such proportions.[35] Also, many works of Chopin, mainly Etudes (studies) and Nocturnes, are formally based on the golden ratio. This results in the biggest climax of both musical expression and technical difficulty after about 2/3 of the piece.[citation needed] Pearl Drums positions the air vents on its Masters Premium models based on the golden ratio. The company claims that this arrangement improves bass response and has applied for a patent on this innovation.[36] In the opinion of author Leon Harkleroad, "Some of the most misguided attempts to link music and mathematics have involved Fibonacci numbers and the related golden ratio."[37] sadolcourt: I've done the number play, like you have, and come to this conclusion about a standard drum set configuration: 10 x 8 to 12 x 9 = Golden Ratio 12 x 9 to 13 x 10 = a bit narrow. 13 x 10 to 14 x 14 = Golden Ratio 14 x 14 to 16 x 16 = durn near Golden Ratio 14 x 6.5 snare and 12 x 9 = Golden Ratio. 14 x 14 to 18 x 14 kick = durn near Golden Ratio 18 x 16 tom to 20 x 20 kick = durn near Golden Ratio Generally, I'd say a normal drum set's dimensions are already Golden Ratio certified. Whether "power" config or "jazz" config, the toms' height dimensions seem to change only an inch or so from standard, making it about a 10 percent deviation. Hardware suppliers For information on where to purchase lugs, rims, and other hardware, see the Supplier's page on this site. |