
|
|
Drum Kit Home
DundunThe BasicsSize Construction The Heads Rings Finishing Scally's Big Dundun |
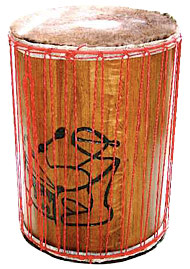
Photo courtesy of Robert Towler |
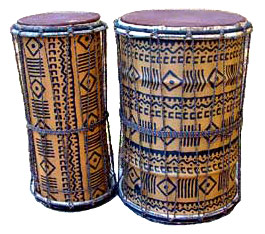
Photo courtesy of Rhythm Konnections |
|
|
|
The Basics The Dunun, also known as a dundun or djun-djun is a west African bass drum. It comes in many sizes - each with its own name. Some are: kenkeni (smallest), sangban (medium) and doundounba (largest) Size scally: As I have been experimenting I have used different timbers and different width boards. The small drum, Kenkeni was made with 30 narrow 35mm wide boards. Here are mine: Kenkeni Diameter 25cm (10") X Length 50cm (20") Sangban Diameter 34cm (13.5") X Length 60cm (24") Dununba Diameter 42cm (16.5") X Length 76cm (34") Plenty of dunduns are shorter than mine. I don't understand soundwaves well enough to be able to work out the optimal length. My simple mind would to have the length twice the diameter. The Golden rule would say Length at 1.6 times the diameter. Most dunduns that I have seem would fall within this range. Construction Scally: Everything is shaped by hand. Generally starting with a plane or spokeshave, then sanding down through the grits. The shell is finished with coconut oil so the drums can continue to breathe. I usually cut the staves longer than the final drum length. It is a pain trying to cut the ends to length and parallel and straight. (A later post) While I was routing the shell, it occurred to me that I could put a small straight bit in the router and rout 3/4s of the way through the shell. It sounds like it would be simple enough and give a straight and parallel edge. I could finish the cut with a saw once I took it out of the jig. koko: I use a straight 10 or 12 mm bit and make several passes. procyon: I also build Douns and I trim mine to length by attaching a piece of aluminium flashing about 15 cm wide and 1.5 times the circumference of the drum to the interior of the shell with short sheet metal screws. This gives me a surface that is 90 degrees to the axis of the drum that I can use as a reference. I have a 10 cm high rip fence on the table saw and I slid the drum and metal flashing setup along the fence and then rotate the drum by hand. This makes a good cut on the first edge and then the flashing is removed to cut the second end. I just did a 35 cm (14")by 70 cm (28") doun and this method worked quite well. scally: I think I understand. The metal extends beyond the rough rim of the shell. So you have a good straight edge to run against the fence. (From a later post after building the Koko jig.) So far I have run four duns through the jig and the finish from the router bit is improving. It is much easier to rotate the smaller drum shells and they end up with a better routed finish. Then I sand them in the jig with a Rotex working from 50 grit down to 240 grit. This gets rid of the routing marks and give a smooth finish. I got a mate to rotate one of the dununbas while I routed the inside. It was slow work - the shell is 600mm long. We stopped once the stave steps were gone and left the rough routed finish. If I could work out how to slowly rotate the big shells I think I could get a good finish. The Heads Scally: Dunduns are even worse than djembes because you have to get the skins and rings on both ends of the drums at the same time. Last weekend a mate and I put skins on a big dundun - 850mm Long X 570mm diameter. It took a full cow skin and over 2 hours. fienddrummer: My mentor Tom Harris down in Douglasville, GA came up with the pulling rig....one of his buddies David Strohour from Earthshaking Music in Atlanta came up with the rope pull (or Magic Wand). Tom made my Wand for me. I've got the plans for it if you're interested. Or you can buy one here: http://www.earthshakingmusic.com/EM-MAGWND.html I've only built a few Dununs....and they are a pain in the arse!!! You get the top head in place and mess up the bottom! ARGH!!! I have a set that I built. The Sangban and the Kenkini came out great but I still need to repair the dununba, I cracked a seam while trying to seat the heads. Rings Scally: I finally finished welding the rings and have the tape and rope loops on them all. The rings are a bit tighter than I planned. It might be a struggle getting the skin on the small dun. The rings are all welded, wrapped in cloth and rope loops tied on. So they are ready for the skins. Finishing Scally: A light Danish oil finish has been applied inside and outside of the shells to protect the carving and the timber. |
|
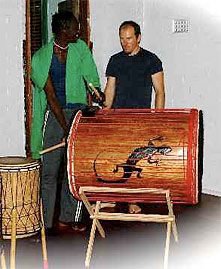
Scally's Big Dundun Scally: After finishing my set of dunduns the talk turned to a Big Dundun. Some suggested using a 44 gallon drum but I am a wood worker. Dimensions - approximate those of a 44 gallon drum. Diameter 570mm X Length 870mm 32 Blackbutt boards ~ 120mm x 19mm. West two part epoxy glue. It was a challenge getting all the big staves together. I used a ply disc inside each end to help. Several band clamps and ropes. Again lots of work with #40 grit on an angle grinder, then Rotex to #120 and finish with ROS #240. |
|
|
The Drummer figure looks like a freehand sketch. I carved it with a carbide burr in a die grinder. Then painted the recess with Black Japan. My Gecko lizard was carved with a mill burr, cleaned up with a dremel sanding disc. Also painted with Black Japan. Black Japan is probably a local product. It has been around for a long time and used to restore the black trim comoon on some colonial houses. http://www.feastwatson.com.au/WoodstainsBlackJapan.asp They call it an Oil based stain. I think it has an estapol base even though they recommend applying sealing coats. It is semi transparent but a few coats gives a really deep black. I also mix it with other stains when I want to darken them. The mahogany colour on the drum is a mix of a bought stain and black japan. The bought stain was too pink/red for what I wanted. The white Blackbutt was stained with a mixture so it would match the other drums. Finish was three coats of a tung oil - estapol mix. It took a full cow skin and over 50m rope to put it together. The skin is dry now. I trimmed the excess skin and shaved a bare patch in the centre of the skins. The skin was tightened by gently tightening the 50m rope. I made my own rope puller. A test for my limited welding skills. It is a good lever and with the cleat makes it easier to get a good grip on the ropes. |