|
|
|
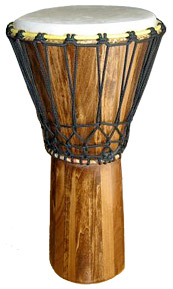
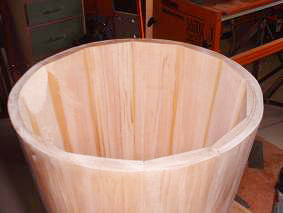
The Basics michael_watkins: They are built stave fashion, but in two pieces and then joined. Edit: I should say, they CAN be built stave. obviously, not all are. Other tips- Calculate the stave widths normally, one for the top and one for the bottom of each section. Remember, there is a taper on both pieces. This means a compound angle on the table saw. Turning will be a challenge because they will want to wobble due to the inside not having any material removed- slow speed if you lathe it. You can use a router with a template and flush trim bit (bearing on top) to cut the rabbets where the two sections join. ssmith2416: I just finished my first Djembe shell. The top half is 12 in diam head and 6.5 inch diam bottom which becomes the middle of the drum. The bottom half of the Djembe is 6.5 in diam top (which joins with the bottom of the other half) and an 8 inch diam bottom. The Glenn Huxtable Method Traditional African drums are made of a solid piece of timber, hollowed out, and carved into the final drum shape. The drums described in these pages are constructed of staves of wood, glued together to form the rough drum shape, then the outside is shaped to a more Ępleasing finish. They are not a traditional design, however they are styled after African Djembe and Ashiko drums. These drums are made from 12 (or you could use 16, 18 etc) wooden staves that are tapered to give the slightly conical shape of the Ashiko drum, and their edges are bevelled to fit together. This produces a rough 12 sided conical shape, the corners are then smoothed off. MATERIALS If you are thinking of constructing stave drums, there is some woodworking equipment that is essential: |
|
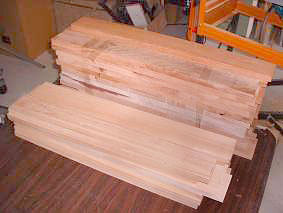
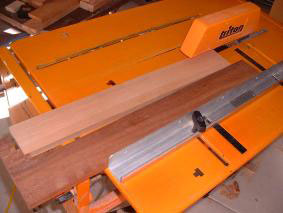
CUTTING THE STAVES Each board is 80mm wide, 19mm thick and were delivered cut roughly to just over 600mm (for ease of handling). They first need to be all cut to the same length. |
 |
|
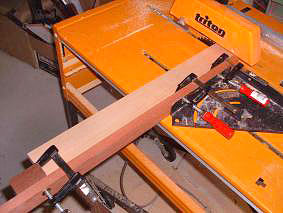
The boards are first cut to length using a saw table, and the simple jig shown to the right. An extension is clamped to the sliding
protractor, and a stop block is clamped to the extension at the desired length. I selected the shortest board, trimmed the ends to
ensure they were cut square, and used this to set the position of the stop block. Then each board can be simply placed up against the
stop block an cut to the same length without having to measure each individual board. |
 |
|
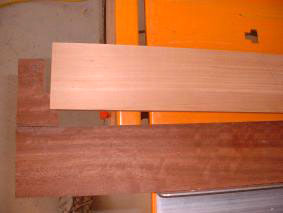
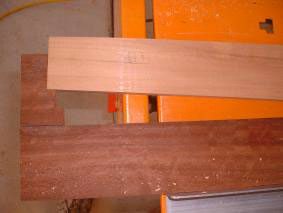
The timbers have all been cut to length. (The slight angle on the left appears to be distortion of the image due to the camera
angle, the boards are all square, and cut to the same length). |
 |
|
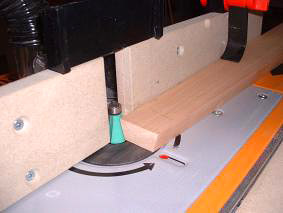
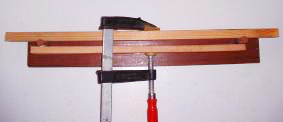
TAPERING THE STAVES To accurately cut tapered staves, you will need a saw table. If your table saw can accurately angle the saw blade to the table, then you can cut both the taper and the bevel at the same time by laying the blade over to 15 degrees (for a 12 sided drum). It may take several tests and micro adjustments to get the angle just right. One way to test the angle of the bevel is to bevel both edges of a piece of scrap about 1m long, then cut this into 12 pieces (about 80mm long) and strap these 12 pieces together in a ring. Any gaps between the bevels will tell you whether to adjust the angle of the saw blade. Several adjustments may be necessary to get a close fit. My table saw is a Triton Workcenter Mk III with a standard circular saw fitted into it in a special cradle. While it is possible to angle the saw blade (just), in the table slot, it required repositioning the saw in the saw cradle. It's quite fiddly and while I did this for my first drum , I was not happy with the process and have decided to cut the bevels in a separate step, using a router. A simple taper jig is used to cut the taper on each stave. The taper jig is a simple straight edge with a series of steps at one end. The first step is used to cut the first taper, then the stave is turned over, and the second step is used to cut the second taper. The height of each taper is the amount that you want to cut off each side of the board. For instance, this is an 80mm wide Sheoak (love the texture) board that wants to be tapered to 40mm at the bottom. So each step is simply 80 - 40 / 2 = 20mm. You don't have to worry about the width of your saw kerf, this will be taken out of the piece that is cut away. For a compound stave drum (djembe), you need to make two taper jigs, one for the bowl section, and one for the stem. |
|
|
The jig holds the board, and runs along the saw fence. If you are not cutting the bevel at the same time (ie the blade is at 90 degrees to the table), the position of the saw fence can be set by placing the stave flush along the base of the jig (ie not stepped as in the photo) and then setting the fence so that the edge of the board rests just along side the saw blade. Adjust the fence position so that the ends of the fence are even (ie same distance from the saw line). Then simply step the bottom end of the board in the first step of the jig, and you are ready to make the first cut (as shown in this photo). |
 |
|
This photo shows a close-up of the board stepped in the first step, ready for the first cut.
The step can also be filed very carefully to slope to the right to accommodate the angle of the stave, so long as the left edge of
the step is 20mm from the base (40mm for the second step). |
 |
|
The second taper is cut by rolling the stave over so that the recently cut (tapered) edge is towards the jig, and the untapered edge
is towards the saw blade. The stave is then stepped into the second step of the jig and the second taper can be cut. If you are cutting the bevel at the same time (your saw blade is angled), the jig needs to be turned end-for-end and the stave rotated 180 degrees. The second step can have a small bevel cut into it to accommodate the beveled edge of the first cut edge. Particular attention must be paid that the stave is sitting tight in the step of the jig or too much may be cut off one or other taper. |
 |
|
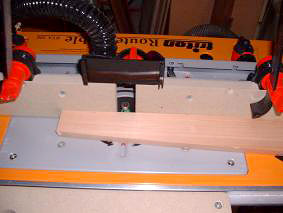
BEVELING THE STAVES My first drum was constructed by cutting the bevels on the saw table, at the same time as tapering the staves. To do this, I had to offset the saw blade at 15 degrees, however this is not really possible with the TRITON saw-table (I had to shift the saw assembly over in the slot) and it was difficult to set the blade offset with any accuracy, which meant a good deal of hand planing to touch up the bevels. I decided that a better approach might be to route the bevels on a router table, with a 15 degree chamfer bit. This should give a most accurate bevel, requiring little if any fine tuning with a hand plane. The router cutter guard has been removed in these pictures for clarity. I never operate the router without the proper safety guards in place. |
 |
|
This picture shows the chamfer router bit, and how it cuts the 15 degree bevel required for a twelve sided drum. The height of the
bit must be adjusted carefully so that the top of the stave only just clears the cutting edge of the router when the stave is hard
up against the router fence. This will stop it taking progressively more off the width of the stave if you make multiple passes to
cut the bevel. An initial pass will cut the bevel, however one or two subsequent passes may be necessary to finish the cut. It is important that all your staves are the same thickness, otherwise any thinner staves will be trimmed progressively narrower with each pass through the router (as I found out too late with one particular stave). The stave is then turned around (end-for-end) and the second bevel is cut in the other side (as shown in this picture, the nearer edge has already been beveled). |
 |
|
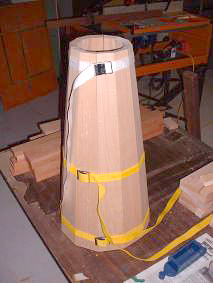
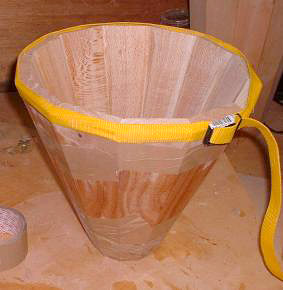
DRY ASSEMBLING THE STAVES: The staves can now be dry assembled to check the fit of the bevels before gluing. The staves are held together with cheap luggage straps that should be available at hardware and outdoor stores. Tighten the straps by hand, then with the aid of two offcuts of wood, push the edges of the straps down the drum shell to further tighten the fit. It would help if you had an octopus on hand to hold the staves while you are assembling them. I seem to manage with just two hands, but it take patience. |
 |
|
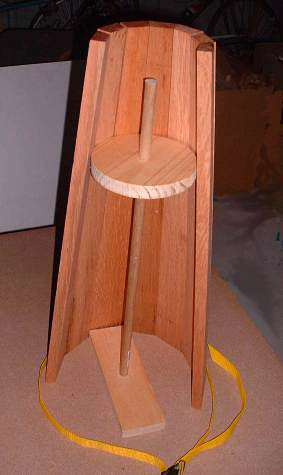
Since then, I have made this simple stand to help hold the staves until I can get a strap around them.
The base of the stand needs work (a heavy round disk would be best.) |
 |
|
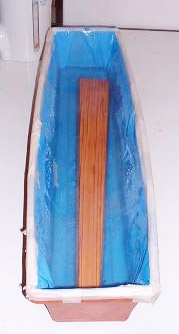
Another way to assemble the staves is to lay them out, face down, and tape them together. For this I used plastic packing tape
because it's quite strong and will stretch a little when under pressure (masking tape will simply rip). As these photo's show, this method is particularly useful when constructing a djembe-like compound stave drum. In this case the bowl section of the drum has such a taper on it that the strap clamps simply slip off when tightened. Lay the staves out in the order that you want them assembled, edge-to-edge and so that the top an bottom edges are aligned. Apply short lengths of tape across three or four staves, near the top, middle and bottom of the stave. Now, carefully lift the smaller radius end as you wrap the two ends together. Some tape will try to lift off the wood, however with a bit of practice you should be able to assemble the staves in one swift, fluid movement. It may be necessary to cut the tape and adjust the bevel on the staves to ensure a good tight fit. Just lay the boards out again as above and apply more tape. |
 |
|
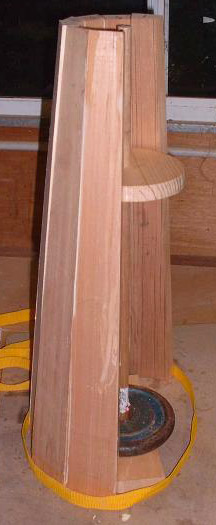
This photo is stepping forward a bit, but shows the same bowl section glued and clamped. You can see how I have been able to use
one strap clamp around the top of the bowl as it overlaps the top of the bowl and cannot slip downwards. The glue was applied by laying the saves out as above, then turning them over so that the inside is facing upwards. Glue can then be applied to the beveled surfaces and the whole lot picked up as before and assembled into the drum shape. For the bottom of the bowl, I have wrapped copious layers of the plastic packing tape, pulled tight so that the tape stretches and deforms slightly. This adds additional pressure necessary for clamping the glue joints. |
 |
|
The joints should be as tight as possible, as the glue will not fill wide gaps. With the straps tightened, hold the drum up to
the light so that you can see along the plane of the joints between staves. Anything more than a paper-thin gap and you should
probably use a jointer, or a hand plane to adjust the bevel.
I found at this point that my router bit was not cutting a perfect 15 degree bevel. I'm pretty sure the router cutter bit is
engineered to fine tolerances, so I can only guess that the router is not held perfectly vertical. I loosened the router and
packed a very thin shim between it and the router table to lean the cutter ever-so-slightly away from the wood (to increase the
angle a bit). I then ran the staves over the router and dry assembled again. After two iterations of this I was reasonably
happy with the fit. |
|
REMOVING THE WARP Sadly I hit another minor problem, three of the staves had a small warp in them. The warp was only about 3-4mm in the middle of the stave, but this did make the bevels, and the ultimate fit, a bit difficult. So I had a go at bending the staves to remove the warp. To do this I would need a heat source, and a simple bending jig. I didn't have a steam generator (or a steamer cabinet) so I opted for hot water to heat the wood. I constructed a simple bath out of an old plastic planter trough. The trough had large drain holes, so I lined it with a plastic (from a plastic shopping bag -- which unfortunately had a small hole in it anyway). I emptied a kettle of boiling water into the bath and soaked a stave for about 45 minutes. To keep the heat in, I later covered the bath with several folded newspapers. |
 |
|
I then removed the stave and put it in the simple bending jig. The jig is just a base board with two 19mm dowels sticking out of it. The dowels are to hold the stave while making minimal contact to allow the stave to dry evenly. The stave (lower light colored timber in the image) is clamped to a sturdy piece of scrap that sits on the other side of the dowel. The clamp is tightened until the upper edge of the stave is in line with a scribe line between the lower edges of the dowels. I left the stave in the jig until quite dry. It worked! |
 |
|
GLUING THE STAVES At last, time to glue the staves. As much as I wanted to get on with this stage, I procrastinated and did other small tasks to put off the inevitable. The problem is that there's no going back from here. After a good deal more dry assembly and adjusting bevels with the hand plane, I got down to it. The glue I used is a Welbond aliphatic resin (carpenters yellow glue). It has a low clamping time (30 minutes) and forms a bond stronger than the wood itself. It doesn't fill gaps, so the staves need to be a tight fit (whatever that means). I'm afraid my woodworking skills aren't up to planing joints that the Inca's would be proud of but I managed to keep the gaps to a minimum. The short clamping time means that you have to work quickly, too quickly to stop and take photos really. The disks sticking out of the half completed drum shell in the photo are the stand. I've temporarily solved my base stability problems of the stand by adding a 5lb weight disk to the base of the stand. Both edges of each stave has to be completely covered with the glue. The staves are roughly aligned while the remaining staves are glued. |
 |
|
Once all the staves are glued, the straps can be tightened to pull the drum into shape and close up any gaps. The straps can be
further tightened by pushing them down the drum shell (with a small block of wood). The joints must be a tight fit, but it doesn't matter too much if they are not flush or level on the inside or outside. The outside will be planed later and any differences in levels will be sorted out then. The inside is left rough. A rubber mallet can be used to tap the tops of the staves level and to ensure the drum is not leaning to one side. The clamping time for the glue is only 30 minutes, but a full strength bond is achieved after 12 hours. While the glue is pretty strong, there doesn't seem to be too much problem of excess glue bonding with the straps. Excess glue can be wiped off with a damp cloth, both inside and outside the drum. |
 |
|
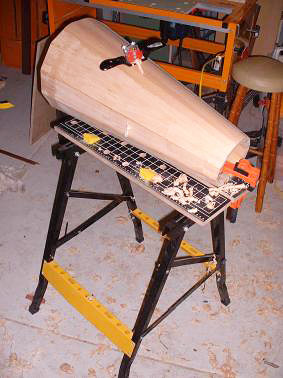
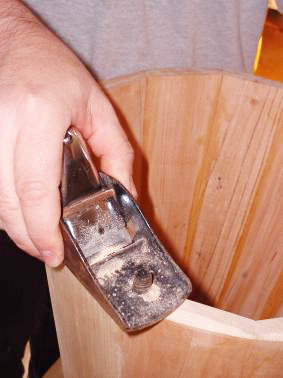
This photo illustrates two things. Firstly, I use a cheap potable workmate clone workbench to hold the drum during shaping. It's
inexpensive and I can get all around it as I change planing positions. I clamp one, or both ends (if the drum is short enough, with
a cheap hold-down that clamps through one of the holes in the work surface. The second thing is that for the initial shaping, removing the corners where the staves join, I have found either a spokeshave or (in the following photo) a hand planer to be effective. The first shaping task is to remove the corners and make the drum shell roughly round. The spokeshave is ideal for planing convex surfaces and has the advantage that it can be set to not take off too much wood at a time. It can be a lot of work though. |
 |
|
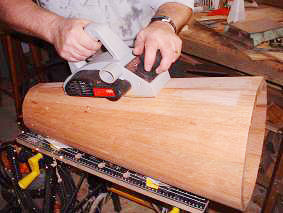
An alternative is an electric hand planer. It will remove the corners with much less effort, however unless you are experienced
with this tool (and I'm not very experienced with it), it's quite easy to remove too much wood, or carve troughs across either
end of the drum if you are not careful to keep the planer level when crossing the ends. I found it safest to plane from the middle
towards each end, and concentrate on applying pressure to the rear of the planer as I approach the ends of the drum. |
 |
|
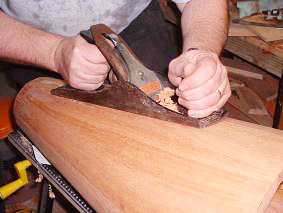
Because the planer is so cumbersome, I follow up with a long base hand plane. This plane is probably technically a jack plane, not a smoothing plane, but it's the longest I have. The plane is kept sharp, and set to take a very thin curl of timber. Happiness is a sharp plane. I found this task very satisfying. This ensures that you cant take too much wood at a time, and that you can straighten the sides. You will end up with a fairly smooth, rounded surface. With enough practice and patience you could probably get a fine finish, however for that I used a cabinet scraper. |
 |
|
A cabinet scraper is a rectangle of metal that has had a hook burnished onto each edge. This hook acts as a mini plane and
scrapes a very fine curl of timber. If you use a lightweight scraper (0.6mm) you can easily hold it in a curve and this will not
only create a smooth surface, but will also even out any high places across the arc of the drum side.
I spent a good deal of time with the hand plane and the cabinet scraper to produce a fine finish. Don't rush this task, time
spent here will produce a much finer finish. |
 |
|
Leveling the top and bottom rim - more to be said here. Small block plane, wood rasp, course sand paper. Tried to use a power hand plane, it rips the end grain and splinters the side of the drum - I don't recommend it. |
 |
|
Sanding the top and bottom rims level . I have glued four sheets of 80 grit garnet paper to a piece of chipboard. Then it's just
a matter of dragging the drum shell around in a circular motion, keeping the edge in contact with the sand paper at all times. It's
hard on the arms but effective. The bottom of the drum wants to be quite smooth, however the top does not have to be sanded until completely flat. We will soon be shaping the lip, which means taking a good radius off the outside lip, and a smaller radius off the inside lip. It is only the section in between that has to be flat all around the lip. |
 |
|
The next stage is to shape the lip. I came across a web page (apologies to the author - I don't recall where) that describes the
profile of the lip a similar to your thumb viewed from the side, with your nail being the inside of the drum, and the curvature of
the fleshy part being the outside. To achieve this, I use the simple jig shown here, to mark concentric circles on the top edge of the drum. The innermost circle is just larger than the smallest radius of the inside corners. I shape a small radius to this line. The other circles act as guides for successive shaping of the larger radius on the outside of the rim. |
 |
|
The tool of choice here is the wood rasp. There's usually a good deal of wood that needs to be taken out on the inside of the lip and a course rasp is pretty essential, preferably a half-round rasp. You can see how I have already gone around the outside taking a slice out of the outside rim, to the outermost marked circle. I will take a lesser angle to the next marked cicle, and so on until the last surface before the innermost circle is flat. This will be the baring edge for the drum skin, and wants to be fairly thin to avoid the skin buzzing on the flat surface. Like your thumb, it should come to a gentle apex then fall off quickly to the inner edge of the rim. |
 |
|
You can see in this image how it is necessary to take a scollop out of the inside surfaces to shape the flat inside stave surface
into a round rim shape. |
 |
|
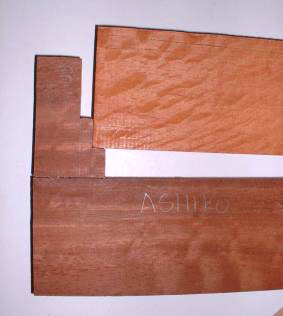
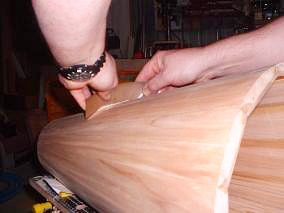
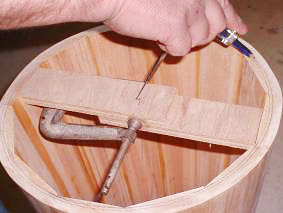
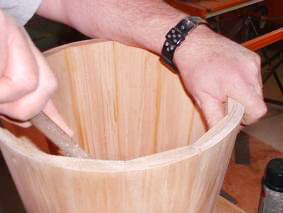
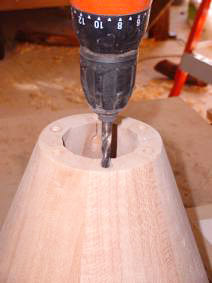
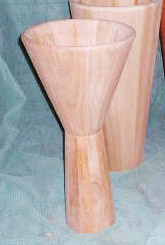
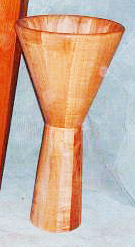
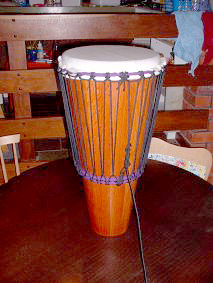
The djembe is composed of two sections, the stem and the bowl. Each of these is constructed the same as an ashiko style drum, but
the proportions are different. The bowl section is short and wide, the stem is thin and tall. Well, that's the best way I can
describe it here. The bottom of the bowl and the top of the stem should be the same size, and may need some small trimming and
shaping to get a smoothe fit. If all else fails, the bottom ring may hide the joint. It's time to prepare the joint between the bowl and stem of the djembe style drum. We are just preparing a dry fit, they wont be glued until the rings are in place. The bowl and stem section joint needs to be reinforced with dowels. With a dowel joint, the important thing is to align the holes for the dowels perfectly. The easiest way to do this is to first drill holes through the bottom of the bowl section. Because of the steep sides on the bowl section, the holes will go right through the inside wall of the bowl section. That's OK, we can use these same holes to drill back into the stem section to ensure the dowel holes line up. Take care that the drill is perpendicular to the drum edge. This will make it easier to dry fit the dowels until you are ready to glue the bowl and stem sections (after the rings are fabricated and fitted). |
 |
|
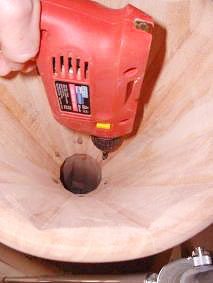
Now stand the bowl section on top of the stem section, and carefully align them how you want them fixed. You might have to tape the
sections together to hold them in place. Then drill back down through the dowel holes in the bowl section, into the stem section, taking care that the drill is perpendicular and unlikely to exit through the wall of the stem section. Don't glue the dowels or the bowl and stem sections yet. The bottom rings on the djembe-style stave drum will generally be too small to fit over the base of the stem and should be fitted before the bowl and stem sections are glued. You can now dry-fit the dowels to hold the bowl and stem sections together while you shape the interface of the bowl and stem sections. I don't have a picture of this stage. I used a cabinet scraper again to shave off high spots on the bowl and stem sections so that the bowl and stem came together smoothly and without a lip. I figured if it didn't look too good I could always cover the join with a knotted chord or fabric strip. As it was it looked OK, and the bottom ring eventually obscured most of the join anyway. |
 |
|
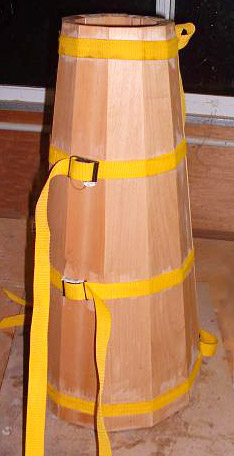
Completed raw shell. |
 |
|
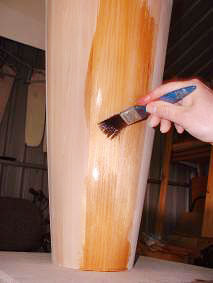
FINISHING THE SHELL In many ways, this can be the most important, and rewarding step. By finishing, I mean - applying a finish to the raw wood, not completing the drum, as there are many more things to do before you can do that. There are many ways to finish your drum shell. You may choose to varnish, paint, oil, wax or even carve the shell.. Not so long ago, all I knew was varnish (or the modern day equivalent), however since I built my lyre I have discovered the wonders of oil and wax finishes. To finish my drum shells, I initially applied Organoil Hard Burnishing oil, and followed this up with a light application of Carnauba polish. This didn't work as well as expected, almost certainly more due to my technique than the oil and polish used. The finish soaked in and went motley and faded after a few weeks, so I went back to what I know and used the same oil and wax that we used on the lyre, ArborOil and ArborWax which coincidentally are made by a local Perth company. This oil and wax is more expensive, and derived from petroleum products, but is easier to apply and gives a good finish that has shown no sign of fading. |
 |
|
SANDING THE DRUM SHELL Before oiling the drums, the bottom, outside and rim of the drums are progressively sanded with 120, 180, 220 and 240 grit garnet paper. Any holes should be filled with a matching wood filler. Small holes can be filled with a mixture of sawdust and glue to match the colour. After the 240 grit paper, move to a 400 grit wet-and-dry paper, then 600 grit. Wipe the wood down with a clean cloth between changing grits, otherwise particles from the coarser papers may remain on the wood and may cause unwanted scratches. If you can see a scratch without oil, it will be very visible when oiled, so time spent on the sanding is well spent. When sanding with the lower grit papers, you should clean the dust out of the papers frequently to prevent clogging, however when you get to the 600 grit wet-and-dry paper, save the dust on the paper - it will be useful for sealing the grain when applying the oil. |
|
OILING THE DRUM SHELL Apply the oil with a brush, or clean cloth. Any oily cloths must be washed in warm soapy water after use to prevent them bursting into flames (I kid you not, the oil is an oxidising agent, and if left scrunched up the rags can generate enough heat to combust). I prefer a brush :-) The oil is brushed on and left for 30-40 minutes, then another coat is applied. If this soaks in, further applications of oil may be necessary. The aim is to reach the saturation point. Wipe off any excess oil and begin rubbing back with the 600 grit wet-and-dry paper. The dust you retained on the paper from the last sanding will form a slurry which will help to seal the grain. It is particularly good on end-grain. If the slurry clogs the paper, wipe it off with a little oil on a rag. If you need to add more oil to the wood, apply it to the sandpaper, not the wood, then continue rubbing. Vigorous rubbing may be required to heat up the oil and produce a hard burnished finish. I'm not sure I have the hang of this bit yet. As you can see from this image, the oil can make dramatic changes in the appearance of the timber. Continue rubbing with 600 grit wet-and-dry and for a finer finish move up to 1200 and 2000 grit paper. Apparently the back of these papers is around 8000 grit and this can be used for a final polish finish. After 48 hours, you can, if you want, apply a little polish. I use Carnauba wax, applied sparingly and polished with a soft, clean cloth. |
|
|
And here's the drum after oiling. |
 |
|
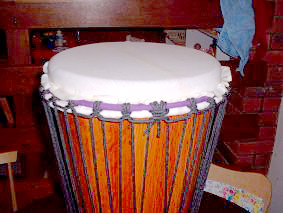
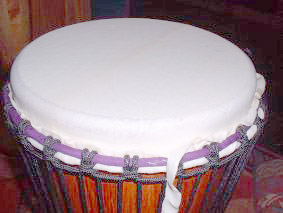
PREPARING THE RINGS The rings hold the skin on the drum and are used to tighten the skin. Consequently they have to be pretty tough to resist deforming under the pressure of the skin. My rings are made of 6mm galvanised steel rod, purchased from my local metal dealers. Some people use re-bar and traditionally, rings may even have been made from several rounds of wire, presumably twisted together. Why four rings? Most Ashiko and Djembe use three rings (flesh ring, upper rope ring, lower rope ring), I use four. I used three on my first drum and found that the ropes around the lower rope ring dug into the relatively soft pine and gouged little furrows up the drum until the ring itself came into tight contact with the side of the drum. This is not only unsightly, but it also makes it almost impossible to tighten the skin as the lower rope ring seems to creep that little bit further up the drum every time. I now add a fourth ring that sits just above the lower rope ring. This ring has no rope attached to it as so sits hard against the drum. The slightly larger rope ring, with it's ropes, sits against this ring and so cannot gouge furrows up the drum. These drums are much better at holding their tune. |
|
FORMING THE RINGS This page will describe the method I first settled on for making the rings, I have since found what should prove to be a much easier method, which I will describe at the end, that I plan to use on the next two drums I am about to start. If you intend to make a lot of drums, and live in the US, then you can get a reasonably priced ring roller from Harbor Freight. I considered making a ring roller myself, but a few trials proved this wasn't as easy as I had hoped. Instead I took a block of Jarrah (West Australian hardwood) and cut a arc to match the size of ring I wanted to form, and put this is a metal vice and successively clamped and bent the steel rod until it more or less formed the size ring I wanted. The top two rings need to have an internal diameter slightly larger than the outside diameter of the drum, enough to allow for a cloth wrapping around the rings, and two thicknesses of skin (in a wet, bloated state) on both sides of the drum. About 5-6mm on both sides, or at least 12mm in total. While close fitting rings seems to be desirable, it's best to err on the generous side Đ you can't do much to overcome rings that are too small to fit over the top of the drum. The bottom rings are less critical. If the rings are too large, they will sit higher on the drum, and there will be less room between the rings to do the Mali weave to tighten the skin. I measure the circumference of the drum about half way up, and work out the diameter from that (d = c / 3.14159). I add around 6mm to the diameter (or 19mm of circumference) of the bottom ring. To do this, simply cut the ring 18mm long than the other lower ring. This ensures the bottom ring stands off from the side of the drum (so the ropes dont gouge the drum) but still overlap the third ring. |
|
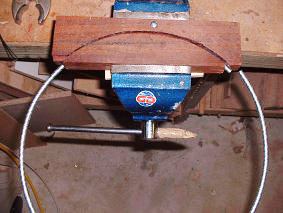
This photo shows the bending block, with an arc cut into it to match the size of ring that I want to bend. I need to make two
such blocks, one for the two top rings and one for the two bottom rings. The vice is opened wide so that the end of the steel rod can be fed into the block, and then the vice is wound tight, initially bending the rod into shape. It helps if you pull on the rod near where it exits the block, this will help the bend. Be careful not to pull too hard and form a kink. Then the vice is loosened and the rod pushed around through the block, and tightened again. Continue this until you have formed a complete circle. |
 |
|
This photo shows the almost completed ring. In general, the block wont produce exactly the required diameter, the metal will
spring back a bit, but by going round and round lots of times, you can get it pretty close. Then its a matter of measuring the circumference to determine where to cut the excess so that the ring will form the desired diameter circle. You can see in this photo that the excess has been cut off, and the ends almost meet. |
 |
|
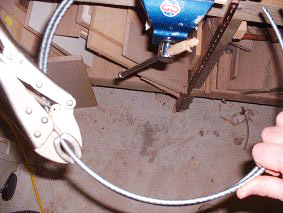
This photo shows an attempt to get two rings to match up. Not entirely successful, but close enough. The vice-grips are being
used to clamp the two rings together at that point while I adjust the bend in one ring to try to match the other. The rings will eventually be wrapped in cotton cloth and have some ropes tied around them, so it's not imperative that they match perfectly. |
 |
|
Once the rings have been bent, and cut to length, the cut ends need to be filed so that they meet flush and then the need to be
welded. The weld needs to be very strong to resist the lacing pressure. I take my rings to a local metal fabrication shop and they
use a MIG or TIG welder (costs about $2.50 per ring). While relatively low-tech the above method of bending rings is a lot of work. I have since found, in the yellow pages (under tube benders) , a local company who can roll a 6m length of this steel rod into a coil of any diameter (within limits) for about $10 a length.. All I then have to do is cut the coil into six rings and take it to my friendly welder. I will need to get coils bent to the circumference of the top and bottom rings. I figure I can get around six rings out of each coil or length of steel. |
|
WRAPPING THE RINGS Once the ring is welded, and any sharp or knobbly bits of weld have been filed back, we wrap the ring in a strip of cotton cloth. This is mostly decorative. Tear or cut cotton material into strips of about 2-3cm wide. This photo shows how the trailing edge of the strip can be folded over to give a neat edge, and to cover the lose ends of the fabric so it does not fray. We need to make small adjustments as we go because we are winding a flat strip onto a curved ring. If the strip runs out before you are finished, just overlap another strip with few drops of craft glue and continue wrapping. I also wrap extra thickness around the third ring, this is the ring that will sit flush against the side of the drum, and hold the lower rope ring in place. The extra thickness of wrapping effectively decreases the inside diameter of the ring and pushes it lower, helping the ropes around the lower ring ring to stand further off the drum sides. I also wrap cloth around the flesh ring, even though this ring will be covered by the skin and not visible. This is really just so the skin does not stick to the ring. Some people paint the ring to stop it rusting (I use galvanised steel). Rust will expand and eat into the skin and could cause the skin to pop. |
 |
|
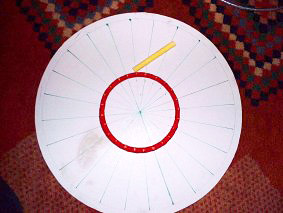
Before tying rope loops onto the two rope rings, you have to decide how many verticals you will have, and therefore how many loops
around each ring. I have seen many photos of Ashiko drums with few widely spaced verticals (up to 12). My first Ashiko had 12 verticals and this proved to be not enough. The diamonds in the Mali Weave were too wide and I could not get fine control over how tight I could pull the skin. I now prefer 18-24 verticals. This photo shows a circle of card marked with 24 equal sectors. Lay the wrapped rope rings over the center and mark with chalk the location of the 24 loops as shown. |
 |
|
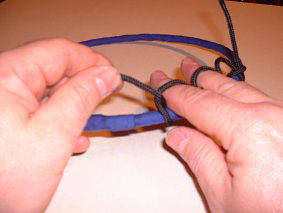
Here we see the beginnings of attaching ropes to the lower rope ring. You can see how I use my fingers to form a uniform size loop. For the top rope ring, I would probably fit two fingers in each loop. |
 |
|
This photo shows more clearly how the ropes are tied to form the loops. |
 |
|
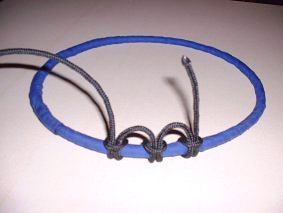
This photo shows the completed ring, with 24 reasonably uniform loops and the ends woven into the knots. |
 |
|
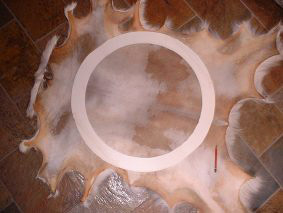
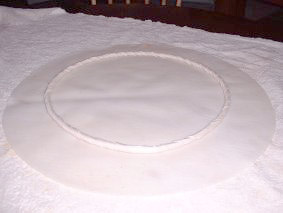
ATTACHING THE SKIN The cardboard ring is a template for marking and cutting the goat skin. The inner diameter is for a clean skin (ie one without hair). This allows for an additional 75mm (3in) to go over the lip of the drum, and wrap around the flesh ring. So the diamerter is 150mm (6in) more than the diameter of the drum. For a 10in drum, you need a 16in disk of skin. The outer diameter is for a hairy skin, where you want a couple of inches extra to fold back over the top rings and hang down the side of the drum. At least another 100mm (4in) on the diameter of the drum. Use the template to find the best piece of skin, free of holes, knife nicks or other blemishes. Hold the skin up to the light to search for thin spots. The template should be centered on the spine, as there is a natural thickening down the spine and this will help balance the tension and improve the sound of the drumhead. |
 |
|
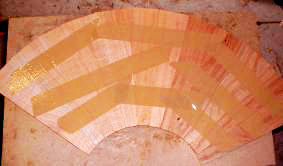
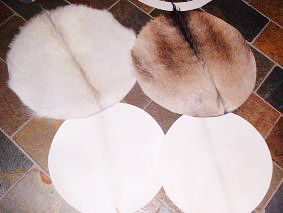
Four disks of goat skin, measured and cut. The skins now need to be soaked in water for several hours (one at a time, unless you are into production-lining). I find six to eight hours is enough. If the water gets a bit stinky, you might want to change it a few times. I generally soak overnight and attach the skin in the morning, or soak in the morning and attach the skin in the evening. The skins will bloat and become floppy and pliable. |
 |
|
Before attaching the skin, rub a candle around the rim of the drum. This will help stop the skin from sticking to the rim as the skin dries, which will make it easier to adjust the tension on the skin later on. |
 |
|
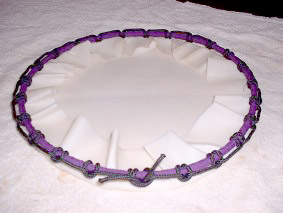
Now place the skin on a clean table, preferably on a towel or something. The playing surface (the outside or hairy side of the skin)
should be face up. Place the flesh ring on top of the skin. I wrap my flesh ring to protect the skin from any sharp bits, maybe not necessary. |
 |
|
Place the top rope ring on top of the flesh ring and tuck the skin in between the two rings. Try to make this a neat as possible. Some people talk of stitching thread or rawhide across from one side to the other. around the ring, to hold it all together and apply gentle tension. I dont find this necessary. |
 |
|
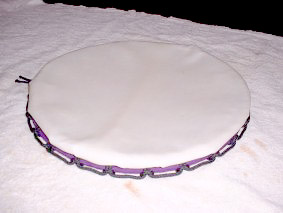
Now gently pick up the skin and rings, and turn them over, so that the playing surface is facing down, the flesh ring is on top of
the rope ring, and the skin is still tucked in around. |
 |
|
Place the drum, upside down, on top of the skin. It should slip down into the rings. If you haven't made the rings sufficiently big enough for the drum to fit inside, this is where you will start to have trouble. If it's a tight fit, that is it will be big enough when the skin is dry, but it's tight now that it is wet, you might be able to pull the rings down when you start lacing the drum. |
 |
|
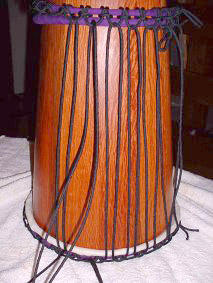
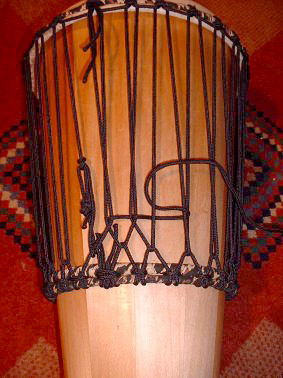
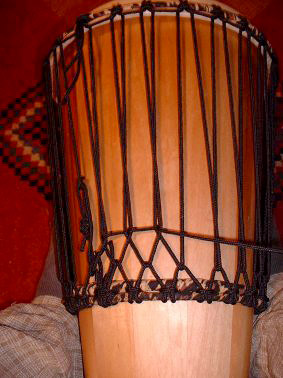
Now set the third ring in place, and place the lower rope ring on top of it (remember, the drum is upside down). Measure the distance between both rope rings, multiply by two times the number of loops around either rope ring (this is the number of verticals) and add a couple of meters for the mali weave.
This is how much rope you will need for the lacing. I purchase 4mm drum chord (in Australia) from www.ropeonline.com.au This photo shows two styles of weaving the verticals. At the top of the photo, the verticals simply go through the loops on the rope ring, at the bottom of the photo the vertical passes from one loop into the neighboring loop before changing direction. In general, I prefer the latter method on both upper and lower rope rings as this separates the verticals and produces a more even Mali weave later on. |
 |
|
Continue lacing the verticals around the drum. Don't pull on any tension at this time, just get the rope into place. If you run out
of rope before you finish, you will have to take up some tension just to get enough rope to finish the loose verticals. Making sure the lower rings are seated evenly and horizontal, start to take up some tension as you go around the drum. Pay particular care that the top rings also remain horizontal as they pull down over the side of the rim. You want to seat the upper rings a couple of cm below the rim so that the rings wont get in the way of your hands when you are playing. Don't pull too tight at this stage, you are only trying to seat the rings and smooth out the skin. If the rings aren't horizontal, or you are not happy with how it went, loosen off the verticals, make adjustments and go around taking up the slack again. |
 |
|
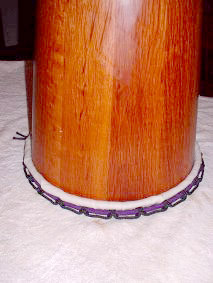
FINISHING A CLEAN SKIN With a clean skin, you should have a small selvage hanging out between the two rings. This must be removed before the skin dries othewise it will be very uncomfortable when playing the drum, not to mention unsightly. It is relatively easy to remove while the skin is wet. |
 |
|
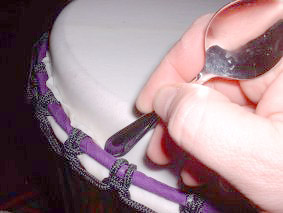
With a sharp pair of scissors, go around the drum and cut the selvage away, as close to the top ring as you can. It doesn't matter is a small bit is left sticking out, we will deal with that in the next step. |
 |
|
With a blunt instrument (I'm using the rounded end of a tea spoon), go around the drum and poke the remaining selvage back down
between the drum and the top ring. It will stay there and dry hard. |
 |
|
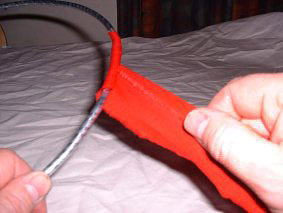
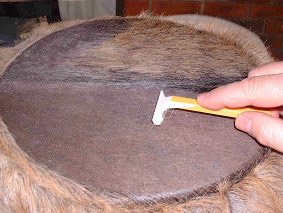
SHAVING A HAIRY SKIN A hairy skin will usually have a larger selvage that hangs down over the side of the drum. I wrap a crepe bandage around the selvage to hold it down as it dries (which you can't see in this photo). The hairy surface of the drum must be shaved, and this is best done while the drum is wet. I use a disposable razor. I break the safety guard off the front of the blade, and file the corners back to avoid nicking the skin. Then, very carefully, shave off the hair. Having worn a beard for nearly 30 years, this is a bit scary. Even with the most care, some stubble will still be left. I have used 150 grit sandpaper to lightly sand the skin and remove the worst of the stubble. This will inevitably take some of the surface of the skin off too, but that does not seem to be a problem if you are careful. |
 |
|
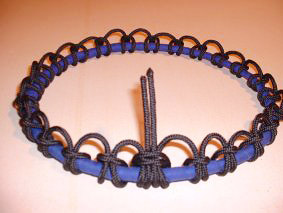
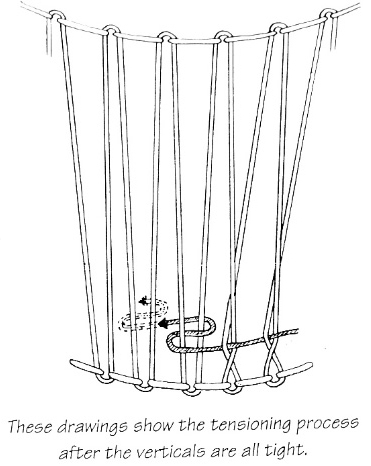
MALI WEAVE
|
 |
 |
MORE ON THE MALI WEAVE Reprinted with permission from Djembe Rhythms How to Tighten a Djembe Head with the Mali Weave The following diagrams show how to weave the cord to tighten your djembe head. Make sure with each knot to pull it down as close to the bottom of the drum as possible. Thanks go to drummaker Michael Villardi for these drawings. |
 |
 |
DJEMBE TUNING Reprinted with permission from Djembe Rhythms Unless you have tightening bolts, like a conga, your djembe head will be strung with nylon cord. One of the most frequently asked questions about djembes is, "How do I tighten the skin on the head?" A djembe that is poorly tuned doesn't sound very good. The bass is deep but boomy; the slaps dull; the tones uninspiring. On the other hand, a drum head that is tuned too tight and high-pitched may be more than is needed in the situation. Ideally the highest-pitched djembe in a group will be the one playing lead and solo parts, to mark the changes in the dance. The higher pitch and sharper slaps will help the calls and breaks carry over the other drums and will be easier for the dancers to hear. 3 Keys to Tuning a Djembe 1. Be careful not to tighten your djembe head too much all at once, or you risk stretching it too thin and risking a tear. Especially be wary of changes in temperature and humidity, as a tight djembe head in a hot car or in desert conditions could blow out as it dries and shrinks. Also beware of tightening it too much if it's still damp after re-heading. It's better to wait until it's perfectly dry before the final tightening and tuning. When you need a tuneup, try adding just 2-3 knots at a time and testing the results. 2. Before tuning with extra knots (known as the "Mali weave"), make sure the vertical lengths of cord are stretched as taut as possible; a pair of vice grips can help by holding each loop steady at the top ring as you pull. It also helps to add leverage with a tool that can be as simple as a stout drumstick or hammer handle, for looping and pulling down on each vertical as you tighten it. 3. After tuning with the horizontal knots, you can fine-tune by tapping down on the rings (to seat the head more snugly) at various points around the head. For this a good tool to use is a rubber-headed mallet available from automotive supplies. You will be surprised how much better your drumming can sound when you have a well-tuned djembe head! Just be sensible about it; trust your intuition about how much is enough; and take care not to have all the djembes in your group tuned at the same or similar high pitch. The polyrhythms of the various accompaniment parts in tradtional West African rhythms are best heard on djembes with varying pitches, just as with the dununs (kenkeni, sangban, and dununba). |