
|
|
Drum Kit Home
CajonSourcesThe Basics Cajon Size The Tapa The Box Screws/Glue The Finish The Sound Hole Cajon Snares Rubber Feet Micing a Cajon Connor's Cajon |

Photo courtesy of Robert Towler |
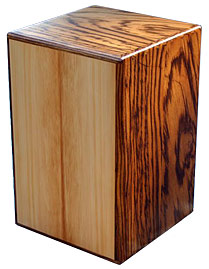
Photo courtesy of Robert Towler |
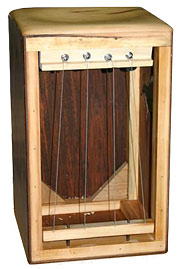
Photo courtesy of Robert Towler |
|
Sources There isn't as much information on building Cajon drums as some other types of drums so a big thanks goes out to Robert Towler who provided a lot of this info. Also, I've posted some great info by Steve Tierra which can be found in many places on the web. Attempts to contact Steve have been unsuccessful, so if you're out there, Steve, and you have any objection to including your info here, please don't hesitate to contact me here: PDGood. The Basics A cajon drum is nothing more than a wooden box with a thin side (Tapa) for striking and a sound hole to let the air escape. Some models have two thin sides so that you can have variety of sound to chose from. On these the sound hole is in the side. Otherwise, it is usually on the opposite side of the Tapa. Many Cajons include a rattle inside - usually made from strings. There doesn't seem to be a standard rattle mechanism - some people attach snare wires, some use guitar strings, while others don't use a rattle at all. The side of the box that you hit (known as the tapa) is very thin (about 1/8") and the remaining sides are thicker - between 1/2" and 3/4". The sides are glued together or sometimes glued and screwed, but the tapa is almost always just screwed in. This is so that the upper corners can be left a bit loose which will create a clicking sound (kind of like castanets) when struck by the player. I've only seen vertical grain used on cajons. I'm sure this is important on the tapa, but doubtful it would matter on the thicker sides. These don't resonate and just need to be strong to control the sound waves. One challenge in assembling a box is in holding the pieces at 90 degree angles while the glue dries. I bought some corner braces from Woodcraft and clamped onto those and that helped a great deal. Cajon Size Robert Towler: 12" x 12" x 18" is standard. My smaller ones don't have much resonance. The big ones keep sounding better. PDGood: There seem to be many sizes, in fact it's hard to find two that are the same. Robert Towler has mentioned the most common size of the ones that you sit on. I've seen some larger drums seem around 16" x 17" x 19" and also huge 4' wide ones that several people can sit on. Also, there is a stand up model that some would say is in the conga family. Steve Tierra: The caja I ended up being most satisfied with was made of 1/4" mahogany ply with light pine framing. I made it as a thinner rectangle...about 18" high (comfortable enough to sit on while playing a conga) - with a 24" face and about 8 " deep. I found that a second layer of ply glued to the INSIDE of one large face gave me a great bass tone, while leaving the other sides thin and light. I cut my opening at the bottom and elevated the caja on wood strips about 1" off the floor). Most cajas (bass cajones) I've seen are large enough to sit on comfortably....you might want to seriously consider your own body configuration in designing a caja. Measure the height of drum throne when you are sitting comfortably and consider that for the height....then mock up how wide the caja should be for your arm length etc. The sound will obviously vary... I recently had occasion to play one (briefly) that was 'tapered' (side to side) and used two playing faces. Measurements for that caja are: 22" wide across the face 17 3/4" high 15 3/4" wide right side (bass side) 13" wide on the left side (that creates a taper from right to left) Sound hole was a crescent (running top to bottom) cut in the rear of the smaller side, 16 3/4" long to a max depth of 3 5/8" Two smaller cajones (cajitas) in quinto sizes and range that I've had a chance to play are both made for 1/2" ply with 1/8" door skin for the top surface. (following measurements are all O.D.) One with ALL sides and faces glued is 10x10" on top, tapering to 4 3/8 x 4 3/8". The sides are 13 1/4 long. Another with a 'rattle top" (two countersunk screws one each top edge - corners left un attached) is also 10x10" but tapers to 5 1/4" with 12" long sides. The Tapa Robert Towler: (on the subject of the tapa) Look for Bendable Ply wood - avoid solid wood initially. A good hardware yard should have it or a larger craft shop. Other sources: http://www.aircraftspruce.com/catalog/wppages/finnishbirch.php sSme more information http://www.woodworkforums.com/wiki/index.php?title=Plywood&printable=yes 1/4" is too thick. 1/8" more or less is good. Less gives a nice deep sound. The tapas are not really soundboards so good Tone-wood is not needed. You want flex in the face so you can push the air. I made some tapas out of solid timber, one was western red cedar. I got scared when the thickness was less than 3mm because I felt the board would break with constant playing. On guitars and violins the boards are pretty thin but they don't get thumped when they are played. Mine had a tight sound - I couldn't get the deeper bass that I could with thin ply. I found a Bending Ply which is used for aircraft wings. They has 1mm and 2mm thicknesses. Then I put veneers on each side so I ended up with about 2mm and 3mm thicknesses for the faces. Very good sounds and strong. This way you can use nice veneers on the outside faces. Glue vs Screws Glue on the face to get a clear sound. It helps keep the box rigid too. Screw on the face to allow you to get the slap of wood on wood. You increase this by undoing the top screws a turn or two. You can glue and screw the bottom 2/3rds of the face. Then use the top screws for the Slap Adjustment. The benefit of using screws is that you can remove the face. Handy if you have an internal snare and need to repair it. Countersink the screws? No problem. Just be careful that you don't countersink too deep. You don't need to overtighten the screws - just do them up snug. All my cajons had two tapas with the sound hole on a side. This way you can have two different faces, maybe different thickness skins or one screwed and one glued or one with a snare. The Box Robert Towler: The box (thicker sides) has soundwaves bouncing off it. Sound doesn't care what the walls are made of as long as they are rigid. The simple ply boxes sound just as good as my expensive, exotic hardwoods - they just don't look as good. Solid wood boxes (not ply wood) with 4 or 5 sides can be glued or screwed together with no internal support. Ply wood boxes and thin solid timber boxes ( say timber less than 1/2" thick) will need an internal frame to strengthen the box. Screws/Glue PDGood: I glued the body with Titebond and used wood screws to hold the joints tight while the glue dried. The glue worked great (most any wood glue will work under these circumstances) with one exception. Where the glue oozed out of the joints and dried it left a ghost image on the wood that couldn't be easily sanded out. I hadn't worried about this at the time because I was planning on putting a veneer over it, but I changed my mind later and regretted that I didn't take more care. I could have cleaned up the excess glue better or I could have put down tape to protect the wood. Either or both would have solved the problem. The screws were a bigger problem. The screw heads stripped frequently, even though I pre-drilled the holes. As a solution, the ones that looked pretty chewed were removed and replaced with a new screw. The new screw generally didn't strip because the hole was worked to the desired size by then. Also, it worked better (stripped less) if I just used the drill up to a point and then hand screwed in the last little bit. Countersinking the tapa: Since the tapa is 1/8" thick that doesn't leave much to countersink with. I tried both - countersinking and just leaving the heads above the surface, but I preferred the look of countersinking. I think I can pull it off better next time now that I have a little practice, but really I want to find screws that don't strip first and the shape of that head will determine what can be done. sadolcourt: You're using those infernal unhardened zinc screws. You're lucky the head is stripping - any more torque, the head would probably pop right off the shank. Then you're in screw city (narf!). I've been there. McFeely's steel screws solve that. Their site can be a little difficult, but here's are some links. Screws and Assortment kits. Mcfeelys also stocks steel screws in different platings, e.g. zinc, black oxide, yellow zinc, etc. It's all still steel material underneath. The usual screws found at Home Depot and Lowe's are not very strong (zinc). Pretty much junk. I hate the idea of having to mail order screws, how bad is quality when an inexpensive object like a screw can't be made right? You can buy a trim ring for the flat head screw to sit in. Either McFeely's or Woodcraft have them. That way, you don't have to counter sink in thin material for the flat head screw, and the trim ring looks nice, too. Here's that link An alternative is to get super round head washer screws (McFeely's), the kind used to secure drawer fronts to drawer boxes. Now you don't have to counter sink at all, and the big screw head is a bit of a decorative element. PDGood: I took sadolcourt's advice and bought steel screws from McFeely's that have a square inset on the head. I also got a square screwdriver and a couple of drill bits from them. They worked great! And the entire order was around $11. The folks at McFeely's couldn't have been nicer. They spent a good 20 minutes with me on the phone explaining my options (their website is a bit confusing, so this was appreciated). I'm never going back to Home Depot screws again! I actually did have some of the HD screws break off in the wood besides the issue of having the heads strip. The steel screws from McFeely's are incredibly tough - no problems at all. jeroen: I would use torx screws. I have never ever had problems with them, honest, and I have killed a lot of philips and posidrive screws and bits over time especially when using stainless steal. They (torx) are more expensive than normal screws but it's worth it. 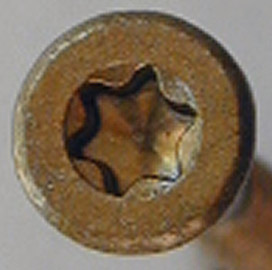 Casper: If you can find them small enough for what you need, you have my vote for torx head screws also. Another nice (but not necessary) feature of the torx head is that you can get a torx head socket for your ratchet and then you don't have to fiddle with a regular design screwdriver. Use the bit that comes with them in your drill to start the screw and then switch to the ratchet. You just have to make sure that head of the ratchet is in straight alignment with the screw - otherwise you're putting a whole lot of undesirable lateral stress on the screw. Robert Towler: I often twist the heads off the soft brass screws when screwing them into hardwood. They are a bugger to get out. I used #6 timber screws 3/4" long. I drilled through the tapa and into the box with a hole diameter equal to the core of the screw. Then I countersunk the tapa for the tapered screw head. It might be safest to fit the screws by hand instead of using a drill. Then you can keep enough weight on the screw to stop it stripping the hole. On my ply boxes I actually have a timber frame behind the tapa. It is screwed and glued to the sides of the box. It is recessed 1/8" below the sides so that the tapa sits inside the ply sides. The tapa is screwed into the timber frame. PDGood: Of course what I could do is just use the screws until the glue dries and then back them out and fill with dowels. Setting the screws by hand is good advice. I learned this the hard way. I found I could use the drill to get it started but then switch to hand tighten at the end. This helped with the stripping and also told me if the hole was not pre-drilled enough. (I actually had the shank of two screws break off in the oak.) The Finish PDGood: Since the box is just for structural support, it can be finished with any durable wood finish - lacquer, poly, whatever. But the tapa is a different story. It is supposed to vibrate, so putting on a stout finish is a no-no because it will inhibit the vibrations. I tried two coats of polyurethane and it drastically weakened the bass note. I have used one thin coat of poly with some success - it seems to help the higher notes resonate but it still reduces the bass note a bit. The safe way to go is to use an oil like Tung Oil. This protects the wood from moisture, although it won't help with scuffs and nicks. The Sound Hole There are many variations of the sound hole - in size, shape and location. My own (untested) theory is that the rules that apply to kick drums should also apply to cajons. A bigger hole or a hole located in the center would give less resonance (a shorter note). Robert Towler: Size - use what is common on shop cajons. The best advice is to try a Large hole.....then gradually cover it with you hand. You will find that , at some point, the sound gets restricted. Then you can use that size for your drums. Location - I don't think it matters. PDGood: My working theory for the sound hole is the same as for a kick drum port. Large = less resonance/more volume. Small = more resonance/less volume. Also, centering the hole should fall in the less resonance/more volume category. This is all just theory at this point. Cajon Snares Robert Towler: I have fixed drum snares to the face, cut them in half and use guitar strings - fixed and adjustable. There are some neat ideas about turning the snare on and off too. Rubber Feet Robert Towler: They stop the box sliding around on a smooth floor. They have no effect on the sound. Micing a Cajon Robert Towler: Most players put a mic in front of the skin (Tapa). Some put one near the sound hole. Some use both. |